
Table of contents: Removal ↓ Installation ↓
Caution! The elements for adjusting the tension of the parking brake cables are located in front of the lower arms of the rear axle. Due to the automatic adjustment of the rear wheel brake mechanisms, additional adjustment of the parking brake is usually not required. It is only necessary when replacing the parking brake cables, calipers or brake discs of the rear wheels.
Removal
1. Loosen the tension of the corresponding parking brake cable by performing the following steps on its adjuster, which is located in front of the lower arm of the rear suspension: (see illustration):
- a) remove the locking element D;
- b) screw the adjuster C until it stops A, holding the nut E of the rear cable end with a 13 mm wrench from turning;
- c) Join together the regulator C in the direction of arrow B to loosen the cable tension.
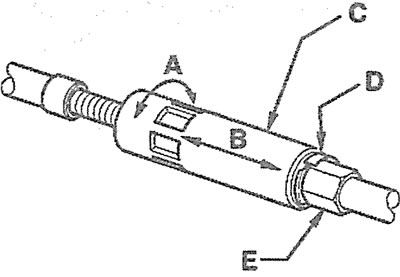
12.1. Loosen the tension of the corresponding parking brake cable using the adjusting mechanism
2. Disconnect the parking brake cable end from the actuator lever on the rear brake caliper (see illustration).
12.2. Disconnect the parking brake cable end from the drive lever on the rear brake caliper
3. Unscrew bolt A and release cable B from holder C (see illustration).
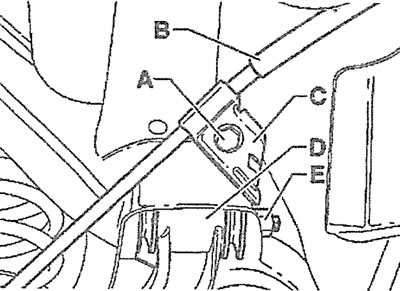
12.3. Unscrew bolt A and release B cable from holder C
4. Squeeze the leashes A and disconnect the cable 1 from the suspension arm (see illustration).
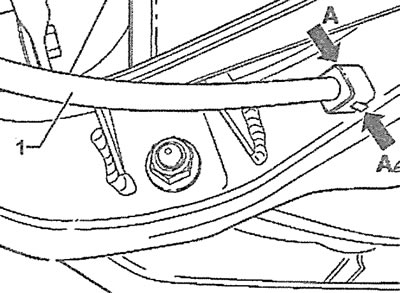
12.4. Squeeze the leashes A and disconnect the cable 1 from the suspension arm
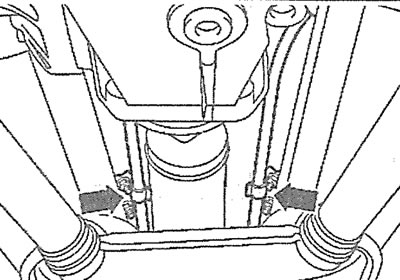
5. Unscrew the heat shield mounting bolts (see arrows in the illustration).
12.5. Unscrew the heat-reflecting shield mounting bolts (see arrows)
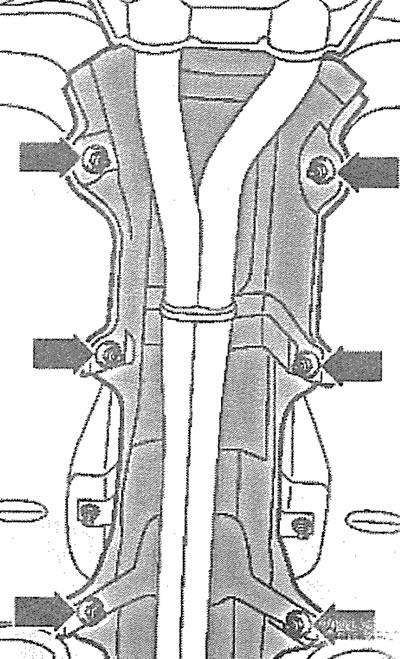
6. Unscrew the nuts and release the parking brake cables from the holders, spreading them as much as possible (see arrows in the illustration).
12.6. Unscrew the nuts and release the parking brake cables from the holders, spreading them as much as possible (see arrows)
7. Remove the rear section of the center console.
8. Remove the plastic pieces from the cable equalizer, if any. These pieces do not need to be reinstalled.
9. Lock the cable equalizer with a screwdriver (see arrow in illustration).
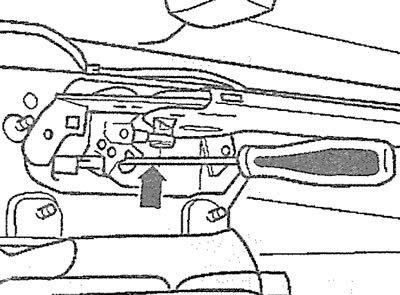
12.9. Lock the cable equalizer with a screwdriver (see arrow)
10. Release the end of the cable leash from the holder by pressing it with a screwdriver (see illustration). Release the end of the cable leash from the holder by pressing it with a screwdriver.
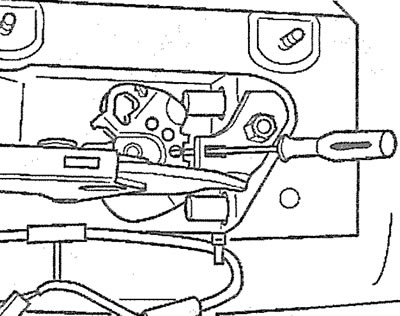
12.10. Lock the cable equalizer with a screwdriver (see arrow)
11. Pull out the cable.
Installation
The cable is installed in the reverse order of removal.
[This article was copied from the website: audimanual.ru]