



Table of contents: Fuel tank, all-wheel drive vehicle ↓ Fuel delivery module and fuel level… ↓ Removal and installation the suction… ↓ Fuel cooler ↓
Fuel tank, all-wheel drive vehicle
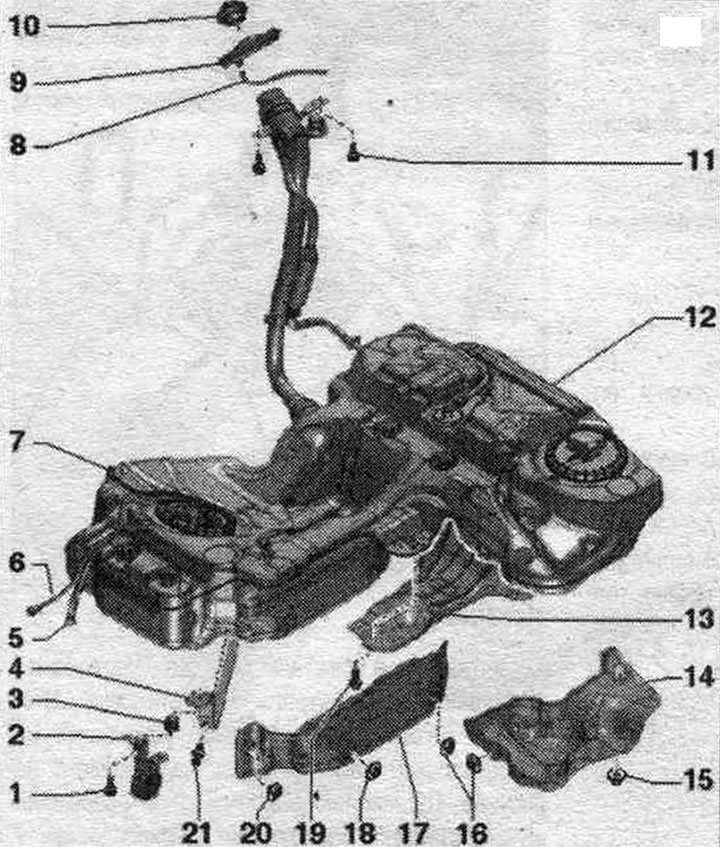
1. Bolt.
2. Muffler suspension.
3. Buffer.
4. Tightening clamp.
5. Fuel supply. main line: to the fuel filter; don't overdo it; clipped to fuel. tank.
6. Reverse fuel. line: from the fuel cooler; don't overdo it; clipped to fuel. tank; to disconnect, press the fitting lock.
7. Fuel line: only on vehicles with independent heater: to the independent heater metering pump; don't overdo it; clipped to fuel. tank; to disconnect, press the fitting lock.
8. Overflow hose: hung on the bumper bracket.
9. Rubber bowl.
10. Lid: screw on until it clicks into place; attached to the fuel filler flap assembly. tank using a clamp.
11. Bolt: for fastening the fuel filler neck. tank; to remove electrostatic discharge; 20 Nm.
12. Fuel tank.
13. Rack.
14. Heat shield fuel. tank.
15/16. Nut: 2 Nm.
17. Heat shield fuel. tank.
18. Nut: 2 Nm.
19. Bolt: 20 Nm.
20. Nut: 2 Nm.
21. Lock clip.
Fuel delivery module and fuel level sensor
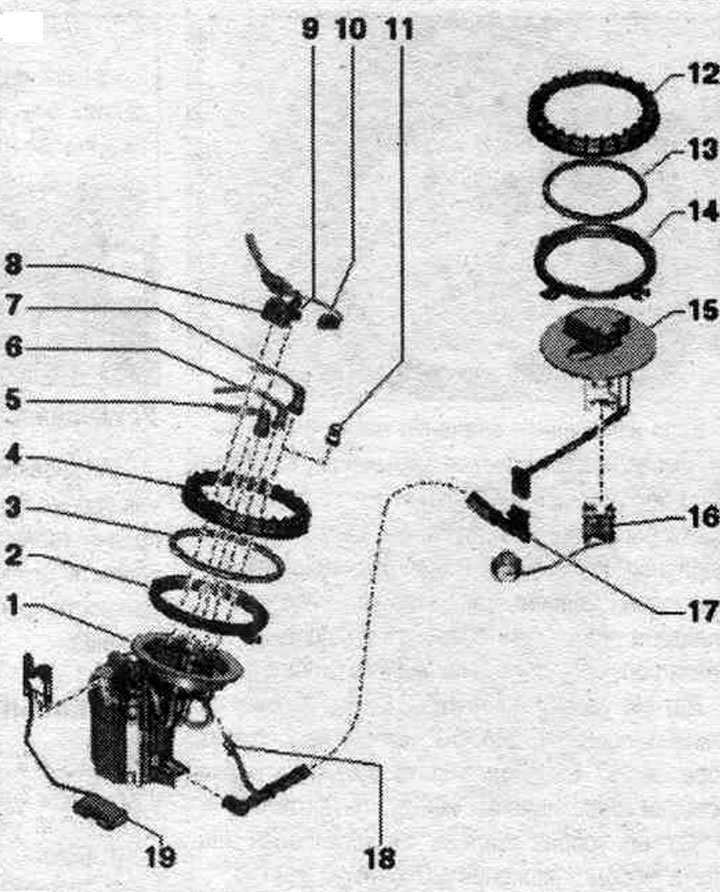
1. Fuel supply unit: check the supply of booster fuel. pump "G6"; after installation, fill the car with at least 5 liters of fuel.
2. Threaded ring.
3. Seal cuff: replace; install dry.
4. Union nut: replace; 120 Nm; removal and installation using the T40068 A socket wrench.
5. Fuel supply. main line: to the fuel filter; don't overdo it; to disconnect from the flange, press the fitting lock; when installing, observe the direction (feed or return), indicated by the arrow on the shut-off flange; clipped to fuel. tank.
6. Reverse fuel. line: from the fuel cooler; don't overdo it; to disconnect from the flange, press the fitting lock; when installing, observe the direction (feed or return), indicated by the arrow on the shut-off flange; clipped to fuel. tank.
7. Fuel line: only on vehicles with independent heater: to the independent heater metering pump; don't overdo it; to disconnect from the flange, press the fitting lock; clipped to fuel. tank.
8. Electrical connector: for fuel injection. pump "G6" and fuel level sensor "G".
9. Electrical connector: for fuel level sensor 2 "G169".
10. Electrical connector: only for vehicles with independent heater: to the independent heater metering pump.
11. Cap: for vehicles without independent heating.
12. Union nut: replace; 120 Nm; removal and installation using the T40068 A socket wrench.
13. Seal cuff: replace; install dry.
14. Threaded ring.
15. Shut-off flange: to fuel level sensor 2 "G169".
16. Fuel level sensor 2 "G169": after installation, fill the car with at least 5 liters of fuel.
17. Suction pipe: after installation, fill the car with at least 5 liters of fuel.
18. Electrical connector: for fuel level sensor 2 "G169".
19. Fuel level sensor "G".
Removal and installation the suction line
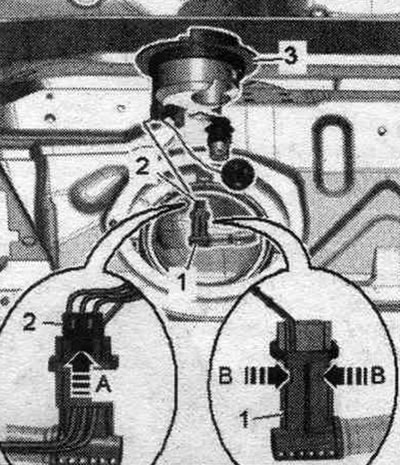
Removing the fuel supply unit. Remove fuel level sensor 2 "G169". Remove fuel level sensor 2 "G169" "pos. 3" together with the suction line "1" from the fuel hole. tank. When removing, ensure that the float of fuel level sensor 2 "G169" does not bend. Disconnect the plug "2" by pressing the lock "arrow A". Squeeze the clamp with pliers "arrow B" and remove the suction line.
Installation
Installation in reverse order. Prepare suction line "6" for installation. The plug connector "5" must be installed on the suction line "6" as shown in the figure. The plug connectors "2" and the suction line must be secured with 7 cable ties "pos. 3, 4, 7, 8". A seal must be installed. ring "1" on the suction line.
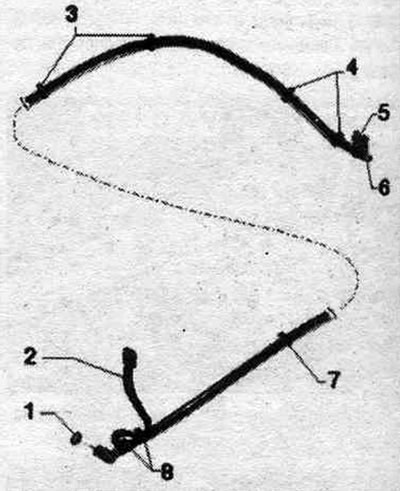
Install the suction line "1" onto the bracket until it clicks into place. Connect plug connector "2" and make sure it is securely fastened. Work carefully so as not to bend the float of the fuel level sensor 2 "G169" "pos. 3". Route the suction line from the trunk to the fuel hole. tank. Install a new seal. cuff over the flange and insert into the groove on the fuel. tank. Insert your hand into the front opening of the fuel tank. tank and install the suction line in the mont. position. Install fuel level sensor 2 "G169". Install the fuel delivery module. After installing the intake line, add at least 5 liters of fuel to the car.
Cars with independent heater: Bleeding the fuel supply. highways.
Fuel cooler
The engine cooler is located on the right side under the bottom.
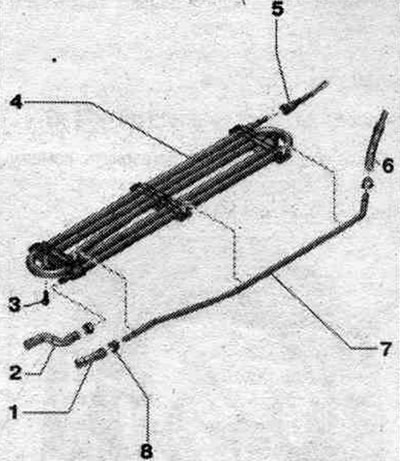
1. Fuel supply. main line: to fuel filter. 2. Return fuel. line: to the fuel cooler. 3. Bolt: 1.5 Nm. 4. Fuel radiator. 5. Reverse fuel. main line: to the fuel tank; clipped to fuel. tank; to disconnect, press the fitting lock. 6. Fuel supply. main line: from the fuel tank; clipped to fuel. tank. 7. Fuel supply. main line: to the fuel filter; fixed to the fuel. tank. 8. Spring clamp.