



Table of contents: Halogen headlights - vehicles up to… ↓ Repair kits ↓ Removal and installation the… ↓ Replacing the low beam headlight… ↓ Replacing the high beam headlight… ↓ Replacing the parking light bulb… ↓ Replacing the daytime driving… ↓ Replacing the front side marker… ↓ Replacing the front turn signal bulb… ↓ Removal and installation the left… ↓ Removal and installation the right… ↓
Halogen headlights - vehicles up to model year 2012
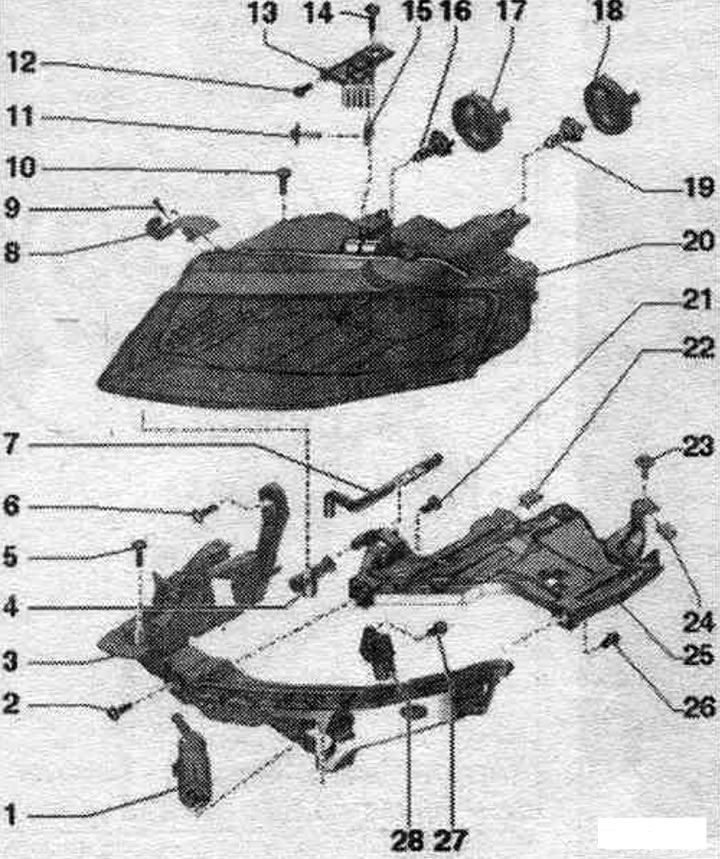
1. Headlight washer nozzle.
2/5/6/21/23/26/27. Bolt.
3. Holder.
4. Ventilation: for headlight housing.
7. Ventilation hose.
8. Headlight housing bracket.
9. Bolt: 1.8 Nm.
10/11/14. Bolt: 4.5 Nm.
12. Stop screw.
13. Headlight housing bracket.
15. Bracket.
16. High beam headlight bulb: left high beam headlight bulb "M30", right high beam headlight bulb "M32"; 12 V, 55 W (H7).
17. High beam headlight housing cover.
18. Low beam headlight housing cover.
19. Low beam headlight bulb: left low beam headlight bulb "M29", right low beam headlight bulb "M31"; 12 V, 55 W (H7).
20. Headlight housing; replacing LEDs is not possible; the entire headlight assembly must be replaced.
22/24. Bracket.
25. Fastening.
28. Front Airbag Impact Sensor.
Repair kits
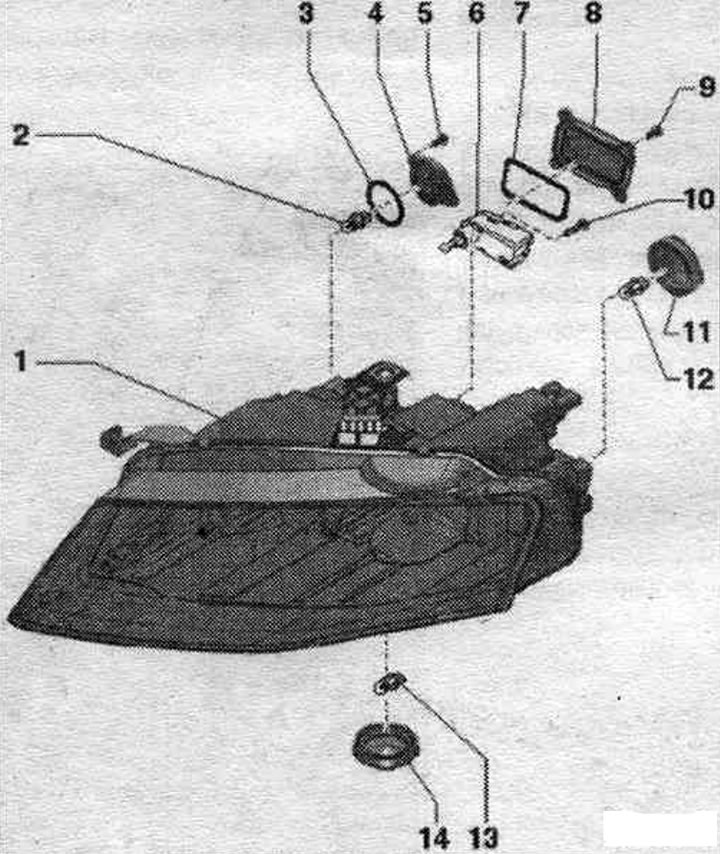
1. Headlight housing.
2. Front turn signal lamp: Front turn signal lamp. left turn signal "M5", front lamp. right turn signal "M7"; 12V, 24W, yellow.
3. Sealing ring: not supplied separately as a spare part.
4. Turn signal housing cover: To replace the bulb, it is necessary to cut the headlight housing; for subsequent closing of the mont. the housing cover is supplied with holes.
5. Bolt: from the turn signal cover repair kit; 2 Nm.
6. Headlight range control actuator: right headlight range control actuator "V49"; not supplied separately as a spare part.
7. Sealing ring: not supplied separately as a spare part.
8. Housing cover execution. headlight aiming motor: left headlight only; to replace the executable. the engine needs to cut the headlight housing; for subsequent closing of the mont. the housing cover is supplied with holes.
9. Bolt: from the repair kit. motor for adjusting the headlight angle; 2 Nm.
10. Bolt; 1.4 Nm.
11. Stop light/daytime running light housing cover: The headlight housing must be cut to replace the bulb; for subsequent closing of the mont. the housing cover is supplied with holes.
12. Daytime running light: left syst. light. daytime driving lighting "L174", right lamp syst. daytime driving lighting "L175"; 12 V, 13 W.
13. Parking lamp. light/daylight: left parking lamp. light "M1", right parking lamp. light "M3"; with daylight function; stop lights, brightness reduced to 70%; 12 V, 13 W.
14. Stop light/daytime running light housing cover: The headlight housing must be cut to replace the bulb; for subsequent closing of the mont. the housing cover is supplied with holes.
Removal and installation the headlight housing
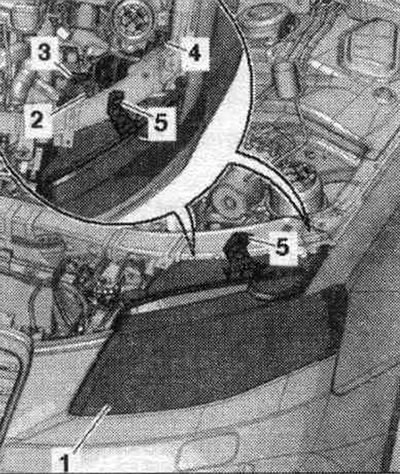
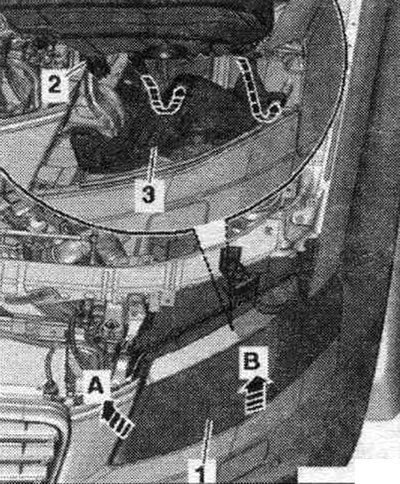
Turn off the ignition. Set the light switch to position 0. Remove the lock support trim. Disconnect plug connection "2". Unscrew screws "3, 4, 5" on headlight housing "1".
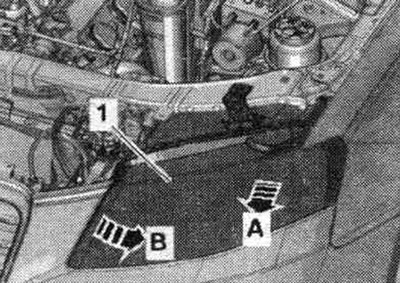
Pull the headlight housing "1" forward "arrow A" until the headlight guides come out of the runner mountings. Then move the headlight housing towards the "arrow B" wing and remove it from the runners.
Installation
Installation in reverse order: install the outer edge of the headlight housing "1" inside, behind the wing. Move the headlight housing inwards "arrow A"; in doing so, the guides on the headlight housing "2" must engage in the retainer guides "3" "arrows". Insert the headlight housing downwards into the headlight housing retainer to the stop "arrow B". The headlight housing must enter its seating recess easily and without force.
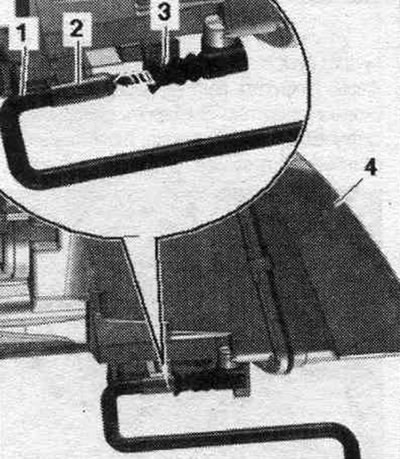
When installing headlight "4", make sure that the ventilation "3" of the headlight is evenly placed on the fastening "2" of the ventilation hose "1" "arrow".
Tighten bolts "3, 4, 5".
Replacing the low beam headlight bulb "M29"/"M31"
Turn off the ignition. Set the light switch to position 0. Remove the headlight housing. Remove the low beam lamp housing cover "1" from the headlight housing "arrow A". Remove the lamp "3" from the spring clips "arrow B". Disconnect the plug connection "2" of the lamp.
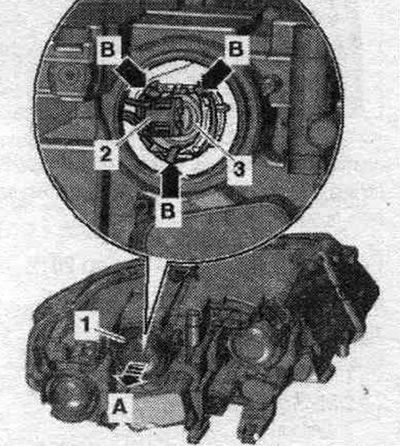
Installation in reverse order. Insert the new lamp into the housing, being careful not to touch the glass bulb of the lamp with your bare hands. Insert the lamp into the housing, overcoming the resistance of the spring clamps. Reconnect the connector and close the housing cover. Install the headlight housing.
Replacing the high beam headlight bulb "M30"/"M32"
Turn off the ignition. Set the light switch to position 0. Remove the headlight housing. Remove the high beam lamp housing cover "1" from the headlight housing "arrow A". Remove the lamp "3" from the spring clips "arrow B". Disconnect the plug connection "2" of the lamp.
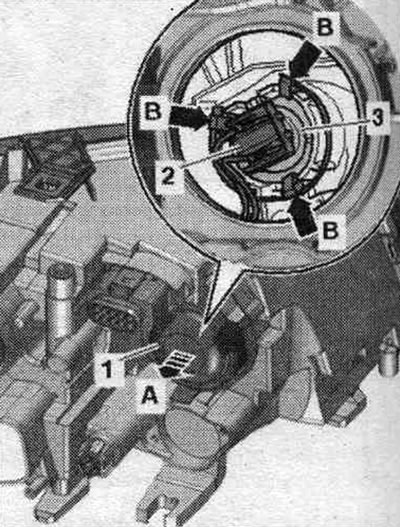
Installation in reverse order. Insert the new lamp into the housing, being careful not to touch the glass bulb of the lamp with your bare hands. Install the lamp at the lower spring clip. Press the lamp into the housing, overcoming the resistance of the upper spring clips. Reconnect the connector and close the housing cover. Install the headlight housing.
Replacing the parking light bulb "M1"/"M3"
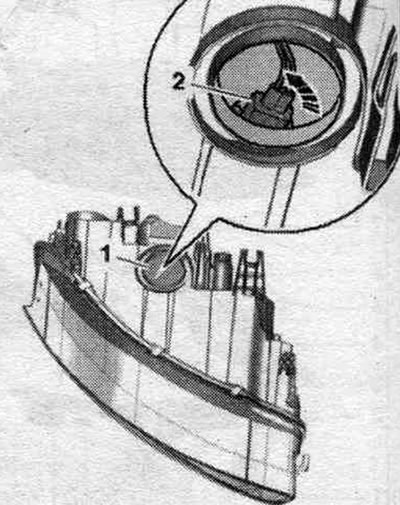
Remove the headlight housing. To replace the parking light bulb, the headlight housing must be cut with a sharp carpet knife in the designated area. For subsequent closing of the mont. the housing cover is supplied with holes. Cut out the plug "1" from the headlight housing with a sharp carpet knife. After removing the plug, carefully remove any chips and fine dust from the headlight housing. Turn cartridge "2" counterclockwise "arrow" and remove it from the housing.
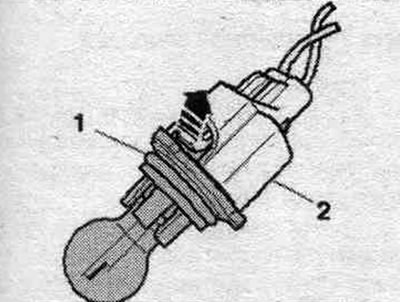
Unlock the spring latch "arrow" and disconnect connector "2" from cartridge "1".
Installation in reverse order. Insert the new bulb into the socket on the headlight, being careful not to touch the glass bulb with your bare hands. Close the hole in the headlight with housing cover "1" from the repair kit.
Install the headlight housing.
Replacing the daytime driving lighting system bulb "L174"/"L175"
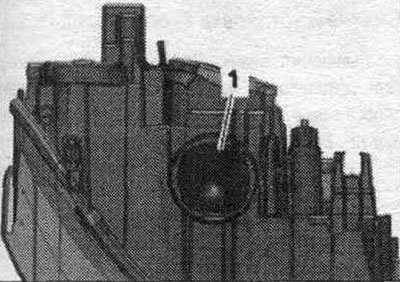
The headlight housing has been removed. To replace the system lamp. for daytime driving lighting, the headlight housing must be cut with a sharp carpet knife in the designated area. For subsequent closing of the mont. the housing cover is supplied with holes. Cut out plug "2" from the headlight housing with a sharp carpet knife. Turn cartridge "1" counterclockwise "arrow" and remove it from the housing.
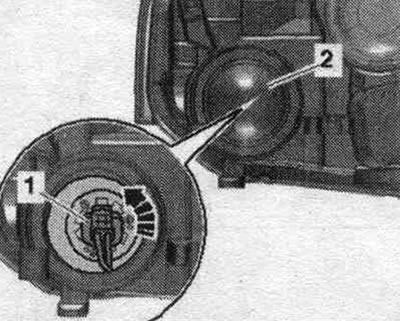
Unlock the spring latch "arrow" and disconnect connector "2" from cartridge "1".
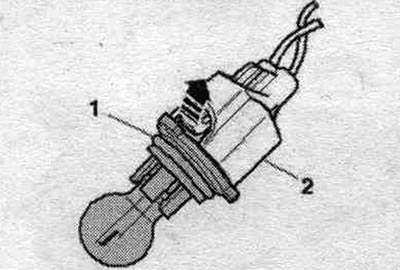
Installation in reverse order. Insert the new bulb into the socket on the headlight, being careful not to touch the glass bulb with your bare hands. Close the hole in the headlight with housing cover "1" from the repair kit.
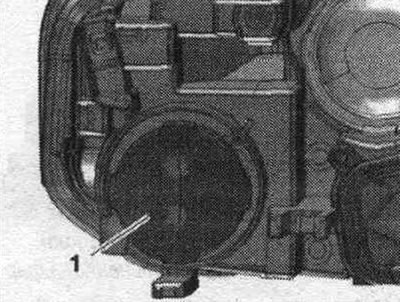
Install the headlight housing.
Replacing the front side marker light bulb "M33"/"M34"
The front side marker light bulb is an LED and is installed in the headlight housing. Replacing the LEDs is not possible, the headlight must be replaced completely.
Replacing the front turn signal bulb "M5"/"M7"
Remove the headlight housing. To replace the front lamp. the turn signal headlight housing must be cut with a sharp carpet knife in the designated place. For subsequent closing of the mont. the housing cover is supplied with holes. Cut out plug "2" from the headlight housing with a sharp carpet knife. Remove the high beam lamp housing cover "1" from the headlight housing.
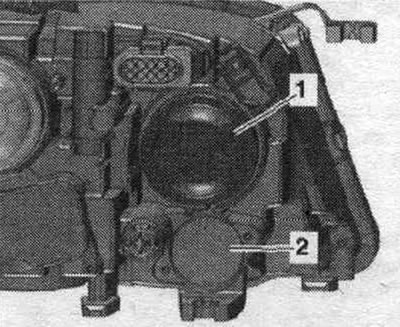
Turn cartridge "1" counterclockwise "arrow" and remove it from the housing. Move the turn signal socket "2" upwards towards the high beam lamp hole. Disconnect connector "3" and remove the cartridge from the housing.
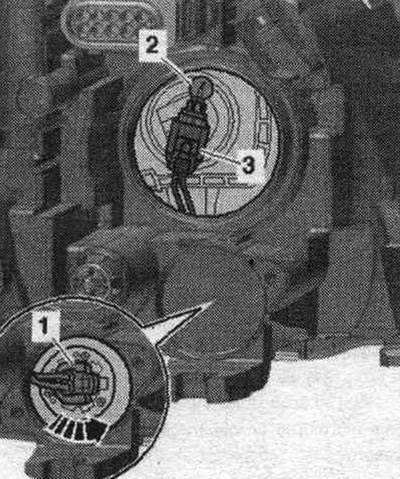
Installation in reverse order. Insert the new bulb into the socket on the headlight, being careful not to touch the glass bulb with your bare hands. Close the hole in the headlight with housing cover "1" from the repair kit. Tighten the arrow bolts.
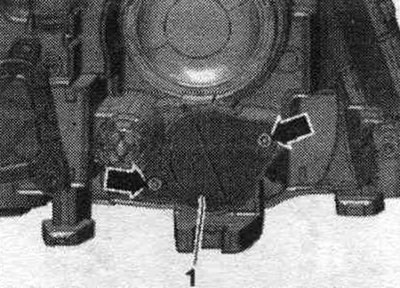
Install the headlight housing.
Removal and installation the left headlight range adjustment actuator motor "V48"
Remove the headlight housing. To replace the executable. the headlight housing of the left headlight corrector motor "V48" must be cut with a sharp carpet knife in the place provided for this purpose. For subsequent closing of the mont. the housing cover is supplied with holes. Cut out the plug "1" from the headlight housing with a sharp carpet knife. After removing the plug, carefully remove any chips and fine dust from the headlight housing.
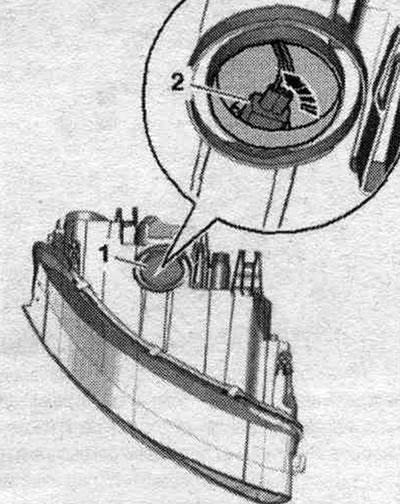
Cut out plug "2" from the headlight housing with a sharp carpet knife. After removing the plug, carefully remove any chips and fine dust from the headlight housing. Remove the low beam lamp housing cover "3" from the headlight housing. Unscrew the bolts "arrow" of the engine version "1" for adjusting the headlight angle.
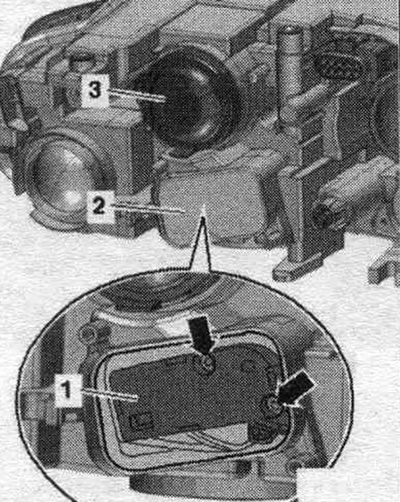
Pull the reflector "4" back and move the actuator motor "3" of the headlight corrector up "arrow", due to this the ball head "2" of the adjustment axis will come out of the ball head mount "1".
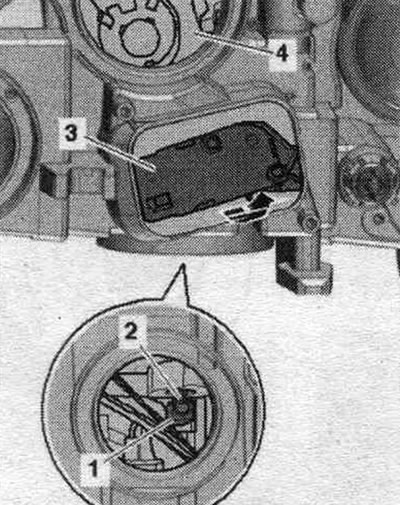
Installation in reverse order. When inserting, connect the connector. Pull the reflector down and insert the ball head of the adjustment axis into the reflector mount. Close the hole in the headlight with housing cover "1" from the repair kit. Tighten the arrow bolts.
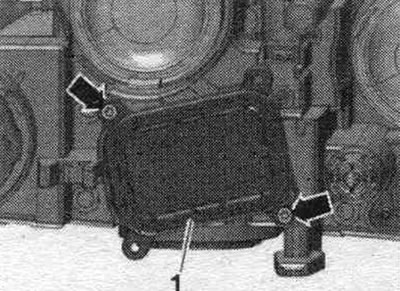
Close the hole in the headlight with housing cover "1" from the repair kit. Install the headlight housing.
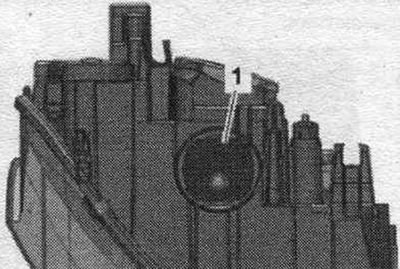
Removal and installation the right headlight range adjustment actuator motor "V49"
If the right headlight corrector actuator motor "V49" is faulty, the headlight must be completely replaced. Replacing the headlight housing.
(Content source: the specified website: AUDIMANUAL)