
Table of contents: Lane sheathing. doors ↓ Removal and installation the front… ↓ Removal and installation decorative… ↓ Removal and installation the front… ↓ Removal and installation of front.… ↓ Removal and installation the… ↓ Removal and installation of the… ↓ Removal and installation the… ↓ Removal and installation door trim… ↓
Lane sheathing. doors
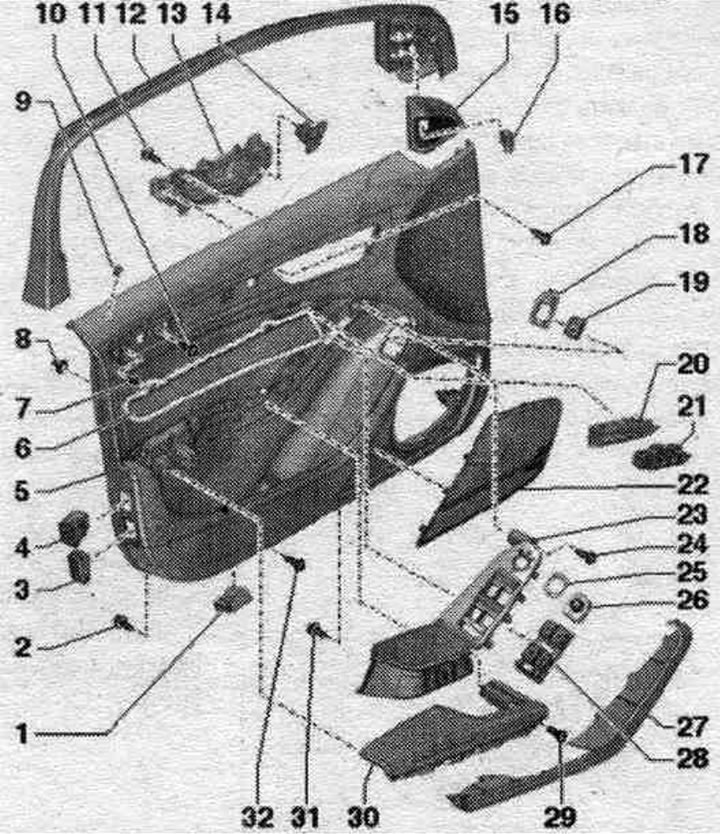
1. Threshold illumination.
2. Bolt: for armrest; 6 pcs.; 1.2 Nm.
3. Active and passive reflector.
4. System deactivation switch. interior security "E183"/anti-theft alarm switch "E217".
5. Door trim: the hole for the bushing "pos. 9" is required before replacing the door trim. process according to the sample of the removed door trim.
6. Decorative overlay.
7. Clamp: 3 pcs.; press into the door trim.
8. Clamp: with sealing gasket; for door trim; 7 pcs.
9. Bushing of the control lamp for switching on the SAFE mode of the central lock "K133": only in the door.; a hole for the bushing is necessary before replacing the door trim. process according to the sample of the removed door trim.
10. Bolt: for door trim; 2.5 Nm.
11. Bolt: for the internal door opening handle mechanism; 6 pcs.; 1.2 Nm.
12. Covering glass frames.
13. Internal door opening handle mechanism.
14. Internal lock key: driver's side.; door lock switch from the passenger compartment on the driver's side. "E308", lane side. passenger: door lock switch from the passenger compartment on the front side. passage. "E309".
15. Tweeter speaker cover.
16. Lane change assist button "E530".
17. Bolt: for door trim; 2.5 Nm.
18. Cover: for remote trunk release switch "E188"; only leads to the door.
19. Remote trunk release switch "E188".
20. Decorative cover for switch: for driver's seat control panel, with memory function "E97".
21. Driver's seat control panel with memory function "E97".
22. Speaker cover: for midrange speaker.
23. Door handle: with switch mount.
24. Bolt: for door trim; 2.5 Nm.
25. Symbol overlay.
26. Exterior mirror position control button "E43": option: switch per. mirrors with folding function "E168".
27. Overlay: for armrest.
28. Window lift button: driver's side: window lift control panel in the driver's door. "E512"; side of the lane. passenger: window lift button in the front door. passage. "E107".
29. Bolt: for door trim; 2.5 Nm.
30. Armrest.
31. Door closing handle bolt: 5 pcs.; 1.2 Nm.
32. Bolt: for door trim; 2.5 Nm.
Removal and installation the front trim. armrest
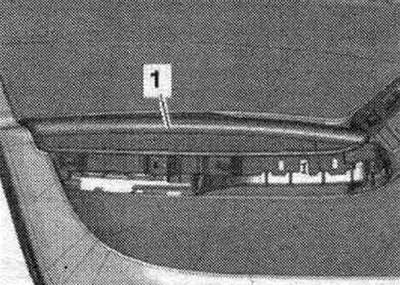
Insert a screwdriver into the hole at the bottom of trim "1." Carefully pry the trim, starting from the back, and remove the "arrow" from the door trim.
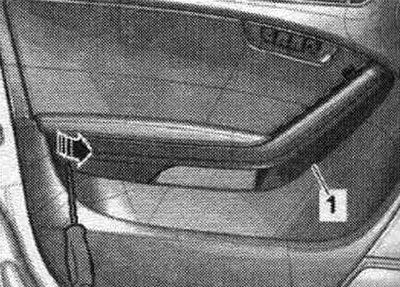
Installation in reverse order. First, install the trim on the front of the door trim and press until it clicks into place.
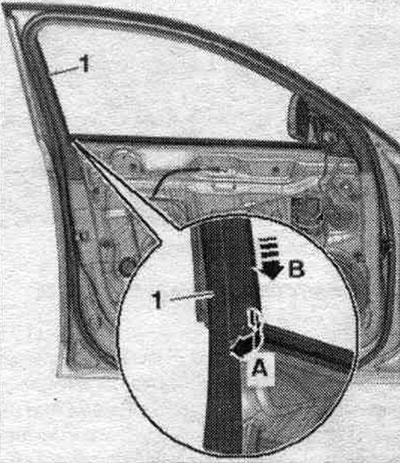
Removal and installation decorative trim
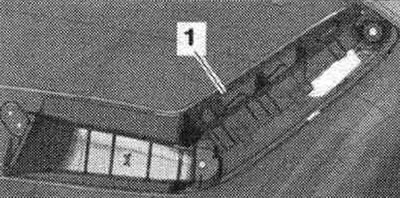
Starting from the rear, pry off the decorative trim "1" with a screwdriver and remove it from the door trim "arrow A". Remove the decorative trim backwards in the "direction of arrow B" from the inner door handle, slightly lifting the decorative trim with a screwdriver in the front part so that the inner hook of the decorative trim can come out of the opening in the door trim.
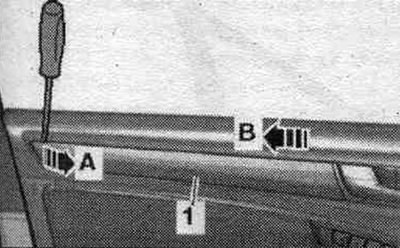
Installation in reverse order. First, install the decorative trim on the inner door drive, and then press it against the door trim until it clicks into place.
Removal and installation the front door trim
Turn off the ignition. Remove the decorative trim. Remove the armrest cover. Unscrew bolts "1...5".
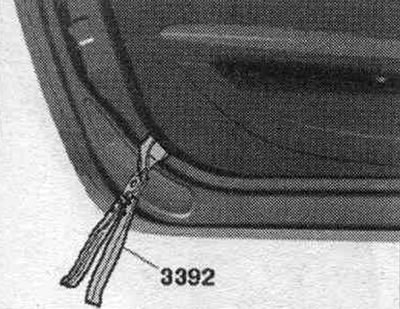
Separate the door trim with the "3392" dismantling pliers from the back bottom along the entire perimeter, starting from the door. To do this, place the pliers next to the fastening clamps between the door trim and the door.
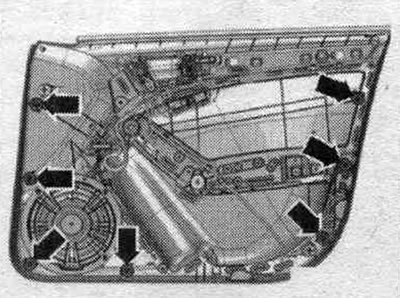
Position the mounting clamps "arrows." Remove the door trim from the window groove from above by pulling the trim upward.
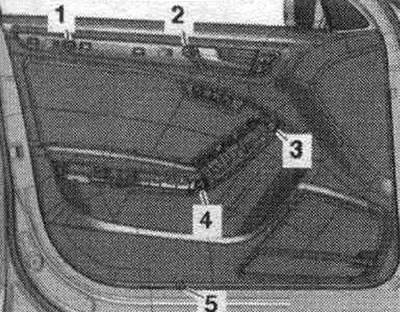
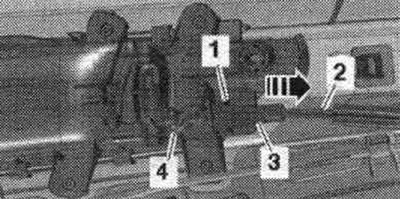
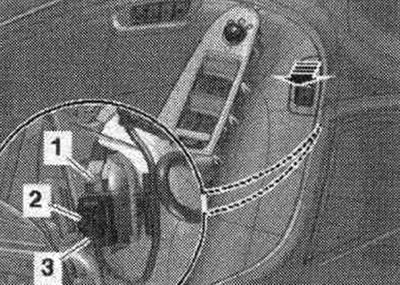
Carefully disconnect the clamp "3" from the cable support "1". Remove the cable "2" of the inner door drive in the direction of the arrow from the cable support. Disconnect the end of the rod "4" on the inner door opening handle mechanism.
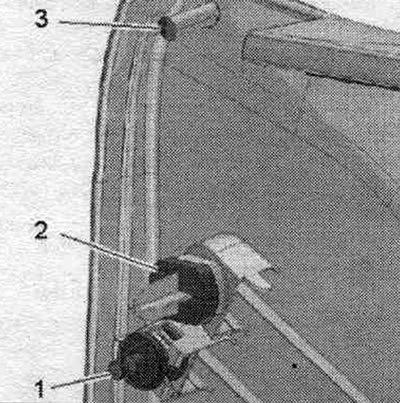
To disconnect the el. press the safety lock "1" of the plug connection, turn the fastening bracket in the "direction of the arrow" and remove the plug connection. Remove the door trim.

Installation
Check if there are rubber buffers "3" and all seals "2" in the door trim. Check that all mounting clips "1" are present in the door trim.
Insert the end of the rod "4" into the lever of the internal door opening mechanism. The open side of the eye at the end of the rod should face downwards. Pull cable "2" of the inner door drive "in the direction of the arrow" and insert it into cable support "1". Clip "3" should snap into the cable support with an audible click. Connect the plug connection to the door control unit. Place the door trim at the window groove and press downwards. Carefully install the fasteners and press the door trim at the attachment points to the door until it clicks into place. Installation in reverse order.
Removal and installation of front. armrest
Remove the door trim. Unscrew bolts "1...3" on the back of the door trim.

Unscrew and remove armrest "1" from the door trim.
Installation in reverse order.
Removal and installation the interior door handle with mounting location for the front pushbutton panel
Remove the door trim. Remove the front armrest. Remove the window lift control panel. Remove the outside mirror position adjuster. Unscrew bolts "1...5" on the back of the door trim.

Carefully remove the inner door handle "1" with the button panel mount from the door trim.
Installation in reverse order.
Removal and installation of the button trim "E188"
Remove the door trim. Disconnect plug connection "3" from the remote trunk release switch "E188." Release clamp "1" and press cover "2" with the remote trunk release switch "E188" out of the door trim panel. Remove the remote trunk release switch "E188" from the cover.
Installation in reverse order: install the cover until it clicks into place.
Removal and installation the interior door handle mechanism
Remove the door trim. Version with internal locking button: Disconnect plug connection "2". Version with lighting: Disconnect plug connection "4". Unscrew the bolts "1, 3, 6, 7, 8, 9". Remove the internal door opening handle mechanism "5" from the door trim.
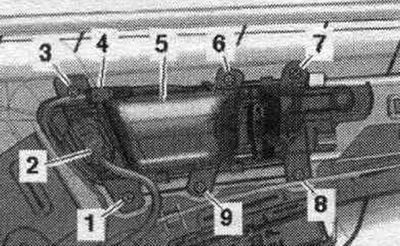
Installation in reverse order.
Removal and installation door trim and window frame
Lower the door glass. Remove the tweeter cover. Option with tweeter: remove tweeter. Equipment variant with lane assist: remove the lane assist button "E530". Carefully pry off the window frame trim "1" with the wedge "3409" first at the bottom — inside, then carefully push it along the window glass seal over the entire length "arrow A". At the same time, remove the door trim and window frame trim downwards and remove it from the frame "arrow B".
Installation
At the back, at the top, insert the trim "1" of the window frame "arrow" into the seal of the glass frame "2".
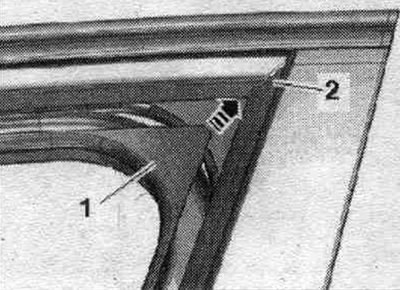
Installation in reverse order.
(The original publication in its entirety is posted on the website «AudiManual.ru»)