



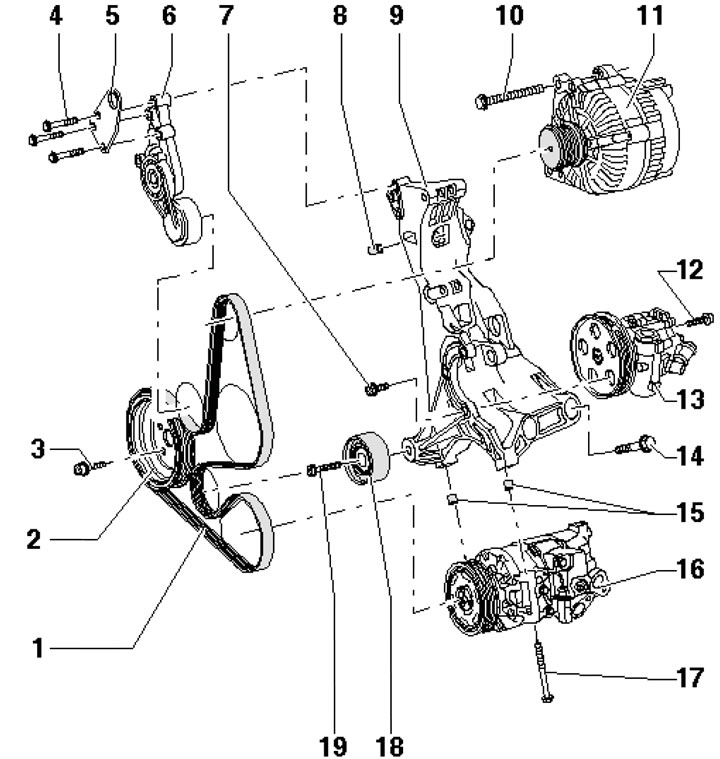
19.1. Alternator Belt Installation Details 1. Generator drive belt; 2. Crankshaft pulley; 3. Special pulley mounting bolt 2, 10 Nm, then tighten to an angle of 90°, use a new bolt; 4. Eye mounting bolts 5, 23 Nm; 5. Engine lifting eye; 6. Belt tensioner 1; 7. Holder mounting bolt 9, 23 Nm; 8. Bushing; 9. Auxiliary unit holder; 10. Generator mounting bolts, 23 Nm; 11. Generator; 12. Rear power steering pump mounting bolt, 23 Nm; 13. Power steering pump; 14. Holder mounting bolts 9, 45 Nm, apply varnish to the threads; 15. Bushings (2 pcs.); 16. Air conditioning compressor; 17. Compressor mounting bolts 16, 25 Nm; 18. Intermediate roller; 19. Roller mounting bolt 18,; 20 Nm, then tighten to 90° angle, use new bolt
2. Mark the alternator belt with chalk or a felt-tip pen to indicate the direction of rotation so that you can install the belt in the same way. Loosen the belt tension by turning the tensioner in the direction of the arrow (see illustration 17.18), secure the tensioner with lock No. T40098 and remove the belt from the pulleys and rollers.
Note: If the belt cannot be removed from the pulley, loosen the tensioner mounting bolts a few turns.
3. Installation is carried out in the reverse order of dismantling the components. Before installing the belt, make sure that all units are (generator, compressor, power steering pump) are mounted securely. Install the used belt so that it runs in the same direction as before. Pay attention to the correct seating of the belt on the pulleys and its running.
[This article was previously published on the resource Audimanual.ru]