



Table of contents: Front seat belt and its parts ↓ Removal and installation the rear… ↓
Front seat belt and its parts
1. Front seat belt installation details are shown in the illustration.
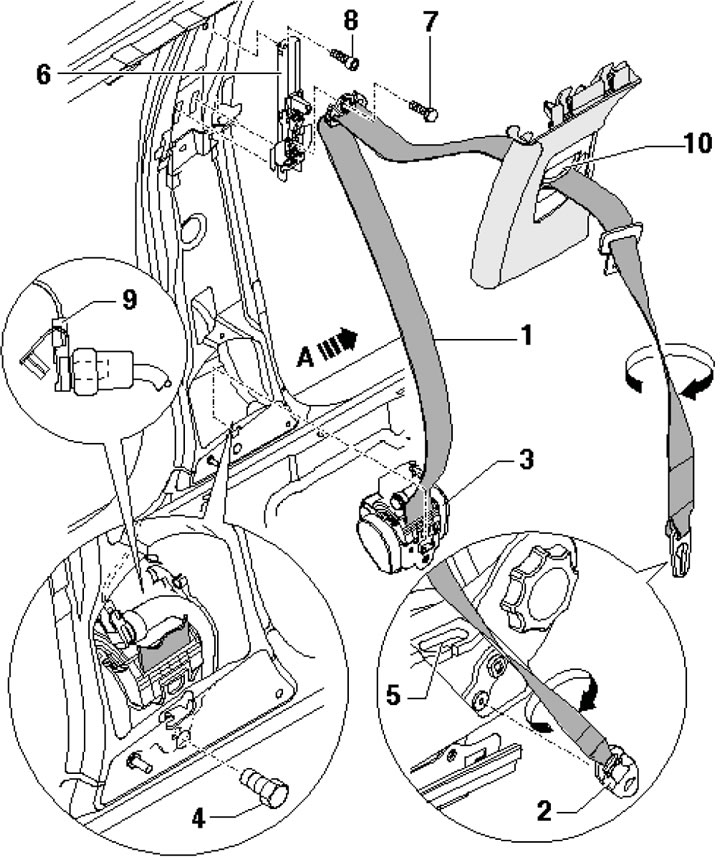
15.1. Front seat belt installation details 1. Seat belt; 2. Bottom anchor; 3. Return mechanism; 4, 7. Bolt, 55 Nm; 5. Guide; 6. Upper anchor height adjustment unit; 8. Bolt, 23 Nm; 9. Connector; 10. Height adjustment button
2. To remove the height adjustment unit, remove the upper section of the B-pillar trim, unscrew the bolts (7 and 8 in Illustration 15.1) and pull the regulator (6) upwards.
Note: Do not press the button (10) when installing. The following describes how to remove the belt.
3. Disconnect the negative cable from the battery.
4. Separate the A and D pillar trim from the B pillar trim. Remove the upper and lower sections of the B pillar trim.
5. Unscrew the fastener of the lower anchor point of the belt (2 in illustration 15.1) and release the belt (1) from the guide (5). Pay attention to the locking element, loosen the bolt (4) and remove the return mechanism (3).
6. Unscrew the bolt (7 in illustration 15.1) at the top of the height adjustment unit (6) and separate the belt from it. If necessary, remove the adjustment unit by unscrewing the bolt (8). Using a screwdriver, unhook the yellow tab on the yellow/blue connector and disconnect the connector.
7. When installing, position the belt with a half-turn twist (arrow in illustration 15.1).
Removal and installation the rear seat belt
8. The front seat belt installation details are shown in the illustration.
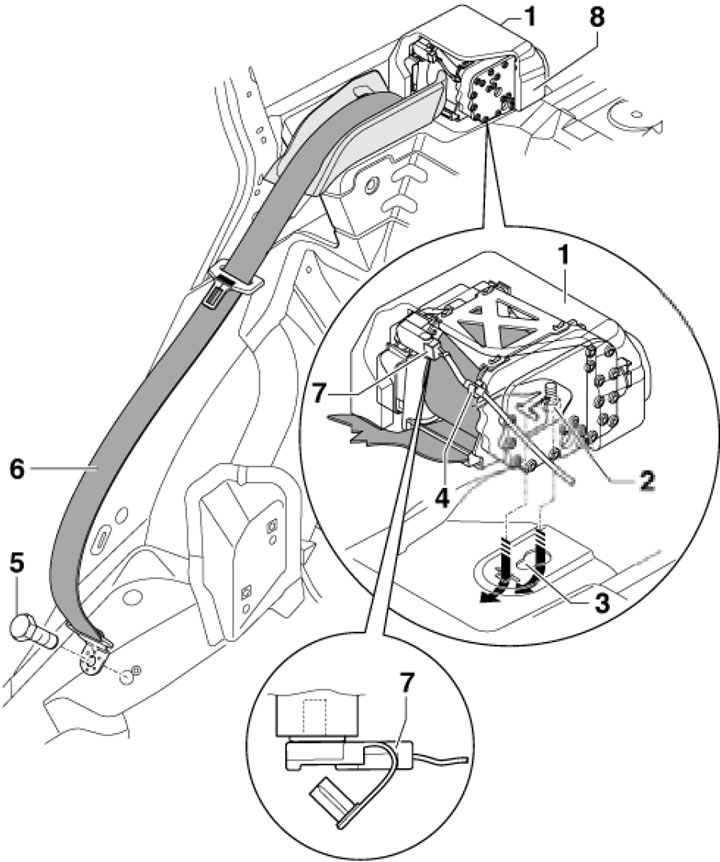
15.8. Rear seat belt installation details 1. Return mechanism/belt module; 2, 5. Bolt, 55 Nm; 3. Mounting holes of mechanism 1; 4. Tensioner wiring; 6. Belt; 7. Tensioner connector; 8. Soundproofing overlay
9. On Sedan models, remove the upper C-pillar trim section, rear shelf and insulation underneath.
10. Remove the luggage compartment side trim.
11. Unscrew the bolt (2) on the mechanism (1) from underneath, unscrew the bolt (5) of the lower anchor and disconnect the connector (7).
12. When installing the return mechanism, make sure that the bolt (2) comes into contact with the small hole of the holder (3) when tightening and after.
[This article was previously published on the resource: AUDImanual]