
Table of contents: Execution order ↓ Removal the clutch slave cylinder ↓ Removal the clutch master cylinder ↓ Bleeding the hydraulic clutch system ↓
The clutch control units are visible in the clutch bell of the dismantled engine
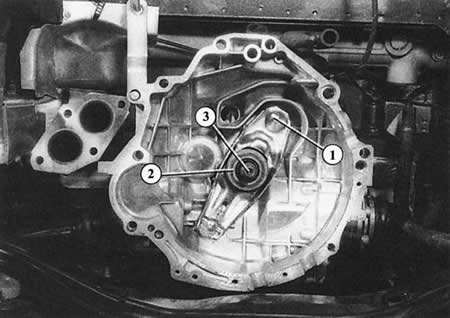
- 1 - off lever (the force of the clutch master cylinder acts on it);
- 2 - release bearing;
- 3 - gearbox input shaft.
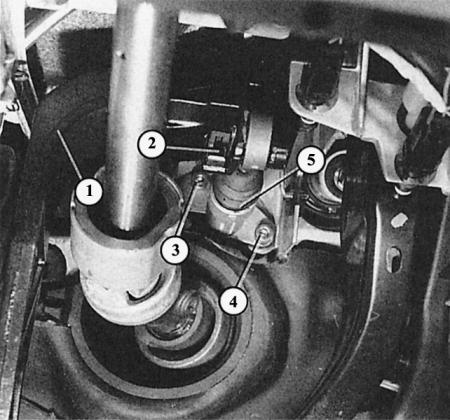
Above the clutch pedal (the lever is marked with the number "1"), the rubber cuff (5) of the clutch slave cylinder and both mounting bolts (3 and 4) are visible. The number "2" marks the locking clamp of the pivot pin, which must be removed during dismantling.
Execution order
1. If the clutch disengages properly, its hydraulic system is in order in any case.
2. But if it turns off poorly or the pedal falls without resistance, then air has probably entered the hydraulic system.
3. Simply bleeding the air will not help here - you need to find the leak and repair it. Now you can bleed the air from the system. Information about other causes of clutch failure can be found at the end of this chapter in the section Help with malfunctions.
4. For preventive inspection of the hydraulic clutch system, look for traces of brake fluid on the slave cylinder (at the top of the clutch pedal) and on the master cylinder (on the gearbox).
5. Oil-soaked clutch cylinders are leaky and must be replaced. Although the origin of the oily dirt on the master cylinder is difficult to determine without thoroughly cleaning this area.
Tip: The clutch hydraulics get their fluid from the brake fluid reservoir, but if there is a leak in this area, the brake system is not in danger. The fluid intake pipe for the clutch hydraulic system is located quite high on the reservoir, so there is always enough fluid left for the brakes.
Removal the clutch slave cylinder
1. Suck out as much liquid as possible from the expansion tank (using a large medical syringe).
2. Remove the instrument panel trim on the bottom left (chapter Salon).
3. Place an old rag under the working cylinder, disconnect the supply hose and allow the remaining fluid to drain into the rag.
4. From the engine compartment side, unscrew the pressure hose to the master cylinder.
5. Unscrew the two Allen bolts securing the slave cylinder.
6. Fold back the pivot pin retaining clamp (connection of the pedal and the working cylinder), squeeze your finger out.
7. Now you can remove the cylinder.
8. When installing a new cylinder, the rod pressing on the piston of the working cylinder must be adjusted so that the clutch pedal is approximately 10 mm higher than the brake pedal.
9. Be sure to check that the return spring presses the pedal properly. At the same time, the pedal in the resting position should not touch its bracket at the top. Otherwise, the piston of the working cylinder in the resting position will not be able to move to the rear stop.
10. To adjust, loosen the lock nut on the push rod and turn the push rod left or right around its axis. Then tighten the lock nut again.
11. Bleed the hydraulic clutch system.
Tip: The clutch pedal in the Audi A4 is equipped with a so-called top dead center spring. It helps when you press the pedal, but returns it to its original position after you remove your foot. If the pedal does not return back, then air has entered the hydraulic system or the pedal or spring is heavy.
Removal the clutch master cylinder
1. Raise and secure the front left side of the vehicle.
2. Unscrew the hydraulic pressure hose from the master cylinder - be careful, this will cause brake fluid to leak out.
3. Place the container underneath.
4. Loosen the mounting bolt on the cylinder, remove the master cylinder back from the gearbox housing.
5. If necessary, help yourself with anti-corrosion spray and a pry bar.
6. Lightly lubricate the surfaces of the new cylinder body with oil, lubricate the pusher with MoS2 paste.
7. Insert the master cylinder into the gearbox housing and press it in until the mounting bolts can be screwed into the threads on the gearbox (25 Nm).
8. Bleed the hydraulic system.
Bleeding the hydraulic clutch system
Anyone who does not have a standard workshop bleeder removes air from the hydraulic clutch system in the same way as from the brake system – almost without fail – in the following way:
1. Open the bleed nipple on the front wheel brake and the nipple on the clutch master cylinder about 1.5 turns each.
2. Connect both nipples with a hose.
3. Now slowly and carefully press the brake pedal several times to force the hydraulic fluid from the front wheel brake through the clutch hydraulics.
4. Do not press the pedal too hard, otherwise the hose will break!
5. Do not lose sight of the fluid level in the expansion tank.
6. If no more air bubbles from the hydraulic clutch system enter the expansion tank, then both nipples are screwed in and the hose is removed.
7. Check the brake fluid level!
(The original article is located on the online resource: audimanual)