Repair Chevrolet Repair Toyota Repair Honda Repair AvtoVAZ Repair Mercedes-Benz Repair BMW Repair Opel
Home  |  Contacts  |  Sitemap  |    
English Русский
Български
Беларускі
Український
Српски
Hrvatski
Română
Polski
Slovenský
Magyar
AudiManual.ru


  • AUDI 80
  • AUDI 100
  • AUDI A3
  • AUDI A4
  • AUDI A6
  • AUDI A8
  • AUDI Q
  • OTHER
  • ARTICLES
B4 (1991-1996) B3 (1986-1991) B3 (1986-1991, petrol) B2 (1979-1986)

Steering wheel — removal and installation (Audi 80 B4)

  • Home
  • Audi 80
  • B4 (1991-1996)
  • Chassis
  • Suspension and steering wheel
  • Steering wheel — removal and installation
            0
Table of contents: Steering wheel without air cushion ↓ Steering wheel with airbag unit ↓
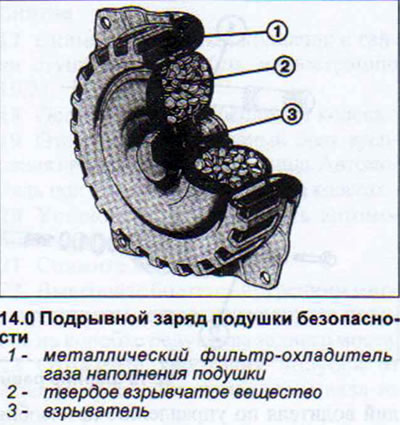
The steering wheel of AUDI 80 cars can be equipped with an airbag unit. Such a steering wheel has an enlarged cover. Under which is a folded airbag. It is a bag filled with gas at the moment of a collision. The gas is formed as a result of combustion of a solid charge, which is located in a metal case and is ignited by the airbag control unit when colliding with an obstacle at a speed of at least 18 km/h (see illustration 14.0). The airbag control unit is located in the center console. When the airbag is deployed, it is filled with nitrogen for 50 milliseconds. The airbag is an effective means of protection only in combination with seat belts.

The steering wheel of AUDI 80 cars can be equipped with an airbag unit. Such a steering wheel has…


When performing work related to the airbag, it is necessary to adhere to and implement a number of safety precautions. The main ones are:

1. Disconnect the battery and the negative (-) cable.

2. Disconnect the power plug under the steering column cover.

3. Do not leave the removed airbag unit unattended.

4. Place the removed airbag unit so that the impact-receiving surface of the airbag faces upward.


5. Disconnect the battery when performing welding work on the vehicle.

6. Replace all airbag components if your vehicle has been in an accident.

The disposal of a vehicle equipped with an airbag is carried out according to special rules.

Steering wheel without air cushion


Removal

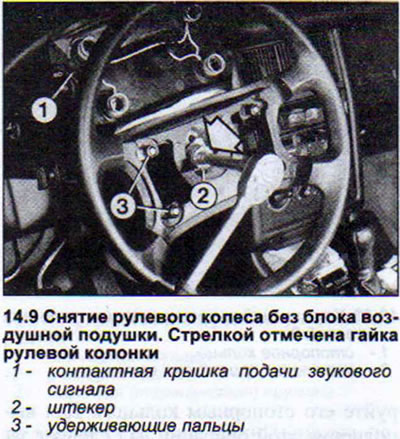
7. Remove the horn cover from the retaining fingers by pulling it upwards. Be careful, there are plastic hooks on the left and right sides of the cover (see illustration 14.9).

8. Set the steering wheel to the "Lock" position.

9. Loosen the nut securing the steering wheel to the steering column using a 24 mm socket wrench (see illustration).

9. Loosen the nut securing the steering wheel to the steering column using a 24 mm socket wrench…


10. Install the steering wheel so that its spokes are symmetrical and the wheels are straight.

11. Remove the nut and washer.

Installation

When installing the steering wheel, ensure that the spokes are positioned symmetrically.

12. Set the steering wheel lock to the "Lock" position.

13. Tighten the steering wheel to steering column mounting nut to a torque of 40 Nm.

Steering wheel with airbag unit


We recommend that you remove and install the steering wheel with the airbag unit yourself only if you have the relevant experience. Otherwise, entrust this to a workshop.


Removal

14. Disconnect the ground (-) terminal from the battery.

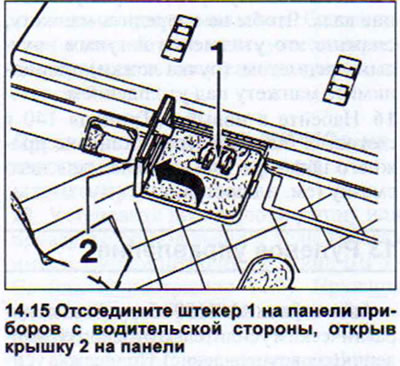
15. Diesel vehicles: Disconnect the plug on the driver's side instrument panel by opening the cover on the panel (see illustration).

15. Diesel vehicles: Disconnect the plug on the driver's side instrument panel by opening the cover…


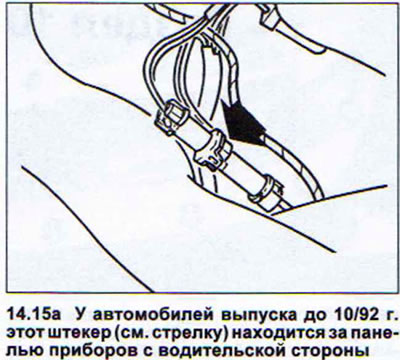
For cars produced before 10/92, this plug is located behind the instrument panel on the driver's side (see illustration 14.15a).

For cars produced before 10/92, this plug is located behind the instrument panel on the driver's…


16. Unscrew the bolts securing the airbag unit to the steering wheel using a T 30 wrench. The bolts are located on the right and left sides and are unscrewed from the back of the steering wheel.

17. Lift the airbag unit and turn it over.

18. Release the airbag connector from the mount

19. Disconnect the airbag connector.

20. Remove the airbag unit and place it with the AUDI logo rings facing upwards.


21. Remove the upper part of the steering column trim.

22. Pull out the airbag unit connector plug by squeezing the retainer tabs (see illustration).

22. Pull out the airbag unit connector plug by squeezing the retainer tabs (see illustration).


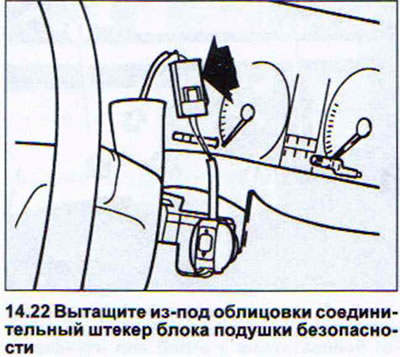
23. Disconnect the connecting plug.

24. Remove the steering wheel using the same steps as when removing the steering wheel without the airbag unit.

Installation

After the steering wheel is secured to the steering column, tighten the airbag unit mounting bolts by hand. Then tighten the right mounting bolt first to 6 Nm (if you look in the direction of travel), and then at the same moment - the left one.
The article was checked by auto expert Timur Bazhenov
This article is available at russian, bulgarian, belarusian, ukrainian, serbian, croatian, romanian, polish, slovak, hungarian

Share information:
Previous articles
Audi 80 B4: Suspension and steering wheel
Next articles

Steering system
Drive axle shafts — disassembly
Drive axle shafts
Rear Wheel Hub Bearing — Adjusting Play
Wheel installation


Similar articles on other Audi car models:
Steering wheel — removal and installation Audi 100 C3 (1982-1990, diesel)
Removal and installation the steering wheel Audi A3 Type 8L (1996-2003)
Removal and installation the steering wheel Audi A4 B6 (2000-2006)
Steering wheel — removal and installation Audi A6 C5 Allroad (1999-2005)
Removal and installation the engine Audi A8 D2 (1994-2002)
Removal and installation the steering wheel and steering column Audi Q7 Typ 4L (2005-2015, diesel)
Removal and installation driver's airbag (sports steering wheel) Audi A2 (1999-2005)
Link to this page in different formats


Visitor comments

No comments yet


How much will 17 + 41 =


80(B4, 1991-1996) 
  • General information
  • User manual
  • Maintenance
  • Troubleshooting
  • Power unit
  • Engine
  • Cooling system
  • Heating and ventilation
  • Petrol injection
  • Diesel fuel system
  • Fuel system
  • Exhaust systems
  • Ignition system
  • Transmission
  • Clutch
  • Car gearbox
  • Chassis
  • Brake system
  • Suspension and steering wheel
  • Body
  • Body and trim
  • Electrical equipment
  • Electrical system
  • Electrical circuits
 
80(B3, 1986-1991) 
  • General information
  • Repair characteristics
  • Maintenance
  • Power unit
  • Gasoline engine
  • Diesel engine
  • Engine lubrication system
  • Fuel system (gasoline)
  • Injection system (gasoline)
  • Fuel system (diesel)
  • Ignition system
  • Cooling system
  • Heater
  • Exhaust system
  • Transmission
  • Clutch and gearbox
  • Chassis
  • Steering
  • Brake system
  • Car suspension
  • Body
  • Body elements
  • Electrical equipment
  • Power devices
  • Lighting and appliances
  • Electrical circuits
 
80(B3, 1986-1991, petrol) 
  • General information
  • User manual
  • Maintenance
  • Power unit
  • Engine 4-cylinder
  • Engine 5-cylinder
  • Cooling system
  • Fuel and exhaust systems
  • Ignition system
  • Transmission
  • Clutch
  • Mechanical transmission
  • Automatic transmission
  • Drive shafts
  • Chassis
  • Brake system
  • Suspension
  • Steering
  • Body
  • Exterior
  • Interior
  • Electrical equipment
  • Equipment and devices
  • Electrical circuits
 
80(B2, 1979-1986) 
  • General information
  • User manual
  • Power unit
  • Engine FZ
  • Engine EP, YP, YZ, DT, DS, DZ
  • Transmission
  • Clutch
  • 4 speed gearbox
  • 5 speed gearbox
  • Front wheel drive
  • Chassis
  • Front suspension
  • Rear suspension
  • Steering
  • Brake system
  • Electrical equipment
  • Equipment and devices
  • Electrical circuits
 
AudiManual.ru © 2017-2026 · Mobile version · Feedback · Sitemap: EN BG BY UA RS HR RO PL SK HU · Site search · News and articles
80 B2 · 80 B3 petrol · 80 B3 · 80 B4 · 100 C3 diesel · 100 C3 petrol · 100 C3 · 100 C4 petrol · 100 C4 · A3 Type 8L · A4 B5 petrol · A4 B5 · A4 B6 petrol · A4 B6 · A4 B7 · A4 B8 · A6 C4 · A6 C5 · A6 C5 Allroad · A8 D2 · Q5 Type 8R · Q7 Typ 4L · Audi A2 ·
This site uses cookies 🍪. Click the button to accept this fact.