
Table of contents: Key checkpoints ↓ Motor oil ↓ Cooling system ↓ Brake fluid ↓ Battery ↓ Charging the battery ↓ Fast charging of the battery ↓ Checking and filling ↓ Tire Pressure Monitoring Indicator ↓ Control lights ↓
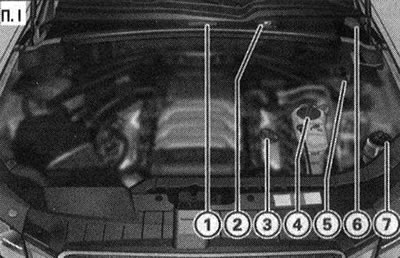
Typical arrangement of filler tanks and oil filler hole
Key checkpoints
- 1. Engine start assist terminal (+) under the cover, "Battery charging" "Engine starting"
- 2. Brake fluid reservoir
- 3. Oil filler hole
- 4. Expansion tank of the cooling system
- 5. Engine start assist terminal (-) with hexagonal head, "Battery charging", "Engine start"
- 6. Windscreen washer reservoir
- 7. Power steering fluid reservoir


The location of the oil filler hole (position "3") may differ from that shown in the illustration depending on the engine version.
Motor oil
| "LongLife Service" | Preventive maintenance | |
| Petrol engines | VW 504 00 | VW 502 00. alternative: VW 504 00 |
| Diesel engines | VW 507 00 | With diesel particulate filter: VW 507 00. Without diesel particulate filter: VW 505 01, alternatively VW 507 00. |
The service interval indicator on the dashboard of the car informs about the need to change the oil. It is recommended to change the oil at an Audi or specialized company. If it is necessary to top up the oil between two oil changes, use the engine oils from the oils listed in the table according to the VW standard. To do this, you need to know whether the car is serviced according to the reduced service interval scheme ("Audi Longlife Service") or constant frequency of service maintenance (preventive maintenance): see the last entry in the service book; whether the car is equipped with a petrol or diesel engine: see the sticker on the inside of the fuel filler cap; is the vehicle equipped with a diesel particulate filter? See the transmission entry in the service book.
Note: If the oils listed in the table are not available, other oils can be added. To avoid damaging the engine, no more than 0.5 liters of the specified oils can be added at a time before the next oil change. Gasoline engines: according to ACEA 3A or API SM. Diesel engines: according to ACEA C3 or API CF. For the Chinese market, the following applies: vehicles with a gasoline engine may only be operated with oil according to VW 502 00 with a viscosity coefficient of SAE 5W-40. Service "LongLife Service" not available in all countries.
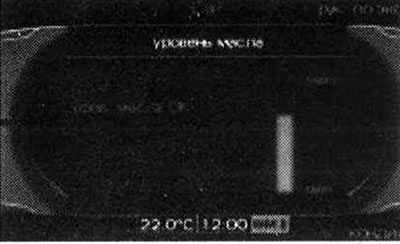
Display: oil level indicator
The car must be on a level surface. Select: car function key CAR → Oil level (oil level). Let the engine warmed up to operating temperature idle for a while, then turn off the engine. Wait about 2 minutes. Check the oil level on the display. Add oil if the oil level on the indicator almost reaches the "min" mark.
Depending on driving style and operating conditions, oil consumption can be up to 0.5 liters per 1000 km. When driving the first 5000 kilometers, oil consumption may exceed this value.
Note: The oil level indicator on the display is provided for information purposes only. If the oil level is insufficient, a message appears on the instrument panel stating that the oil level has dropped to the minimum value. Add oil. If the engine compartment lid has been opened, the instrument panel will display the current oil level the next time the ignition is turned on.
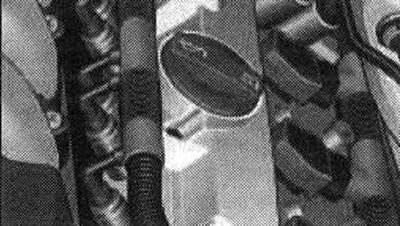
Underhood space: oil filler plug
Unscrew the oil filler plug. Carefully add the appropriate oil in 0.5 liter portions. Screw the oil filler plug tightly and close the engine compartment lid. Check the oil level after 2 minutes. Add more oil if necessary.
Caution! Check the oil level on the radio or MMI display. If the message Please reduce oil level is displayed, contact a specialist company to remove excess oil if necessary. Do not add additives to the oil. Damage caused by the use of such products is excluded from warranty.
Cooling system
The cooling system fan can be switched on automatically. The fan is driven by a poly V-belt from the engine. The fan is equipped with a viscous clutch that regulates its rotation speed depending on the temperature. In addition, an additional electric fan is switched on automatically, operating depending on the coolant temperature and the temperature of the engine compartment. After the engine and ignition are turned off, the additional fan can continue to operate for up to 10 minutes. It can also switch on automatically after a while in the following cases: when the temperature rises due to aerodynamic heating; or additional heating of the heated underhood space by bright sun rays.
Attention. When working in the engine compartment, remember that the machine may turn on the fan - risk of injury!
Brake fluid
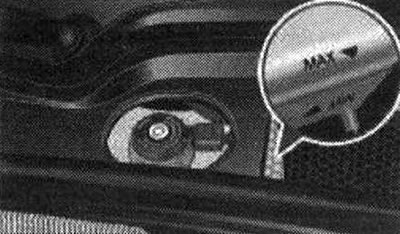
Underhood space: marks on the brake fluid reservoir
The brake fluid level can be quickly checked visually. Visually determine the level of the brake fluid in the reservoir. It should always be between the "MIN" and "MAX" marks. A slight decrease in the fluid level as the car mileage increases is explained by wear and tear of the automatic transmission, adjustment of the brake linings. This is normal. If the fluid level drops significantly over a short period of time or if the fluid level drops below the "MIN" mark, it is possible that the brake system is not hermetically sealed. If the brake fluid level in the reservoir is too low, the brake system indicator light comes on. Immediately contact a specialized company to check the brake system.
Battery
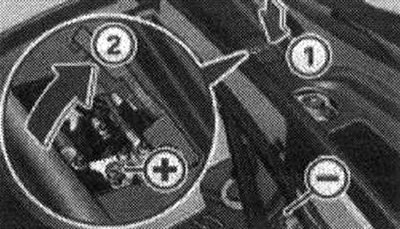
Underhood space: terminals for connecting the charger and jumper cables
The battery charging terminals are located in the engine compartment. Read the warnings. Disconnect all power consumers. Remove the ignition key. Open the engine compartment cover. Remove cover "1" by pressing the arrow. Fold back cover "2" of the positive pole. Connect the charger terminal clamps to the jumper bolts as required (bolt under the cover ="plus", hex bolt ="minus"). Insert the charger power cord plug into the socket and turn on the device. After charging: turn off the charger and disconnect it from the mains. Then disconnect the charger terminal clamps from the battery. Close cover "2" of the positive pole and install cover "1". Close the engine compartment cover.
A discharged battery can freeze already at a temperature of about 0°C. Before charging, be sure to let the frozen battery thaw. It is recommended not to continue using a thawed battery, since the formation of ice can damage the battery case and result in electrolyte leakage.
Charging the battery
Before charging the battery, be sure to follow the instructions of the charger manufacturer! When charging with low currents (for example, using a small-sized charger) the cables connecting the battery to the on-board network do not need to be disconnected. When charging, the battery caps must be closed.
Fast charging of the battery
For technical reasons, accelerated charging of batteries using chargers with an output voltage greater than 14.8 V is not permitted.
Warning. Never charge a frozen battery - risk of explosion! Charge the battery only through the terminals in the engine compartment.
Checking and filling
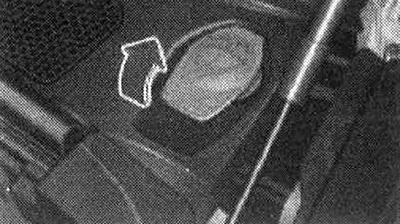
Underhood space: windshield washer reservoir

The windshield washer reservoir contains liquid for cleaning the glass and for cleaning the headlights. To avoid limescale deposits in the spray nozzles, it is necessary to fill with distilled water. Always add glass cleaner to the washer fluid (in winter - with antifreeze).
Caution! Never mix in antifreeze intended for cooling systems or other additives. Do not use glass cleaners containing varnish solvents - risk of damaging the varnish!
Tire Pressure Monitoring Indicator
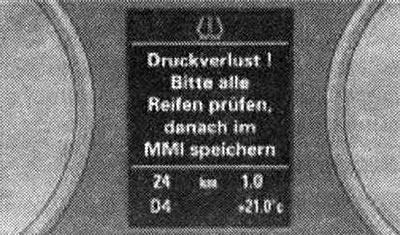
Display: warning symbol with text indication
The tire pressure warning light on the instrument panel indicates that the tire pressure is too low or that the system is malfunctioning. The tire pressure warning light uses the ABS sensors to compare the distance traveled by each individual tire and the vibration pattern.
Control lights
Moderate loss of air pressure in the tire in at least one wheel. In addition, the control lamp (yellow) on the instrument panel is lit. Check/correct the air pressure in the tires in all 4 wheels and save it via the radio or MMI.
Significant loss of air pressure in the tire in at least one wheel. In addition, the control lamp (red) on the dashboard is on. Check the tires and replace them (repair) wheel. Check/correct the air pressure in the tires in all 4 wheels and save it via the radio or MMI.
TPMS (Tire Pressure Monitoring System - tire pressure monitoring system) - Tyre pressure! System malfunction (tire pressure monitoring system malfunction). If after switching on the ignition or while driving the TPMS symbol appears and in addition the control lamp (yellow) on the instrument panel first flashes for about 1 minute and then lights up continuously, a system fault has occurred. Contact your nearest specialist workshop as soon as possible.