
Table of contents: Removal ↓ Installation ↓
All control devices and control lamps of the car are combined into a single unit - the instrument cluster (instrument panel). The instrument panel must be removed to replace, for example, a burnt-out instrument panel light bulb. If the control and measuring device is faulty, the instrument panel must be replaced as a set, because it is non-separable.
The instrument cluster is controlled by a microprocessor and has a self-diagnostic function. When malfunctions or failures occur, they are registered as corresponding codes that can be "read" using the AUDI diagnostic device. With this diagnostic device, you can set up or adjust the readings of some indicators, such as the fuel gauge, fuel consumption, maintenance deadline messages, and mileage counter.
If the LED bulbs fail, or there are other defects, the instrument panel should be replaced completely.
Before replacing the instrument cluster, it is recommended to query the self-diagnostic unit memory using a diagnostic device to obtain data on the faults that have occurred. In addition, using the same diagnostic device, you should read information about the dates of the upcoming maintenance, as well as the vehicle mileage, and record them. These works are performed in the workshop.
Removal
Note: There is no need to remove the steering wheel.
1. Lower the steering column all the way down.
2. With the ignition off, disconnect the ground (-) wire terminal from the negative battery terminal.
Attention! If the radio has an access code, then disconnecting the battery deletes this code. After connecting the battery, the radio can only be turned on after entering the appropriate code or by using the services of an AUDI workshop or the manufacturer of the radio. Therefore, before disconnecting the battery, check and write down the entered code.
3. Pry up cover 1 on the instrument panel from the side and then remove it (see illustration).
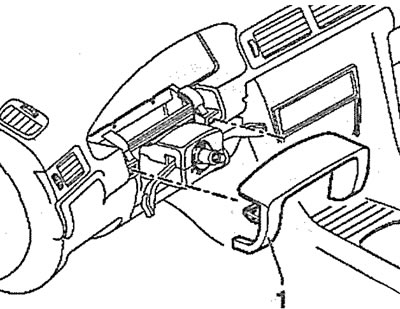
16.3. Pry up the cover 1 on the instrument panel from the side and then remove it
4. Unscrew the two Phillips-head screws 1 (see illustration).
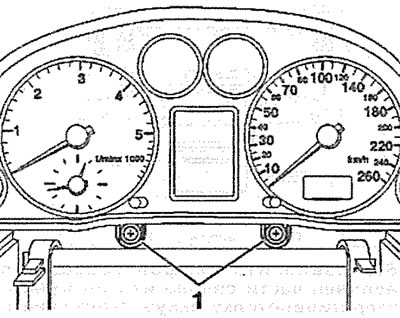
16.4. Unscrew the two screws 1 with Phillips-head screwdriver heads
5. Remove the trim from the left side of the instrument panel by prying it off with a screwdriver (see arrow in illustration).

16.5. Remove the trim from the left side of the instrument panel by prying it off with a screwdriver (see arrow
6. Move the instrument panel towards you, into the passenger compartment (see arrows in the illustration) and remove the instrument panel.
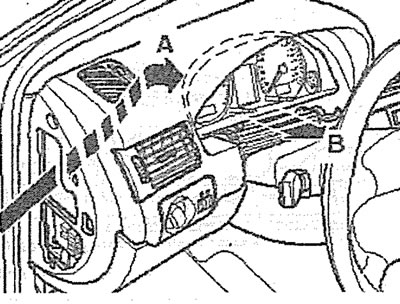
16.6. Move the instrument panel towards you, into the passenger compartment (see arrows)
7. Disconnect the plugs on the back of the panel by pressing the lock 1 and turning the bracket in the direction shown by the arrow in the illustration.
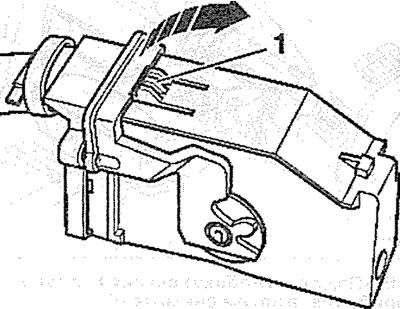
16.7. Disconnect the plugs on the back of the panel by pressing the lock 1 and turning the bracket in the direction shown (see arrow)
8. Replace light bulbs if possible.
Installation
The shield is installed in the reverse order of removal.
9. Connect the negative (-) wire terminal to the battery terminal.
If you replace the instrument cluster with a new one, please contact the workshop to enter the data on the maintenance dates and mileage.