
Table of contents: Headlight ↓ Parking light bulb ↓ Direction indicator light ↓ Fog light bulb ↓ Tail light bulbs ↓ Rear fog light bulb ↓ License plate light bulb ↓
Over time, the bulbs in headlights and lanterns wear out. Therefore, even if the bulbs appear to be in good condition, they should be replaced approximately every two years. This does not apply to halogen bulbs, which, for example, can be installed in the main headlights. Halogen bulbs usually have a longer service life and are replaced when a defect appears. A bulb with reduced luminous intensity can be identified by black deposits on the glass bulb.
Before replacing a light bulb, disconnect the corresponding power consumer.
Warning! Do not touch the glass bulbs with your fingers. Use clean napkins for this. Fingerprints evaporate and then settle on the reflector, which leads to its tarnishing. Bulbs should only be replaced with bulbs of the same design. If, due to carelessness, stains still remain on the bulb, then remove them with a clean, lint-free cloth moistened with alcohol.
Attention! Headlight lenses are made of plastic and covered with protective varnish. Wiping them with a dry or dirty cloth is not allowed.
Warning! Halogen bulbs for high beam, low beam and fog lights are filled with gas and are under pressure. Therefore, when working with them, wear protective glasses and work gloves to avoid cuts if the bulb is damaged.
Warning! High voltage is supplied to xenon bulbs, which is associated with a risk to life in case of unqualified handling. For this reason, replacing xenon bulbs is not included in this manual.
Headlight
Low beam bulb
1. Left headlight. Remove the power steering fluid reservoir cap (see arrow in illustration), to provide access to the headlight.
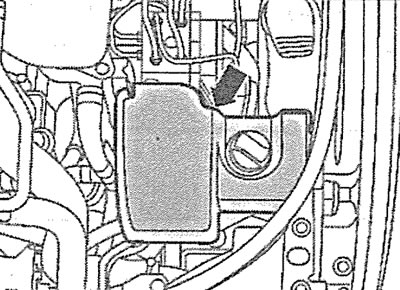
14.1 Remove the power steering fluid reservoir cap (see arrow), to provide access to the left headlight
2. Right headlight. Remove the protective cover (see arrow 1 in the illustration), unscrew the bolts (see arrows in the illustration) and remove air ducts 1 and 2 to provide access to the headlight.
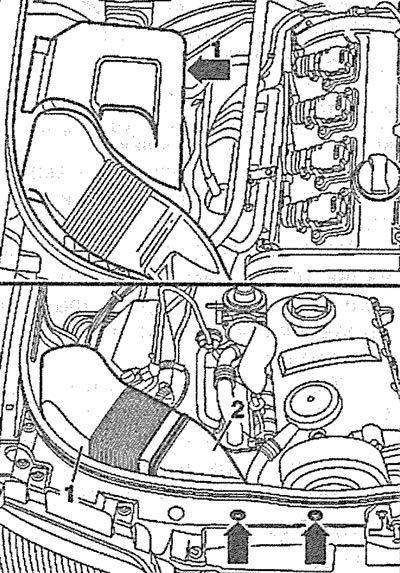
14.2. Remove the protective cover (see arrow 1), unscrew the bolts (see arrows) and remove air ducts 1 and 2 to provide access to the right headlight
3. Press the two wire clips on the back of the headlight (see arrows in the illustration) and remove the headlight cover.
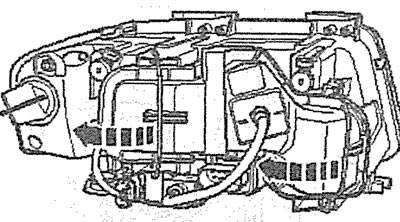
14.3. Press the two wire clips on the back of the headlight (see arrows) and remove the headlight cover
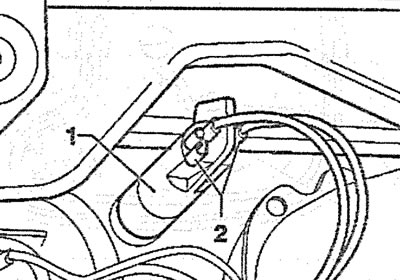
4. Disconnect plug 2, release spring clip 1 holding the bulb board and carefully remove the low beam bulb (see illustration).
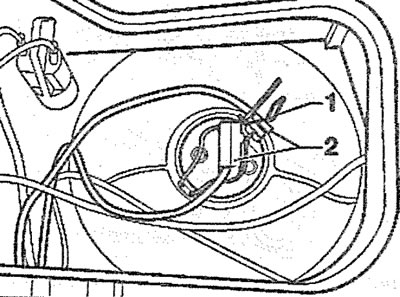
14.4. Disconnect plug 2, release spring clip 1 holding the bulb board and carefully remove the low beam bulb
5. Insert the new bulb so that the protrusion on its base fits into the corresponding protrusion on the headlight.
Warning! Do not touch the glass bulbs with your fingers. If, due to carelessness, stains still remain on the bulb, remove them with a clean, lint-free cloth moistened with alcohol.
6. Clamp the bulb base with spring clamp 1, connect plug 2 (see illustration 14.4).
7. Replace the headlight cover and secure it with wire staples.
8. Contact a workshop to check the headlight angle. High beam bulb
9. Left headlight. Remove the power steering fluid reservoir cap (see arrow in illustration 14.1), to provide access to the headlight.
10. Right headlight. Remove the protective cover (see arrow 1 in illustration 14.2), unscrew the bolts (see arrows in illustration 14.2) and remove air ducts 1 and 2 to provide access to the headlight.
11. Press the two wire clips on the back of the headlight (see arrows in illustration 14.3) and remove the headlight cover.
12. Disconnect plug 1, release spring clip 2 holding the bulb board and carefully remove the low beam bulb (see illustration).

14.12. Disconnect plug 1, release spring clip 2 holding the bulb board and carefully remove the low beam bulb
13. Insert the new bulb so that the protrusion on its base fits into the corresponding protrusion on the headlight.
Warning! Do not touch the glass bulbs with your fingers. If, due to carelessness, stains still remain on the bulb, remove them with a clean, lint-free cloth moistened with alcohol.
14. Clamp the bulb base with spring clamp 2, connect plug 1 (see illustration 14.12).
15. Replace the headlight cover and secure it with wire staples.
Parking light bulb
16. Left headlight. Remove the power steering fluid reservoir cap (see arrow in illustration 14.1), to provide access to the headlight.
17. Right headlight. Remove the protective cover (see arrow 1 in illustration 14.2), unscrew the bolts (see arrows in illustration 14.2) and remove air ducts 1 and 2 to provide access to the headlight.
18. Press the two wire clips on the back of the headlight (see arrows in illustration 14.3) and remove the headlight cover.
19. Turn the socket 1 of the parking light bulb counterclockwise and carefully remove the socket from the headlight housing (see illustration).
14.19. Turn socket 1 of the parking light bulb counterclockwise and carefully remove the socket from the headlight housing
Caution! Disconnect plugs 2 (see illustration 14.19) only when replacing the cartridge.
20. Carefully remove the bulb from the socket.
Attention! Do not touch the glass bulb of the light bulb with your fingers, use a napkin.
21. Insert a new light bulb into the socket.
22. Insert the socket with the bulb into the headlight housing and turn it clockwise until it stops.
23. Replace the headlight cover and secure it with wire staples.
Direction indicator light
24. Remove the left headlight (see the relevant chapter).
25. Right headlight. Remove the air filter (see the relevant chapter).
26. Turn cartridge 1 counterclockwise and remove the cartridge from the indicator housing (see illustration).

14.26. Turn cartridge 1 counterclockwise and remove the cartridge from the indicator housing
27. Gently press down on the bulb to dislodge it in the socket and turn it about a quarter turn to the left. Then remove the bulb from the socket.
Attention! Do not touch the glass bulb of the light bulb with your fingers, use a napkin.
28. Insert the new bulb into the socket and turn it to the right.
29. Install the socket with the new bulb into the indicator housing and secure the socket by turning it clockwise.
Next, the installation of the dismantled components is carried out in the reverse order of removal.
Fog light bulb
30. Remove the fog light (see the relevant chapter).
31. Remove the fog light cover by unscrewing the 2 bolts securing it (see illustration 14.31), or by turning the headlight cover counterclockwise if the cover has a bayonet mount (see arrow in illustration 14.31a).
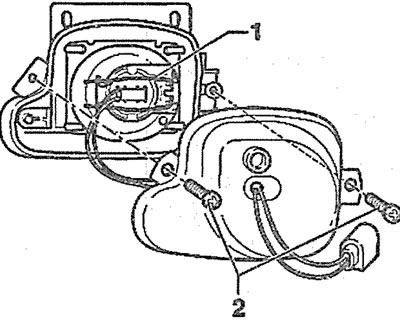
14.31. Remove the fog light cover by unscrewing the 2 bolts securing it |
14.31a. Remove the fog lamp cover by turning the lamp cover counterclockwise if the cover has a bayonet mount (see arrow) |
32. Press down the wire staple 1 (see illustrations 14.31 and 14.32) and remove the bulb holder from the headlight.
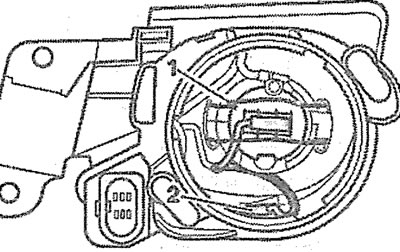
14.32. Press the wire clip 1 and remove the bulb holder from the headlight (bayonet Mounted Fog Light Cover)
33. Disconnect the connectors 2 on the headlight cover (see illustrations 14.32 and 14.33).
14.33. Disconnect the connectors 2 on the headlight cover (the fog light cover is secured with bolts)
Attention! Do not touch the glass bulb of the light bulb with your fingers, use a napkin.
34. Insert a new bulb into the socket and secure the socket with the bulb in the fog light housing using the clamp.
35. Connect the plugs, install the fog lamp cover.
Next, the installation of the dismantled components is carried out in the reverse order of removal.
Tail light bulbs
36. Turn off the ignition.
37. Set the exterior lighting switch on the instrument panel to position "0".
38. Remove the side trim of the trunk. On the left side of the trunk there is a set of on-board tools that must be removed.
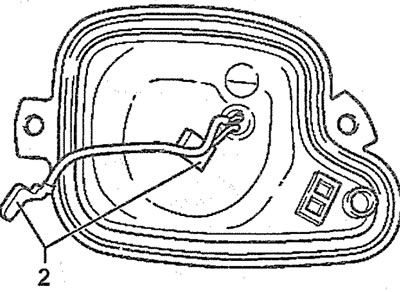
39. Disconnect plug 1 (see illustration).

14.39. Disconnect plug 1
40. Tighten the leashes (see arrows in the illustration) and release the board of 2 rear light bulbs (see illustration 14.39).
41. Gently press the bulb so that it moves in the socket, and turn it about a quarter turn to the left. Then remove the bulb from the socket. Caution! Do not touch the glass bulb with your fingers, use a napkin.
42. Insert the new bulb into the socket and turn it to the right.
43. Insert the bulb board into the lamp and secure it.
44. Connect and secure plug 1 (see illustration 14.39).
Rear fog light bulb
45. Turn off the ignition.
46. Remove the trunk trim.
47. Turn the socket 1 with the bulb of the left fog light counterclockwise, and the right one - clockwise and remove the socket from the housing (see illustration).
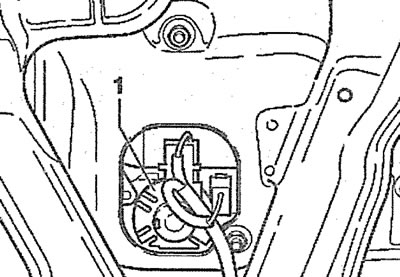
14.47. Turn the socket 1 with the bulb of the left fog light counterclockwise, and the right one - clockwise and remove the socket from the housing
48. Gently press down on the bulb to dislodge it in the socket and turn it about a quarter turn to the left. Then remove the bulb from the socket.
Attention! Do not touch the glass bulb of the light bulb with your fingers, use a napkin.
49. Insert the new bulb into the socket and, pressing it, turn it to the right.
50. Insert the socket with the new bulb into the flashlight and secure it by turning it clockwise/counterclockwise.
51. Install the trunk trim.
License plate light bulb
52. Turn off the ignition.
53. Set the exterior lighting switch on the instrument panel to position "0".
54. Unscrew the license plate light mounting bolt (see arrow in illustration) and carefully remove the flashlight.
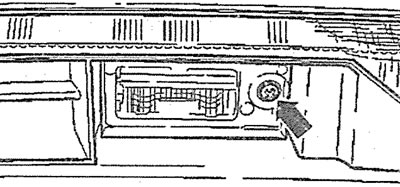
14.54. Unscrew the license plate light mounting bolt (see arrow)
55. Carefully remove bulb 1 (5 W) from the socket and replace it with a new one (see illustration).
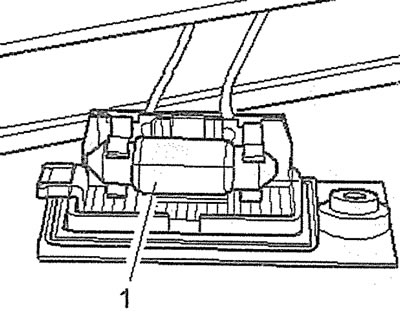
14.55 Carefully remove bulb 1 (5 W) from the socket and replace it with a new one
56. Install the license plate light in place and secure it with the bolt. The bolt should be tightened without much force.
This article was previously published on the resource: AUDIMANUAL.RU