
Table of contents: Installation ↓ Removal the left intermediate roller… ↓
Remove the front noise insulation "1". Disconnect the plug connectors "2" and "3". Unscrew the bolt "arrow" and put aside the bracket "1" with the wiring harness.
Caution! Risk of damage to a used poly V-belt when changing the direction of rotation. To reinstall the poly V-belt, mark the direction of rotation with chalk or a felt-tip pen before removing it.
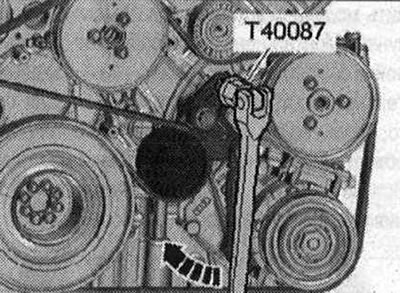
To loosen the tension of the poly V-belt, tilt the tensioner with the Torx T 60 "T40087" attachment clockwise "arrow". Remove the poly V-belt and unload the tensioner.
Installation
Installation in reverse order. Install the poly V-belt on the pulleys.
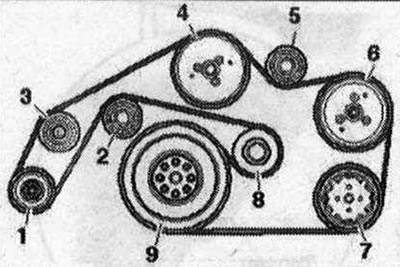
1. Generator; 2. Right intermediate roller; 3. Intermediate roller on the generator bracket; 4. Coolant pump; 5. Left idler pulley; 6. Vane pump; 7. Air conditioning compressor; 8. Tensioner element of the poly V-belt; 9. Torsional vibration damper
When installing the poly V-belt, it is necessary to ensure that it is positioned correctly on the pulleys. Start the engine and check the running of the poly V-belt. Install the bracket for the plug connector of the lambda probe "G39". Install noise insulation.
Removal the left intermediate roller of the poly V-belt
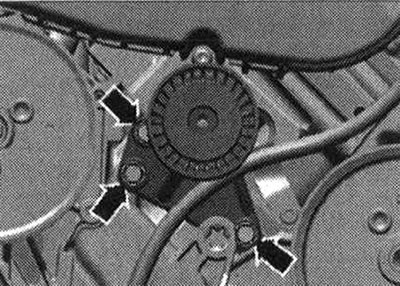
Remove the tension element of the poly V-belt. Unscrew the bolts "arrows" and remove the intermediate roller of the poly V-belt.
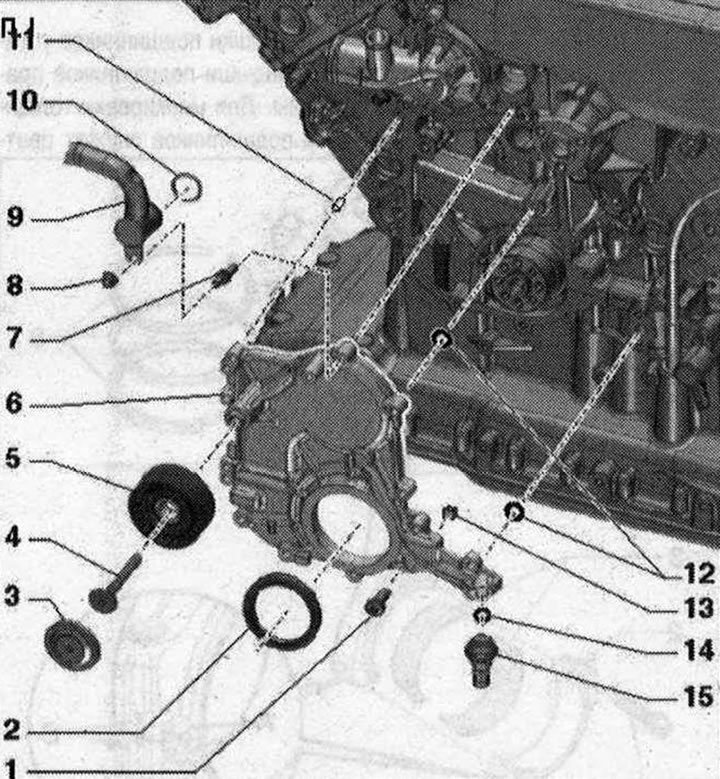
Lip seal and sealing flange on the pulley side of the poly V-belt. I 1/4. Bolt; 2. Crankshaft oil seal on the pulley side: replace; 3. Right idler roller cover; 5. Right idler roller of poly V-belt: install in the correct position; 6. Sealing flange on pulley side; 7. Double bolt: 9 Nm; 8. Nut; 9. Coolant pipe, front; 10/12. O-ring: replace; 11. Mounting pins: 2 pcs.; 13. Seal: 2 pcs.; replace; 14. Sealing cuff: replace; 15. Oil pressure sensor "F22"
Sealing flange pulley side - torque and tightening sequence
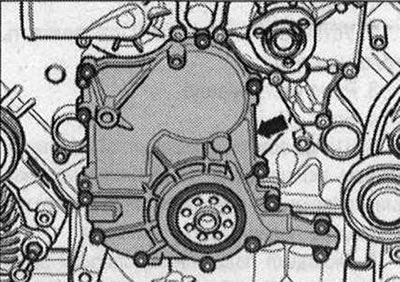
Tighten the bolts of the sealing flange on the side of the belt pulley "arrow" crosswise in stages (tightening torque 9 Nm).
The original version is on the portal AUDImanual.ru