Repair Chevrolet Repair Toyota Repair Honda Repair AvtoVAZ Repair Mercedes-Benz Repair BMW Repair Opel
Home  |  Contacts  |  Sitemap  |    
English Русский
Български
Беларускі
Український
Српски
Hrvatski
Română
Polski
Slovenský
Magyar
AudiManual.ru


  • AUDI 80
  • AUDI 100
  • AUDI A3
  • AUDI A4
  • AUDI A6
  • AUDI A8
  • AUDI Q
  • OTHER
  • ARTICLES
Q7 Typ 4L (2005-2015, diesel) Q5 Type 8R (2008-2017)

Crankshaft (Audi Q5-8R)

  • Home
  • Audi Q
  • Q5 Type 8R (2008-2017)
  • Power unit
  • Diesel engine 3.0 l
  • Crankshaft
            0
Table of contents: Crankshaft frame - bolt tightening… ↓ Accessory of main bearing shells… ↓ Compliance of main bearing shells… ↓
Crankshaft I

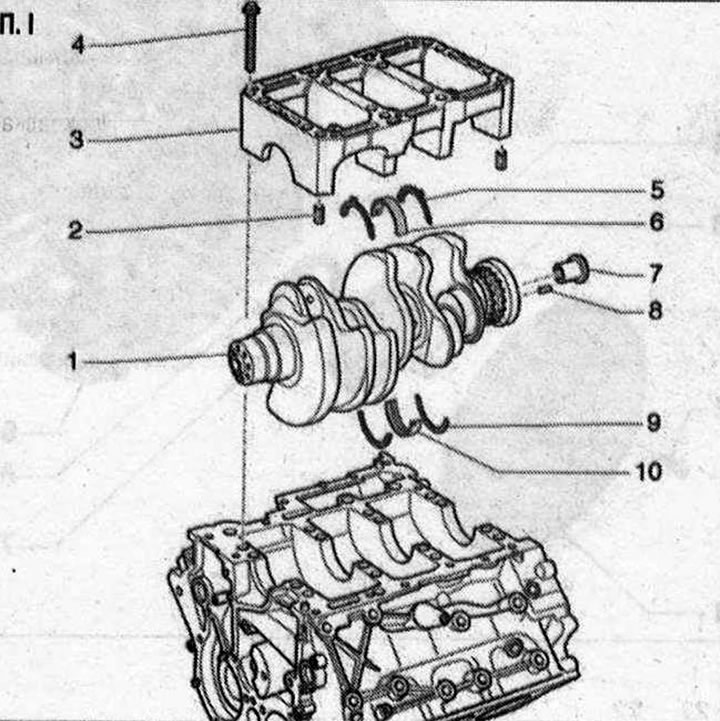
Crankshaft I 1. Crankshaft; 2. Mounting sleeve: 2 pcs.; insert into the cylinder block; 3. Camshaft frame; 4. Bolt; 5. Axial lock washer: only on main bearing 3; mounting position: lubrication grooves facing outwards; observe the correct fixation; 6. Crankshaft support frame bearing shell: Mark previously used shells, but not on the working surface; replace bearing shells worn down to their original material; install new camshaft frame bearing shells with correct color markings; 7. Not installed; 8. Dowel pin: check for secure fit in crankshaft; 9. Axial lock washer: only on main bearing 3; mounting position: lubrication grooves facing outwards; observe the correct fixation; 10. Bearing insert: for cylinder block with oil groove; mark previously used liners, but not on the working surface; install new bearing shells with the correct color markings


Crankshaft frame - bolt tightening sequence and torque


Replace the camshaft frame mounting bolts. Install both centering bushings in the cylinder head. Tighten the bolts in the sequence "1...16" in 3 stages as follows.


Replace the camshaft frame mounting bolts. Install both centering bushings in the cylinder head.…

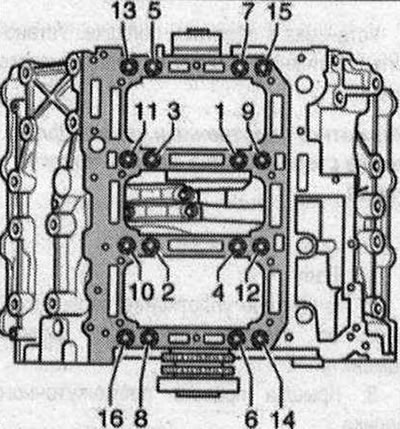
  • 1. Tighten to 30 Nm.
  • 2. Tighten to 50 Nm.
  • 3. Turn 90° further.

Accessory of main bearing shells installed in the cylinder block


At the factory, bearing shells of the correct thickness are installed in the cylinder block. Colored dots on the bearing shell are used to mark the thickness of the bearing shells. The "arrow" points towards the belt pulleys.
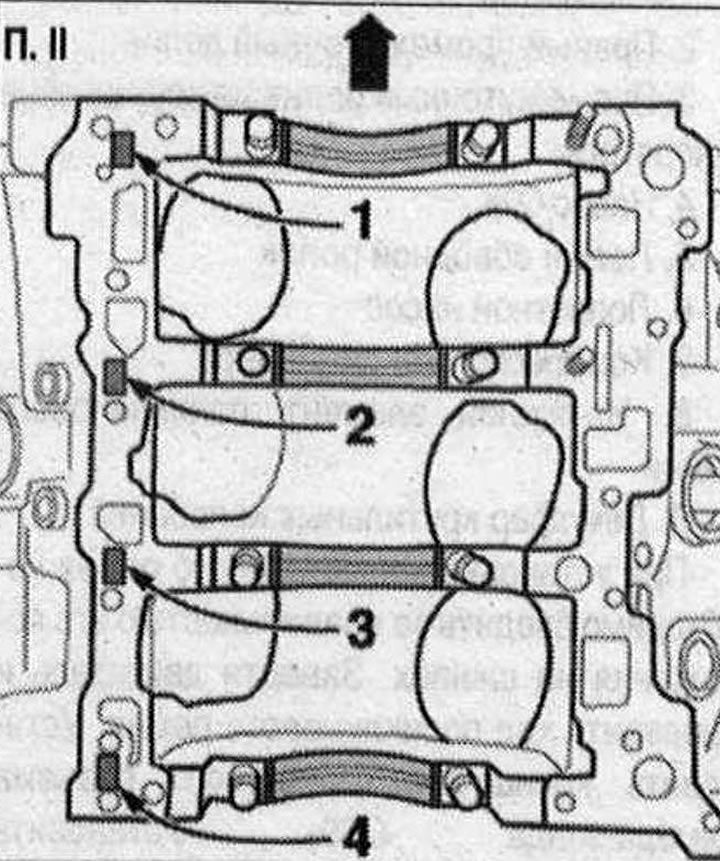
P. II

P. II


The belonging of the bearing shells to the cylinder block is indicated by a letter next to the corresponding bearing.

Letter on the cylinder blockBearing color
R=red
G=yellow
B=blue

Compliance of main bearing shells installed in the crankshaft frame


Compliance of main bearing shells installed in the crankshaft frame


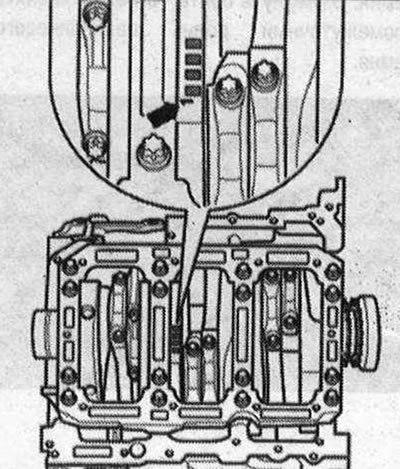
At the factory, bearing shells of the correct thickness are installed in the bearing caps. Colored dots on the bearing shell are used to mark the thickness of the bearing shells. The correspondence of the bearing shells to the crankshaft is marked on the edge of the crankshaft with a letter sequence. The first shell "I" "arrow" is marked in color for bearing 1.


Letter on the crankshaftBearing color
R=red
G=yellow
B=blue
The article was checked by auto expert Timur Bazhenov
This article is available at russian, bulgarian, belarusian, ukrainian, serbian, croatian, romanian, polish, slovak, hungarian

Share information:
Previous articles
Audi Q Q5 Type 8R: Diesel engine 3.0 l
Next articles

Slave disk
Removal the poly V-belt
Poly V-drive
Engine installation
Pistons and connecting rods
Timing chain lining installation diagram
Left camshaft timing chain
Camshaft timing chain right


Similar articles on other Audi car models:
Front and rear crankshaft seals — replacement Audi 80 B3 (1986-1991, petrol)
Crankshaft seals — replacement Audi 100 C3 (1982-1990, diesel)
Checking the crankshaft Audi A3 Type 8L (1996-2003)
Crankshaft seals — replacement Audi A4 B5 (1994-2001)
Crankshaft seals Audi A6 C4 (1994-1997)
Crankshaft Audi A8 D2 (1994-2002)
Removal and installation the crankshaft belt drive pulley Audi A2 (1999-2005)
Link to this page in different formats


Visitor comments

No comments yet


How much will 18 + 27 =


Q7 4L(2005-2015, diesel) 
  • General information
  • Operating instructions
  • Maintenance
  • Power unit
  • Diesels 3.0 l (BUG, BUN, CAS)
  • Diesels 3.0 l (CATA, CCMA)
  • Diesels 3.0 l (CJGA/CJGC)
  • Diesels 4.2 l (BTR, CCFA/CCFC)
  • Cooling system
  • Fuel and exhaust system
  • Engine management system
  • Starting and charging
  • Transmission
  • Automatic gearbox
  • Drive shafts
  • Chassis
  • Brake system
  • Front suspension
  • Rear suspension
  • Steering system
  • Body
  • Air conditioner
  • Exterior
  • Interior
  • Electrical equipment
  • Equipment and devices
  • Electrical circuits
 
Q5 8R(2008-2017) 
  • General information
  • User manual
  • Power unit
  • Petrol engine 2.0 l
  • Petrol engine 3.2 l
  • Fuel system (petrol)
  • Diesel 2.0 liter (CA)
  • Diesel 2.0 liter (CG/CJ/CM)
  • Diesel engine 3.0 l
  • Fuel system (diesel)
  • Transmission
  • Manual gearbox 0B1
  • Manual gearbox 0B2
  • Automatic gearbox 0B5
  • Automatic gearbox 0B6
  • Chassis
  • Front suspension
  • Rear suspension
  • Brake system
  • Steering
  • Body
  • Exterior
  • Interior
  • Doors, locks and windows
  • Safety system
  • Ventilation and heating
  • Electrical equipment
  • Power devices
  • Equipment and devices
  • Lighting and alarm
  • Audio system
  • Electrical circuits
 
AudiManual.ru © 2017-2026 · Mobile version · Feedback · Sitemap: EN BG BY UA RS HR RO PL SK HU · Site search · News and articles
80 B2 · 80 B3 petrol · 80 B3 · 80 B4 · 100 C3 diesel · 100 C3 petrol · 100 C3 · 100 C4 petrol · 100 C4 · A3 Type 8L · A4 B5 petrol · A4 B5 · A4 B6 petrol · A4 B6 · A4 B7 · A4 B8 · A6 C4 · A6 C5 · A6 C5 Allroad · A8 D2 · Q5 Type 8R · Q7 Typ 4L · Audi A2 ·
This site uses cookies 🍪. Click the button to accept this fact.