



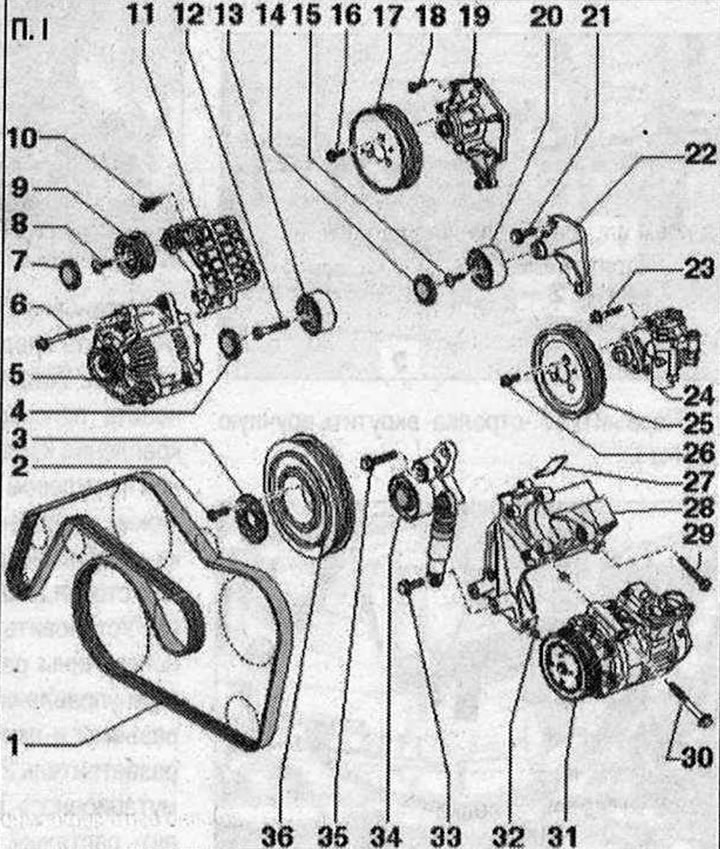
Poly V-belt drive. I 1. Poly V-belt: Check for wear; before removing, mark the direction of travel with chalk or a felt-tip pen; don't overdo it; when installing, ensure correct position on pulleys; 2. Bolt: replace; 20 Nm + 90?; 3. Compensating washer: replace; 4. Right idler roller cover; 5. Generator; 6/10/16/18/23/26/30. Bolt; 7. Guide roller cover 8/12/15/21/33. Bolt: 23 N·m; 9. Poly V-belt guide roller: on the generator bracket; install in proper position; 11. Generator and guide roller bracket; 13. Right idler roller of poly V-belt: install in the correct position; 14. Left intermediate roller cover; 17. Coolant pump belt drive pulley; installation position: the inscription "vorne" points in the direction of travel; 19. Coolant pump; 20. Left intermediate roller of the poly V-belt; 22. Guide roller bracket; 24. Vane pump; 25. Vane pump belt pulley; installation position: the inscription "vorne" points in the direction of travel; 27. Gasket: replace; 28. Additional units bracket; 29. Bolt: 40 Nm; 31. Air conditioning compressor: do not turn off/disconnect the refrigerant lines; when installing, observe the position of the mounting bushings "pos. 32"; 32. Mounting sleeve: 2 pcs.; make sure that the additional units are correctly positioned in the bracket; 34. Tensioner element of the poly V-belt. Depending on the condition of the car, the fastening thread can be made in the cylinder block for the tensioner element with M10 or M11 thread. Strictly observe the correct location of the bolts and tensioners to the cylinder block; 35. Bolt: bolts with M10 thread: 50 Nm + 90°, bolts with M11 thread: 60 Nm + 90°; replace. Different types of threads in the crankcase. Before installation, make sure which thread you are going to work with: M10 or M11. Use the appropriate bolt sizes. Risk of engine damage. Strictly observe the correct location of the bolts and tension elements to the cylinder block; 36. Torsional vibration damper with poly V-belt pulley
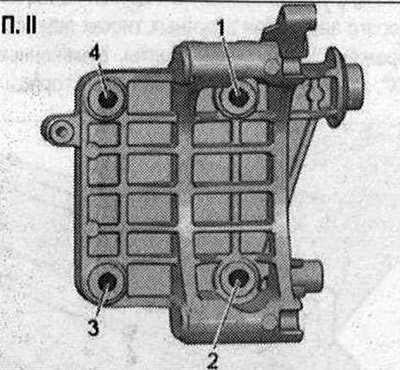
Generator Bracket and Idler Pulley - Bolt Tightening Sequence and Torque
P. II
Insert the bolts in the sequence "1...4". Tighten the bolts in the sequence "1...4" to a torque of 40 Nm.