



Table of contents: Cars with V6 diesel engine ↓ Cars with petrol engines, except for… ↓ Cars with petrol engine 1.8-I ↓ Cars with petrol engine 1.8-I ↓ Cars with 125 hp engine. ↓ Tightening torques ↓ Cars with petrol engines, except for… ↓ Cars with V6 diesel engine ↓
Removal
Please note: The rear and middle mufflers of the exhaust system are welded together, but each of them can be replaced separately.
Place the vehicle over an inspection pit or on a lift.
Remove the lower engine compartment splash shield.
Cars with V6 diesel engine
To access the exhaust manifold to turbocharger connection flange, remove the upper engine cover.
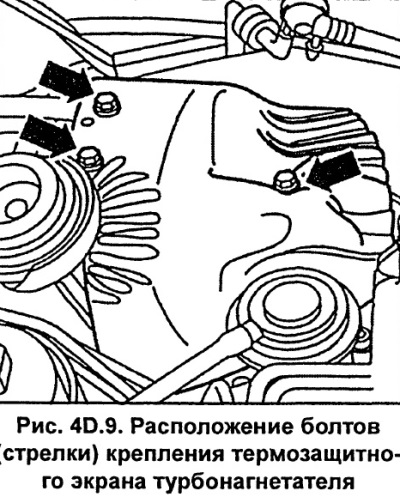
Unscrew the bolts and remove the turbocharger heat shield (see fig. 4D.9).
Lubricate the nuts and bolts of the exhaust system components with a rust destroying agent and wait for some time until the rust is completely destroyed.
Cars with petrol engines, except for 125hp engines.
Disconnect the lambda sensor electrical connector located on the engine compartment bulkhead. There are 2 lambda sensors on vehicles with six-cylinder engines.
Unscrew the exhaust pipe from the exhaust manifold and from the bottom of the turbocharger.
To prevent the exhaust system from falling, secure it to the body with soft wire. If the exhaust system falls, the catalytic converter may be damaged.
Cars with petrol engine 1.8-I
Unscrew the exhaust pipe from the transmission bracket.
While supporting the exhaust system, free it from the suspension mounts and remove it from under the vehicle.
Installation
To make it easier to subsequently unscrew the nuts and bolts that secure the system, lubricate them with Liqui Moly LM-508-ASC high-temperature paste.
Before re-installing the exhaust system components, clean the joints with sandpaper to remove any remaining sealant or rust.
Caution: Always replace gaskets and self-locking nuts.
Cars with petrol engine 1.8-I
Bolt the exhaust pipe to the transmission bracket.
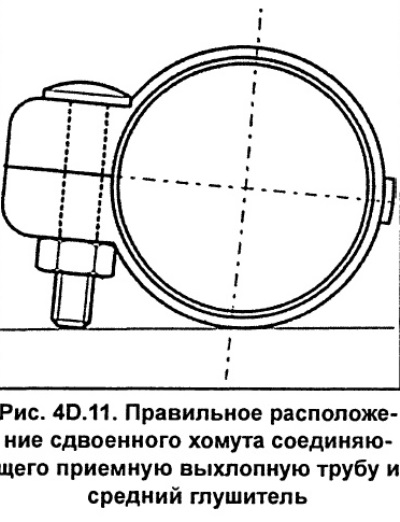
Connect the exhaust intake pipe to the middle muffler with a double clamp, positioning it so that the lower edge of the clamp mounting bolt is at the level of the extinguisher pipe (see fig. 4D.11). The bolts should be on the left side of the pipe. Do not tighten the bolts completely at this stage.
Use a double clamp to connect the middle and rear mufflers and align them relative to each other.
Install the exhaust system components into the rubber suspension mounts, but do not tighten the mounting bolts at this stage.
Bolt the exhaust manifold to the exhaust manifold and the bottom of the turbocharger, making sure the sealing gasket is seated correctly
Align the exhaust system components and check that the system is installed freely, without tension, and that the gap from the body components should be at least 25 mm.
Cars with 125 hp engine.
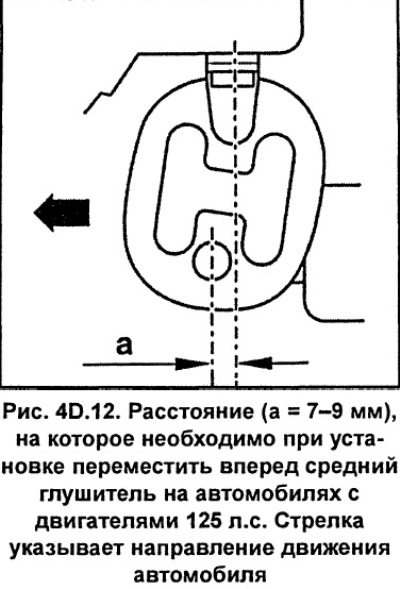
Create pre-stress by moving the middle muffler forward by 7-9 mm (see fig. 4D.12) and secure it in this position. This is necessary so that during thermal expansion as a result of heating, the exhaust system is installed in the correct position.
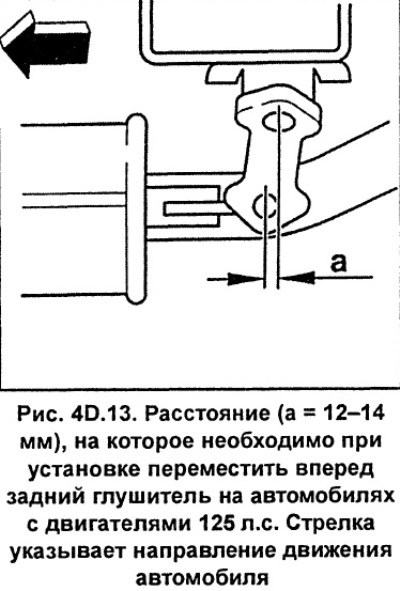
Move the rear muffler forward by 12-14 mm (see fig. 4D.13) and secure it in this position.
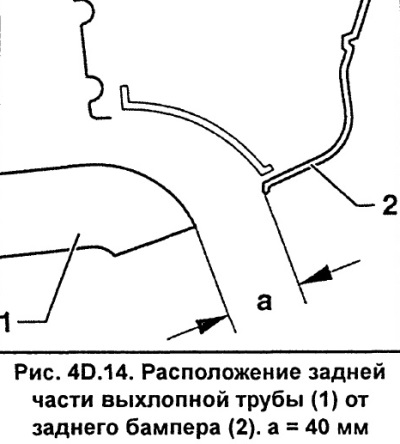
Check and, if necessary, adjust the distance between the rear of the exhaust pipe and the bumper, which should be at least 40 mm (see fig. 4D.14).
Finally tighten all bolts and nuts securing the exhaust system components.
Tightening torques
- Exhaust manifold to cylinder head - 25 Nm.
- Double clamps - 40 Nm.
Six-cylinder engine
- Exhaust inlet pipe to exhaust manifold - 25 Nm.
- Other flange connections - 30 Nm.
- Lambda sensor to catalytic converter - 50 Nm.
Engine 1.8-I
- Exhaust inlet pipe to gearbox bracket - 25 Nm.
Install the lower engine compartment splash shield.
Cars with petrol engines, except for 125hp engines.
Screw in the lambda sensor and connect its electrical connector.
Cars with V6 diesel engine
Install and bolt the turbocharger thermal shield. Install and secure the engine cover.
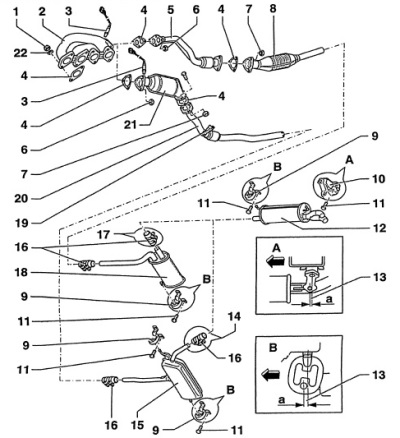
Fig. 4D.3. Exhaust system on front-wheel drive AUDI A6 vehicles with a 1.8-I petrol engine
1 - nut, 25 Nm,
2 - exhaust manifold (aJP engine),
3 - lambda sensor, 50 Nm,
4 - gasket,
5 - exhaust inlet pipe,
6 - nut, 30 Nm,
7 - nut, 25 Nm,
8 - catalyst,
9 - suspension cushion,
10 - suspension bracket,
11 - bolt, 25 Nm,
12 - additional muffler,
13 - distance (a = 7-9 mm) of preliminary tension of the exhaust system in a cold state,
The arrow indicates the direction of movement,
14 - exhaust pipe connection point,
15 - central muffler,
16 - double clamp, 40 Nm,
17 - exhaust pipe connection point,
18 - middle muffler,
19- suspension,
20 - exhaust inlet pipe,
21 - catalyst,
22 - washer.
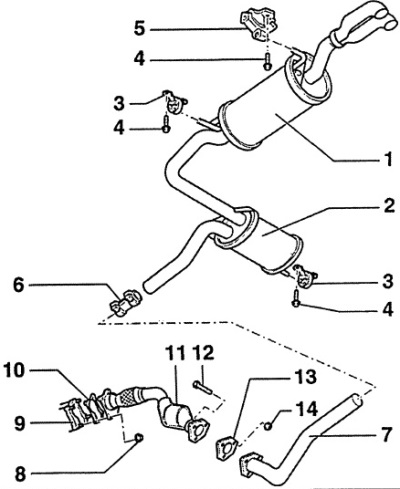
Fig. 4D.4. Exhaust system on front-wheel drive AUDI A6 vehicles with a 1.9-I-TDI 110 hp diesel engine and all-wheel drive vehicles
1 - additional muffler,
2 - middle muffler,
When replacing the muffler, the cut must be made at a distance of 140-150 mm in front of the central muffler.
3 - suspension cushion,
4 - bolt, 25 Nm,
5 - suspension cushion,
6 - double clamp, 40 Nm,
7 - intermediate pipe,
8 - nut, 25 Nm,
9 - turbocharger,
10 - gasket,
11 - catalytic converter,
12 - bolt, 25 Nm,
13 - gasket,
14 - nut, 25 Nm
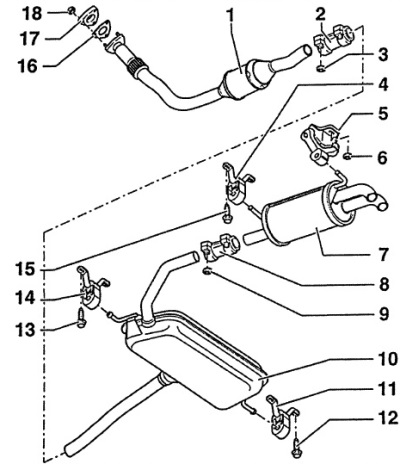
Fig. 4D.5. Exhaust system on front-wheel drive AUDI A6 vehicles with a V6 diesel engine
1 - catalytic converter,
2 - double clamp,
3 - nut, 40 Nm,
4 - suspension cushion,
5 - suspension cushion,
6 - nut, 25 Nm,
7 - rear muffler,
8 - double clamp,
9 - nut, 40 Nm,
10 - muffler,
11 - suspension,
12 - bolt, 25 Nm,
13 - bolt, 25 Nm,
14 - suspension cushion,
15 - bolt, 25 Nm,
16 - gasket,
A new gasket must be used during installation.
17 - turbocharger,
18 - nut, 25 Nm.
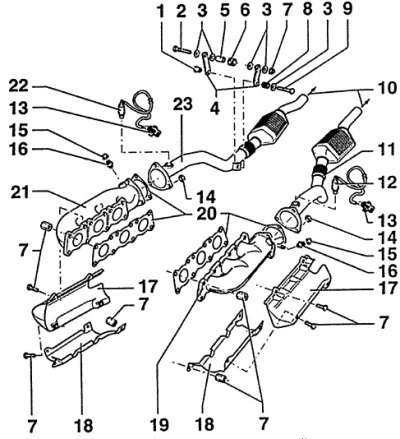
Fig. 4D.6. Exhaust manifolds and exhaust pipes on AUDI A6 cars with a V6 petrol engine
1 - bushing,
2 - bolt,
3 - washer,
4 - bracket,
5 - bushing,
6 - rubber bushing,
7 - nut, 25 Nm,
8 - spring,
9 - bolt, 25 Nm,
10 - to the middle mufflers,
11 - left exhaust pipe with catalytic converter,
12 - lambda sensor No.2, 50 Nm,
13 - 4-pin black electrical connector,
14 - nut, 25 Nm,
15 - cap, 10 Nm,
16 - branch pipe,
17 - upper heat shield,
18 - lower heat shield,
19 - left exhaust manifold,
20 - gasket,
A new gasket must be used during installation.
21 - right exhaust manifold,
22 - oxygen sensor No.1, 50 Nm,
23 - right inlet pipe with catalytic converter.
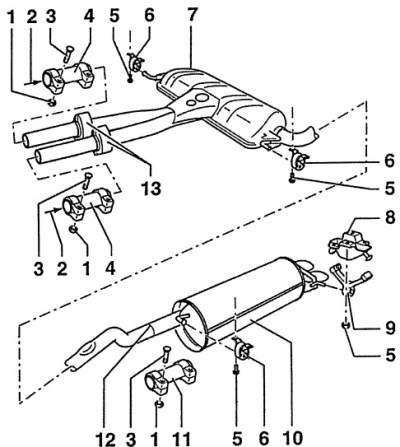
Fig. 4D.7. Central and rear mufflers on front-wheel drive AUDI A6 cars with a V6 petrol engine
1 - nut, 40 Nm,
2 - from the catalytic converter,
3 - bolt,
4 - double clamp,
5 - bolt, 25 Nm,
6 - suspension cushion,
7 - middle muffler,
8 - suspension bracket,
9 - suspension cushion,
10 - rear muffler,
11 - double clamp,
13 - muffler.
Note: The rear muffler on all-wheel drive vehicles is similar to the muffler shown in Fig. 4D.8.
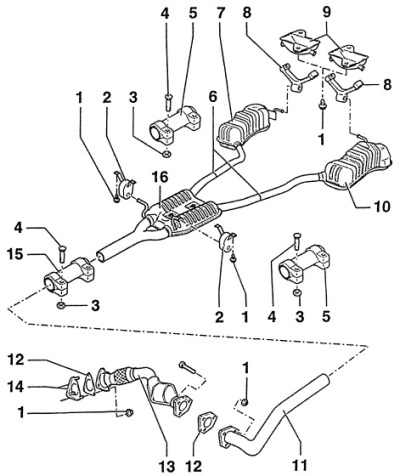
Fig. 4D.8. Exhaust system on all-wheel drive AUDI A6 vehicles
1 - nut, 25 Nm,
2 - suspension cushion,
3 - nut, 40 Nm,
4 - bolt,
5 - double clamp, 40 Nm,
6 - place of pipe cutting,
7 - rear right muffler,
8 - suspension cushions,
9 - suspension brackets,
10 - rear left muffler,
11 - connecting pipe,
12 - gasket,
13 - catalytic converter,
14 - turbocharger,
15 - double clamp, 40 Nm,
16 - middle muffler.
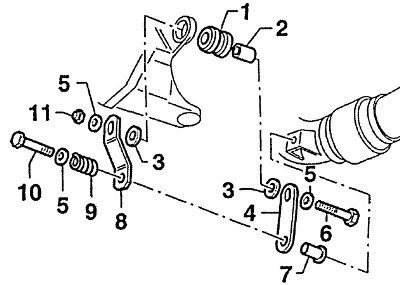
Fig. 4D.10. Details of the exhaust pipe support bracket
1 - buffer,
2 - bushing,
3 - washer,
4 - right overlay,
5 - washer,
6 - bolt,
7 - bushing,
8 - left overlay,
9 - spring,
10 - bolt,
11 - self-locking nut, 25 Nm.