
Removal 4-cylinder petrol engine
Place the vehicle over an inspection pit or on a lift.
Remove the lower engine splash shield.
Drain the engine oil by loosening the oil drain plug about half a turn. Place a container to drain the oil under the drain plug and unscrew the plug completely. If necessary, apply pressure to the plug as you unscrew it to prevent the oil from leaking prematurely.
When the oil has completely drained, screw the oil drain plug back into place.
Remove the poly V-belt.
Cars with air conditioning.Unscrew the tension roller of the poly V-belt of the air conditioning compressor drive and remove the belt.
Engine 1.8-I/150 hp. Using a 5mm diameter steel rod, secure the radiator fan pulley from turning and unscrew and remove the radiator fan from the back of the pulley (see fig. 2.87).
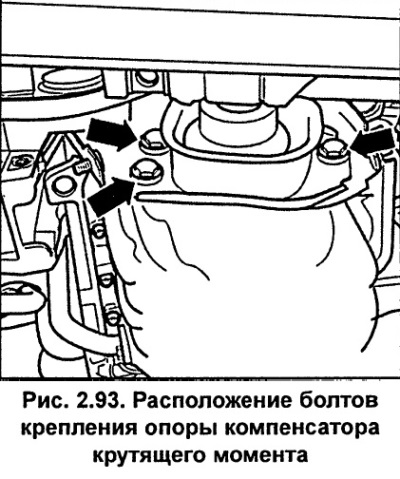
Remove the bolts securing the torque compensator support to the engine and bracket and leave the support in place (see fig. 2.93).
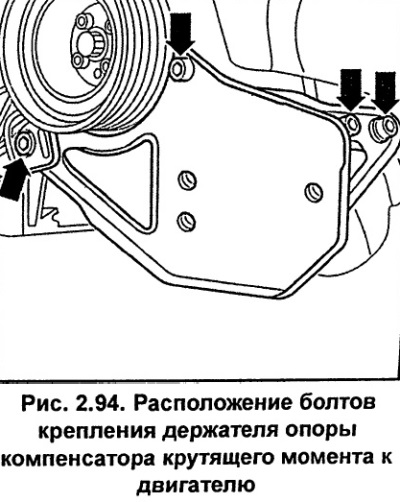
Unscrew the torque compensator support bracket from the engine (see fig. 2.94).
Engine 1.8-I/150 hp. Disconnect the electrical wires from the oil pan that go to the starter. Loosen the clamp and remove the air pipe from the turbocharger.
Engine 1.8-I/150 hp. Unscrew the upper nut securing the left engine mount.
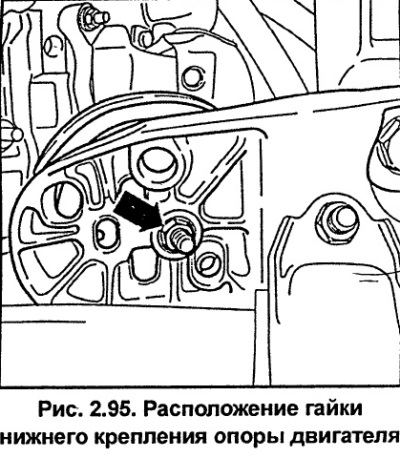
Unscrew the nuts securing both engine mounts (see fig. 2.95).
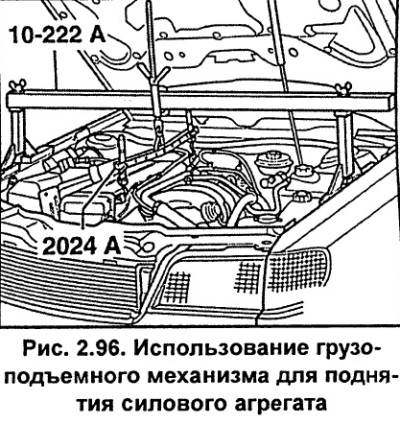
Attach the power unit with the slings of the lifting mechanism and lift it so that its lower part just touches the front wall of the body (see fig. 2.96).
Engine 1.8-I/150 hp. Remove the left engine mount. Also unscrew the oil return line from the turbocharger to the oil pan.
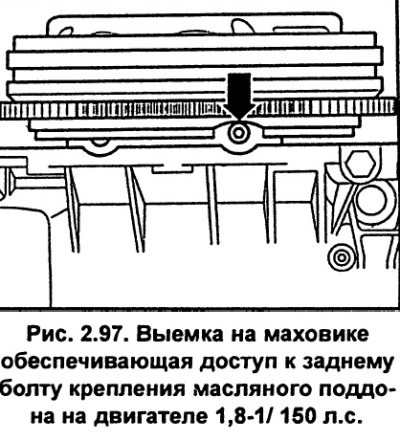
Remove the oil pan mounting bolts. To access the rear oil pan mounting bolts on the 1.8-I/150hp engine, rotate the engine crankshaft to a position where the notch in the flywheel is positioned under the bolt (see fig. 2.97).
Remove the oil pan. If the pan does not come off, knock it off with light blows of a rubber mallet.
Engine 1.8-I/150 hp. Rotate the oil pan forward and to the left while pushing down on the lower radiator hose and remove it.
Installation
Using a plastic or wooden scraper, remove any old gasket from the mating surfaces of the cylinder block and oil pan.
Install a new oil pan gasket.
Tighten the oil pan mounting bolts evenly and gradually. Do not overtighten the bolts, otherwise the oil pan gasket will be deformed.
Engine 1.8-I/150 hp. Tighten the oil pan to gearbox mounting bolts to 45 Nm.
Tighten the oil pan mounting bolts to 10 Nm and the M10 bolts to 45 Nm.
Engine 1.8-I/150 hp. Screw the turbocharger oil return line into the oil pan with a new gasket and tighten the bolts to 10 Nm.
Lower the engine and remove the hoisting gear straps. The engine is 150 hp. When lowering, install the left support.
Tighten the support mounting nuts to a torque of 25 Nm.
Screw in the torque compensator support bracket and tighten the bolts to 40 Nm on the 125 hp engine and to 25 Nm on the 150 hp engine.
Secure the wires going to the starter to the oil pan.
Engine 1.8-I/150 hp. Install the radiator fan and V-belt.
Install the poly V-belt.
Cars with air conditioning.Screw on the tension roller of the poly V-belt of the air conditioning compressor drive and install the belt.
Fill the engine with engine oil. Perform a test drive and check the tightness of the oil pan installation. If necessary, slightly tighten the oil pan mounting bolts.
Engine 1.9-I-TDI
All operations and instructions for removing and installing the oil pan are similar to the operations for removing and installing the oil pan of a 4-cylinder gasoline engine. This section describes the operations that are specific only to the 1.9-I-TDl engine.
When removing the oil pan, it is not necessary to remove the engine mounts and torque compensator mounts.
To unscrew the rear oil pan mounting bolts, use the HAZET 2528-10 wrench.
Before installing the oil pan, apply AUDI-D2 or Loctite Ultra Black sealant to the transitions from the engine block to the cover.
Install the oil pan with a new gasket and tighten the bolts crosswise to 20 Nm.
[This article was previously published on the resource: Audimanual.ru]