
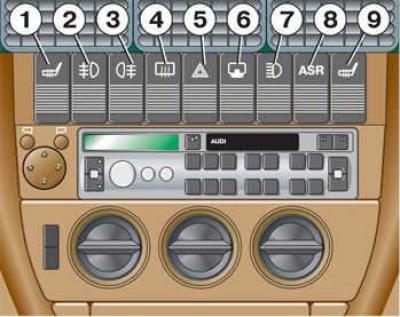
1 – Driver's seat heating switch
The switches are made in the form of ribbed handles.
When the ignition is on, you can use the electric heating of the cushions, backrests of the front and outer rear seats, and the steering wheel. The knurled handle (1) can be used to turn on and continuously adjust the heating of the driver's seat, and the handle (8) - the heating of the front passenger seat. When the seat heating is turned on, the steering wheel heating is automatically turned on. The temperature is preset and is not adjusted by the handle (1).
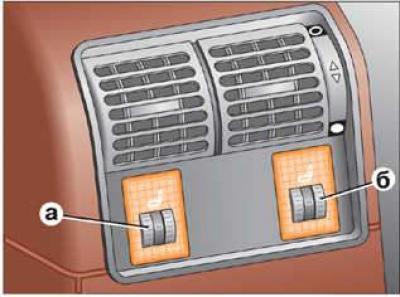
The rear seat heating is switched on and controlled independently by the knurled handles mounted in the rear part of the center console: a – left, b – right.
The rear seat heating is only activated when there are passengers in it.
To turn on the heating, the corresponding knurled handle is moved from position 0 and turned to one of six possible temperature ranges. Simultaneously with the heating system, the backlight of the digital marking of the corresponding knurled handle is also turned on.
2 – fog light switch
The fog lights come on when the parking lights, low beam or high beam are turned on.
When they are switched on, the control lamp built into the switch lights up. When the rear fog light is switched on, independent switching on of the front fog lights is impossible.
Please comply with current regulations regarding the use of fog lights.
3 – Rear fog light switch
The rear fog light only lights up when the low or high beam is on, and on cars with front fog lights, also when the parking lights are on. When the rear fog light is turned on, the front fog lights are automatically turned on as well. In this case, the indicator lights in both switches light up.
Please comply with current regulations regarding the use of fog lights.
In cars with a security alarm, an additional LED is mounted in the same switch.
4 – Rear window heating switch
Electric heating works only when the ignition is on. While it is on, the control lamp in its switch lights up.
The rear window heating switches off automatically after approximately 10 minutes.
Once visibility through the rear window is restored, its heating should be turned off. By reducing electricity consumption, you will also reduce fuel consumption.
Warning: If the rear window is equipped with a radio antenna, it is the three upper links of the conductor, which naturally do not heat up.
Electrically heated mirrors
The reflective surfaces of the mirrors are heated when the rear window heating is on.
5 – Hazard warning light switch
When the hazard warning lights are switched on, the red indicator lamp in the switch flashes synchronously with them.
In addition, the backlight of both arrows on the instrument panel flashes, confirming the operation of the turn signals. The alarm also works when the ignition is off.
Warning: Follow the rules for using hazard warning lights.
6 – fuel filter regulator (diesel) or coolant level
7 – headlight range control
The electric headlight angle adjuster allows for stepless adjustment of the optical axes while the vehicle is moving, in accordance with the actual vehicle load. This ensures that the degree of blinding of oncoming drivers does not exceed the inevitable level. At the same time, correct headlight installation creates the most favorable road visibility conditions for the driver.
To increase the angle of the light cones, turn the regulator handle downwards from the initial position (0). The marked regulator positions approximately correspond to the following vehicle loading condition:
- 0 - driver and front passenger in the car, trunk empty
- I - all seats are occupied, the trunk is empty
- II - all seats are occupied, the trunk is loaded
- III - the driver's seat is occupied, the trunk is loaded.
8 – Automatic Slip Regulation (ASR)
By reducing engine power, the ASR device prevents the drive wheels from slipping when starting off or accelerating front-wheel drive vehicles. The device works in conjunction with ABS (anti-lock braking system). If the ABS is faulty, the ASR is also inoperative. The ASR device is switched on automatically when the engine is started. If necessary, it can be switched on and off by pressing the switch. When the device is switched off, its indicator lamp lights up.
Normally, the ASR device must always be switched on. Only in certain exceptional cases, when slippage is necessary, can the device be switched off, namely:
- when driving with an emergency spare wheel installed;
- when driving with snow chains;
- when driving on deep snow or loose ground;
- when trying to get out of the car while rocking after getting stuck;
- when driving uphill with extremely different degrees of adhesion of the drive wheels (for example, under the left wheel there is ice, under the right wheel there is dry asphalt).
After this, turn on the device again.
Warning: A prerequisite for the smooth operation of the ASR is that the same type of tires are installed on all four wheels of the vehicle. Different tires may lead to an undesirable reduction in engine power.
Light switch/turn signal and low beam switch
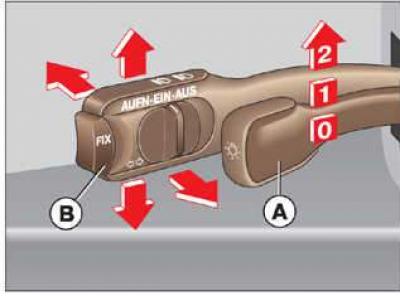
- A - light switch
- 0 - lighting off
- 1 - parking lights on
- 2 - low beam or high beam is on
- B - Lever switch for direction indicators and low beam
The headlights only light when the ignition is on.
Warning: When the key is removed from the ignition with the lights on and the driver's door open, a warning chime sounds.
The direction indicators only work when the ignition is on.
To turn on the right turn signals, move the lever up.
To turn on the left turn signals, move the lever down.
When the direction indicators are on, the indicator lamp flashes synchronously.
Once the turn is completed, the indicators turn off automatically.
Signaling a lane change
The lever is pressed up or down to the point of resistance and held in this position - the control lamp should flash synchronously.
Switching on low and high beams
To turn on the low beam, move the lever to the middle position.
To switch to high beam, press the lever forward.
Intermittent light signal
Pull the lever towards the steering wheel until you reach the point of resistance – the high beam indicator lamp comes on.
Turning on the parking lights
The parking lights only come on when the ignition is off.
To turn on the parking lights on the right, pull the lever up.
To turn on the parking lights on the left, press the lever down.