Repair Chevrolet Repair Toyota Repair Honda Repair AvtoVAZ Repair Mercedes-Benz Repair BMW Repair Opel
Home  |  Contacts  |  Sitemap  |    
English Русский
Български
Беларускі
Український
Српски
Hrvatski
Română
Polski
Slovenský
Magyar
AudiManual.ru


  • AUDI 80
  • AUDI 100
  • AUDI A3
  • AUDI A4
  • AUDI A6
  • AUDI A8
  • AUDI Q
  • OTHER
  • ARTICLES
A2 (1999-2005)

Removal and installation a turbocharger (Audi A2)

  • Home
  • Audi
  • A2 (1999-2005)
  • Engine 1.2 l (diesel)
  • Injection and turbocharging
  • Removal and installation a turbocharger
            0
Table of contents: Removal ↓ Installation ↓

Removal


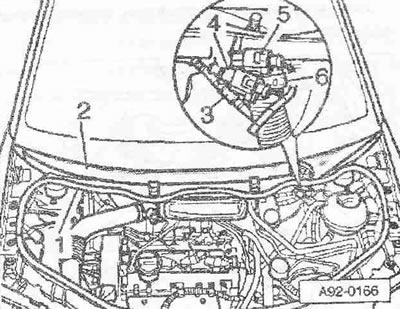
Remove the engine hood. Remove the engine cover. Remove the noise insulation screen located below by disconnecting the crankcase ventilation hose. Using a screwdriver, remove caps "3" and "4" from the windshield wiper arms. Unscrew the nuts on both arms a few turns. Release arms "1" and "2" by slightly tilting them on the windshield wiper axles. Unscrew the nuts completely and remove the windshield wiper arms.

Disconnect the windshield washer fluid tube «3». Disconnect the plug connectors «4» and «5» of the…


Disconnect the windshield washer fluid tube "3". Disconnect the plug connectors "4" and "5" of the heated washer nozzles. Release the hose clamp "6" using hose clamp pliers "V.A.G 1921" remove the drain hose from the fairing grille. Remove the rubber seal "1" of the fairing grille. Remove the fairing grille "2".

Unscrew the bolts and nuts of the «arrows». Remove the fresh air intake duct and hang it on the…


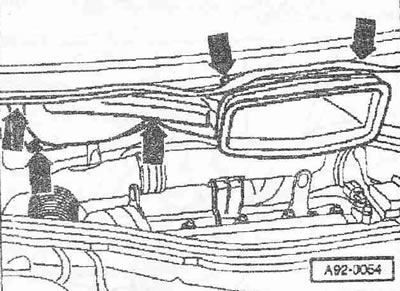
Unscrew the bolts and nuts of the "arrows". Remove the fresh air intake duct and hang it on the right side of the car.


Disconnect plug connector «2» of air flow meter «G70». Disconnect vacuum hose «1». Release hose…


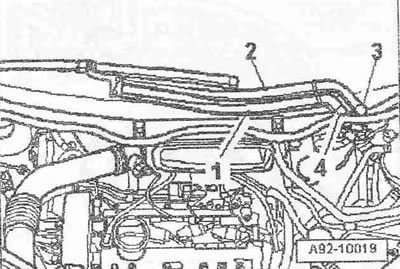
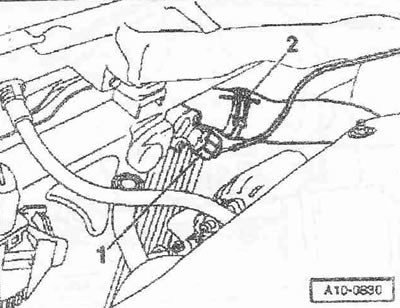
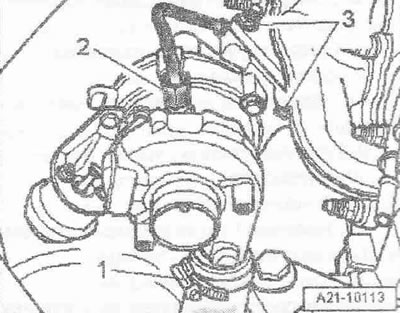
Disconnect plug connector "2" of air flow meter "G70". Disconnect vacuum hose "1". Release hose clamp "4" and remove air duct with air flow meter "G70". Unscrew nut "3".

Remove the air hose «2» connecting the intercooler and the intake manifold. Ignore item «1».


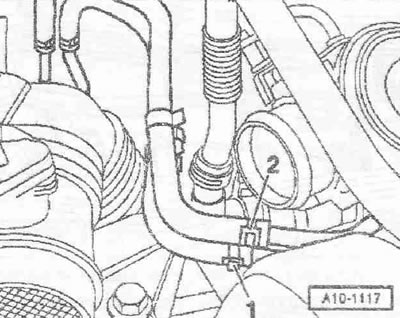
Remove the air hose "2" connecting the intercooler and the intake manifold. Ignore item "1".

Disconnect vacuum hose «1» from mechanical recirculation valve 0G. Remove vacuum hose «2» from…


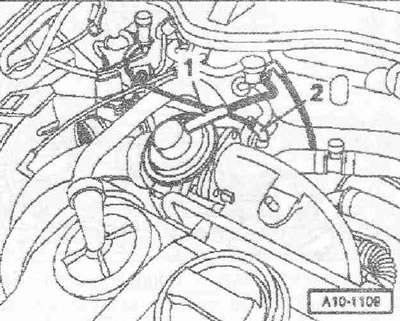
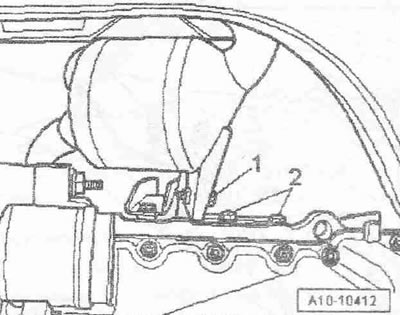
Disconnect vacuum hose "1" from mechanical recirculation valve 0G. Remove vacuum hose "2" from throttle control valve "N₂11".


Warning! The temperature of the fuel lines or fuel in vehicles equipped with a unit injector engine can reach 100°C. Allow the fuel to cool before disconnecting the fuel lines, otherwise severe burns may occur.


Mark and disconnect the fuel pressure line «2» and the fuel return line «1».


Mark and disconnect the fuel pressure line "2" and the fuel return line "1".

Unscrew the «arrow» bolts and remove the air duct from the turbocharger.


Unscrew the "arrow" bolts and remove the air duct from the turbocharger.

Unscrew bolts «2» on the pre-catalyst bracket. Ignore item «1».


Unscrew bolts "2" on the pre-catalyst bracket. Ignore item "1".


Loosen the nuts of the «arrow» threaded connection of the pre-catalyst with the turbocharger.


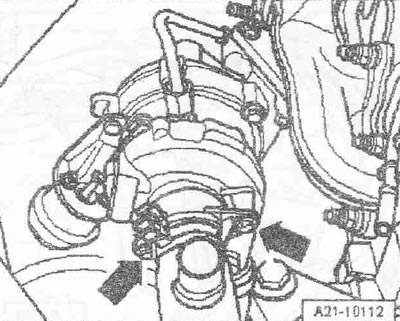
Loosen the nuts of the "arrow" threaded connection of the pre-catalyst with the turbocharger.

Instructions: The detachable element between the pre-catalyst and main catalyst must not be bent more than 10°. Risk of damage!


Disconnect the pre-catalyst from the turbocharger. Tie the pre-catalyst to the body.

Clamp the coolant hoses leading to the EGR radiator using hose clamps «3094». Remove the coolant…


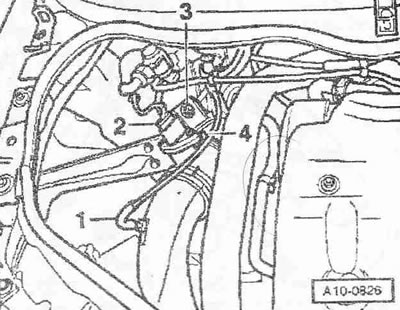
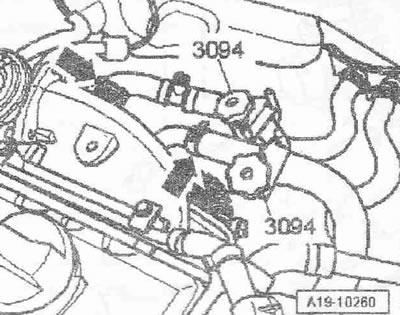
Clamp the coolant hoses leading to the EGR radiator using hose clamps "3094". Remove the coolant hoses "arrows" from the EGR radiator.

Unscrew bolts «2» and «3», as well as nuts «1», and remove the EGR radiator.


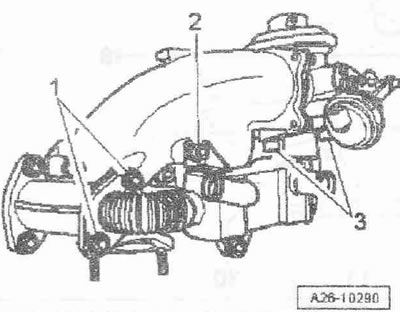
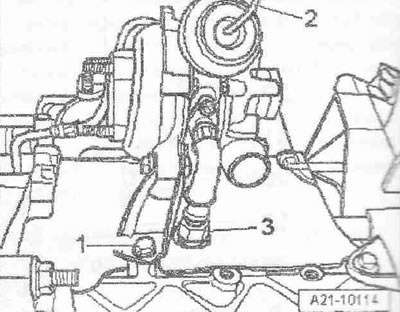
Unscrew bolts "2" and "3", as well as nuts "1", and remove the EGR radiator.


Unscrew the «arrow» bolts and remove the intake manifold.


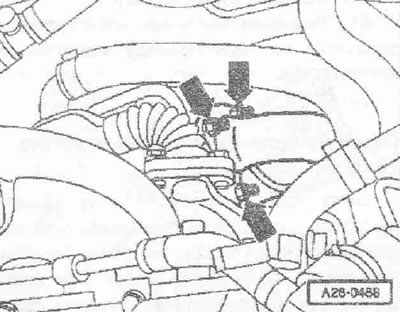
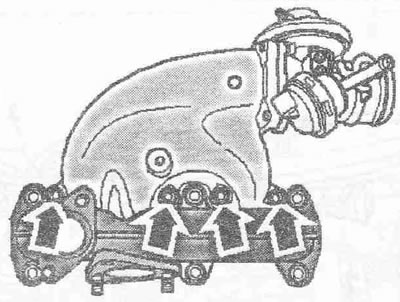
Unscrew the "arrow" bolts and remove the intake manifold.

Remove the air hose «1» from the turbocharger. Unscrew the pressure oil line «2» from the…


Remove the air hose "1" from the turbocharger. Unscrew the pressure oil line "2" from the turbocharger. Unscrew the 3 nuts "3" of the turbocharger.

Remove the vacuum hose «2» from the vacuum boost pressure regulator and release it. Remove the oil…


Remove the vacuum hose "2" from the vacuum boost pressure regulator and release it. Remove the oil return line "3" from the cylinder block. Unscrew the support "1" of the turbocharger from the cylinder block. Remove the turbocharger upwards.


Installation


Installation is in the reverse order, replacing the gaskets, cuffs and self-locking nuts. Fill the…


Installation is in the reverse order, replacing the gaskets, cuffs and self-locking nuts. Fill the turbocharger with oil through the connecting pipe of the pressure oil line. The supercharging system must be sealed. The hoses and pipes of the air supercharging system must be cleaned before installing oils and grease. Use clamps of the appropriate series to secure all hose connections. Install the intake manifold. Install the primary main catalytic converter. Install and adjust the windshield wiper arms. Check the oil level.

Instructions: After installing the turbocharger, leave the engine to idle (do not increase the speed for 1 minute to ensure that oil is supplied to the turbocharger.


Tightening torques:
  • Turbocharger to exhaust manifold: 25 Nm 1)
  • Turbocharger support to cylinder block: 20 Nm
  • Cylinder block oil return line: 30 Nm
  • Pressure oil line to turbocharger: 22 Nm
  • Intake manifold to cylinder head: 25 Nm
  • EGR cooler to mechanical EGR valve: 25 Nm
  • EGR cooler to intake manifold: 25
  • EGR cooler to exhaust manifold: 25
  • Air duct to turbocharger: 8 Nm

1) Replace the nuts.

(The article was copied from the website AUDImanual.ru)
The article was checked by auto expert Daniil Ushakov
This article is available at russian, bulgarian, belarusian, ukrainian, serbian, croatian, romanian, polish, slovak, hungarian

Share information:
Previous articles
Audi A2: Injection and turbocharging
Next articles

Turbocharger — design description
Connection plan for the boost pressure control system
Rules for maintaining cleanliness
Removal and installation the intercooler
Locations of installation of parts and units on a car with an…
Exhaust system — design description
Exhaust Gas Recirculation System — Design Description


Similar articles on other Audi car models:
Turbocharger — removal and installation Audi 80 B4 (1991-1996)
Removal and installation of turbocharger of MPI and MPFI… Audi 100 C4 (1990-1994)
Removal and installation the lower engine compartment cover Audi A3 Type 8L (1996-2003)
Removal and installation a turbocharger Audi A4 B7 (2004-2008)
Device, removal and installation of turbocharger Audi A6 C4 (1994-1997)
Device, removal and installation of turbocharger Audi A8 D2 (1994-2002)
Turbocharger — removal and installation Audi Q5 Type 8R (2008-2017)
Link to this page in different formats


Visitor comments

No comments yet


How much will 27 + 35 =


Audi A2(1999-2005) 
  • General information
  • Introduction to the guide
  • Maintenance
  • Engine 1.4 l (gasoline)
  • Engine repair
  • Lubrication system
  • Cooling system
  • Exhaust system
  • Engine 1.6 l (gasoline)
  • Engine repair
  • Lubrication system
  • Cooling system
  • Exhaust system
  • Engine 1.2 l (diesel)
  • Engine repair
  • Lubrication system
  • Cooling system
  • Injection and turbocharging
  • Engine 1.4 l (diesel)
  • Engine repair
  • Lubrication system
  • Cooling system
  • Turbocharging system
  • Supply system
  • Fuel injection system
  • Exhaust system
  • Transmission
  • Mechanical gearbox 02J
  • Mechanical gearbox 02T
  • Mechanical gearbox 085 DS
  • Chassis
  • Car suspension
  • Steering
  • Brake system
  • Body
  • Exterior
  • Interior
  • Seats
  • Doors, locks and windows
  • Safety system
  • Heating and air conditioning
  • Electrical equipment
  • Power devices
  • Equipment and devices
  • Wipers and washers
  • Lighting and lamps
  • Breakers and switches
  • Electrical circuits
 
AudiManual.ru © 2017-2026 · Mobile version · Feedback · Sitemap: EN BG BY UA RS HR RO PL SK HU · Site search · News and articles
80 B2 · 80 B3 petrol · 80 B3 · 80 B4 · 100 C3 diesel · 100 C3 petrol · 100 C3 · 100 C4 petrol · 100 C4 · A3 Type 8L · A4 B5 petrol · A4 B5 · A4 B6 petrol · A4 B6 · A4 B7 · A4 B8 · A6 C4 · A6 C5 · A6 C5 Allroad · A8 D2 · Q5 Type 8R · Q7 Typ 4L · Audi A2 ·
This site uses cookies 🍪. Click the button to accept this fact.