Repair Chevrolet Repair Toyota Repair Honda Repair AvtoVAZ Repair Mercedes-Benz Repair BMW Repair Opel
Home  |  Contacts  |  Sitemap  |    
English Русский
Български
Беларускі
Український
Српски
Hrvatski
Română
Polski
Slovenský
Magyar
AudiManual.ru


  • AUDI 80
  • AUDI 100
  • AUDI A3
  • AUDI A4
  • AUDI A6
  • AUDI A8
  • AUDI Q
  • OTHER
  • ARTICLES
A2 (1999-2005)

Crankshaft — design description (Audi A2)

  • Home
  • Audi
  • A2 (1999-2005)
  • Engine 1.4 l (diesel)
  • Engine repair
  • Crankshaft — design description
            0
Instructions: Lubricate all supporting and working surfaces with oil.
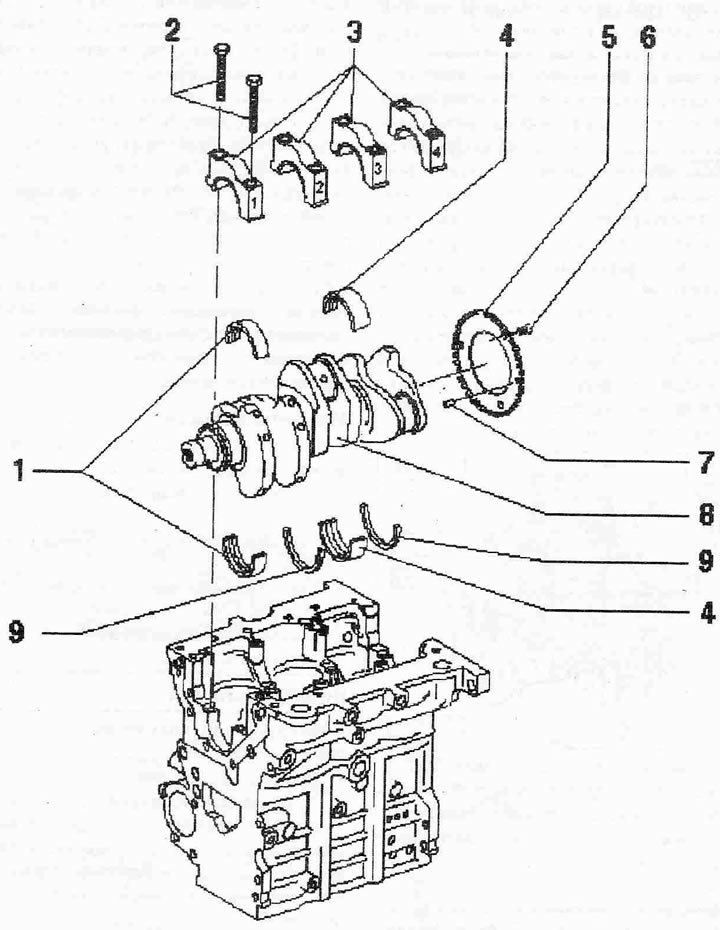

Crankshaft:

Crankshaft:
1. Bearing insert 1, 2, and 4 for cover without lubrication groove, for cylinder block with lubrication groove. Do not interchange previously used bearing inserts (when removing, mark)
2. Bolt. Replace. 65 Nm + tighten by +90°. To measure the radial clearance, tighten by 65 Nm, but do not tighten further
3. Bearing cap Bearing cap 1: Belt pulley side The locking lugs of the cylinder block bearing shells/bearing caps should match each other
4. Bearing insert 3 for cover without lubrication groove, for cylinder block with lubrication groove
5. Speed sensor sprocket "G28". Replace the sprocket after each loosening of the bolts
6. Bolt. Replace, 10 Nm + tighten by +90°
7. Dowel pin. Check protrusion from crankshaft
8. Crankshaft. Before removing, prepare a suitable storage place so as not to damage the sprocket "pos. 5". New axial clearance: 0.07...0.17 mm; wear limit: 0.37 mm. Measure radial clearance using Plastigage strips. New radial clearance: 0.03...0.08 mm; wear limit: 0.17 mm. When measuring the radial clearance, do not rotate the crankshaft
9. Cylinder block adjusting washer, bearing 3


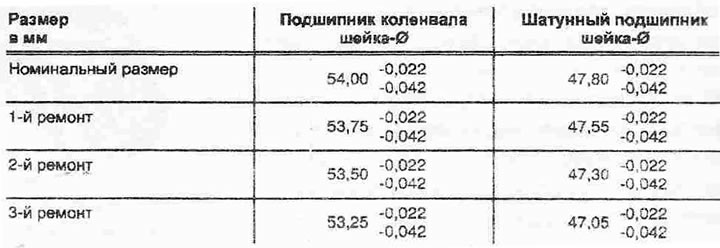
Crankshaft dimensions


Crankshaft — design description


[The article is a reprint of material from: AUDIMANUAL]
The article was checked by auto expert Daniil Ushakov
This article is available at russian, bulgarian, belarusian, ukrainian, serbian, croatian, romanian, polish, slovak, hungarian

Share information:
Previous articles
Audi A2: Engine repair
Next articles

Removal and installation the balance shaft and crankshaft frame
Balance shaft and crankshaft frame — design description
Removal and installation the sealing flange from the gearbox side
Removal and installation a dual mass flywheel
Removal and installation the crankshaft sprocket
Checking the protrusion of the dowel pin from the crankshaft
Removal and installation the drive sprocket of the chain drive
Cylinder head — design description


Similar articles on other Audi car models:
Description of the dashboard Audi 80 B3 (1986-1991, petrol)
Heater — design description Audi 100 C3 (1982-1990, petrol)
Checking the crankshaft Audi A3 Type 8L (1996-2003)
Engine lubrication system — design description Audi A4 B6 (2000-2006, petrol)
Crankshaft — design description Audi A6 C5 Allroad (1999-2005)
Crankshaft Audi A8 D2 (1994-2002)
Crankshaft. Scheme Audi Q5 Type 8R (2008-2017)
Link to this page in different formats


Visitor comments

No comments yet


How much will 15 + 21 =


Audi A2(1999-2005) 
  • General information
  • Introduction to the guide
  • Maintenance
  • Engine 1.4 l (gasoline)
  • Engine repair
  • Lubrication system
  • Cooling system
  • Exhaust system
  • Engine 1.6 l (gasoline)
  • Engine repair
  • Lubrication system
  • Cooling system
  • Exhaust system
  • Engine 1.2 l (diesel)
  • Engine repair
  • Lubrication system
  • Cooling system
  • Injection and turbocharging
  • Engine 1.4 l (diesel)
  • Engine repair
  • Lubrication system
  • Cooling system
  • Turbocharging system
  • Supply system
  • Fuel injection system
  • Exhaust system
  • Transmission
  • Mechanical gearbox 02J
  • Mechanical gearbox 02T
  • Mechanical gearbox 085 DS
  • Chassis
  • Car suspension
  • Steering
  • Brake system
  • Body
  • Exterior
  • Interior
  • Seats
  • Doors, locks and windows
  • Safety system
  • Heating and air conditioning
  • Electrical equipment
  • Power devices
  • Equipment and devices
  • Wipers and washers
  • Lighting and lamps
  • Breakers and switches
  • Electrical circuits
 
AudiManual.ru © 2017-2026 · Mobile version · Feedback · Sitemap: EN BG BY UA RS HR RO PL SK HU · Site search · News and articles
80 B2 · 80 B3 petrol · 80 B3 · 80 B4 · 100 C3 diesel · 100 C3 petrol · 100 C3 · 100 C4 petrol · 100 C4 · A3 Type 8L · A4 B5 petrol · A4 B5 · A4 B6 petrol · A4 B6 · A4 B7 · A4 B8 · A6 C4 · A6 C5 · A6 C5 Allroad · A8 D2 · Q5 Type 8R · Q7 Typ 4L · Audi A2 ·
This site uses cookies 🍪. Click the button to accept this fact.