
Instructions: Lubricate all supporting and working surfaces with oil.
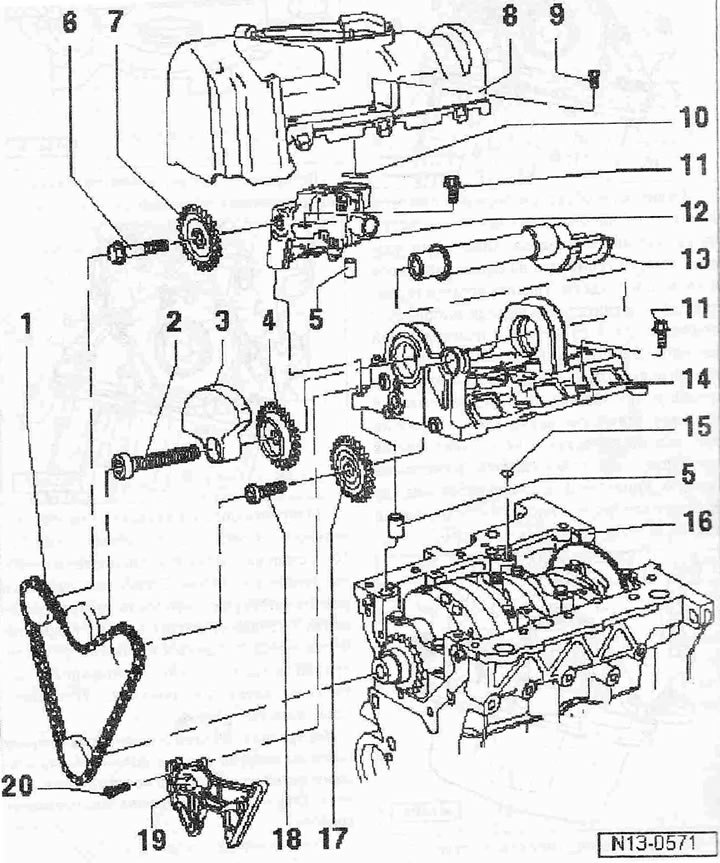
Balance shaft and crankshaft frame:
1. Chain. Observe the installation position
2. Bolt. Replace (use combination wrench "T10061" to loosen and tighten) 100 Nm + turn further by +90°
3. Counterweight. Installation is possible in only one position
4. Balance shaft sprocket. Installation is possible in only one position
5. Mounting sleeve
6. Bolt. Replace 20 Nm + tighten by +90°
7. Oil pump sprocket. Installation is possible in only one position
8. Oil separator with sealing tape
9. Bolt, 5 Nm
10. Sealing ring. Replace. Check for secure fit, lightly lubricate with oil for installation
11. Bolt. Oil pump to crankshaft frame: 20 Nm + turn further by +90°; replace bolt, crankshaft frame to cylinder block: 14 Nm + turn further by +180°; replace bolt
12. Oil pump with 11.5 bar safety valve. Before installation, check the presence of both centering sleeves "pos. 5" for centering
13. Balance shaft
14. Crankshaft frame. Before installation, check the presence of centering bushings in the cylinder block and the installation of the sealing ring in the crankshaft frame
15. Sealing ring. Replace and check for proper fit in crankshaft frame
16. Cylinder block
17. Roller sprocket
18. Bolt, 20 Nm
19. Fix the chain tensioner with the "T10060 A" chain tensioner slide for removal
20. Bolt. Replace. 8 Nm + tighten by +90°