



Table of contents: Removal ↓ Installation ↓
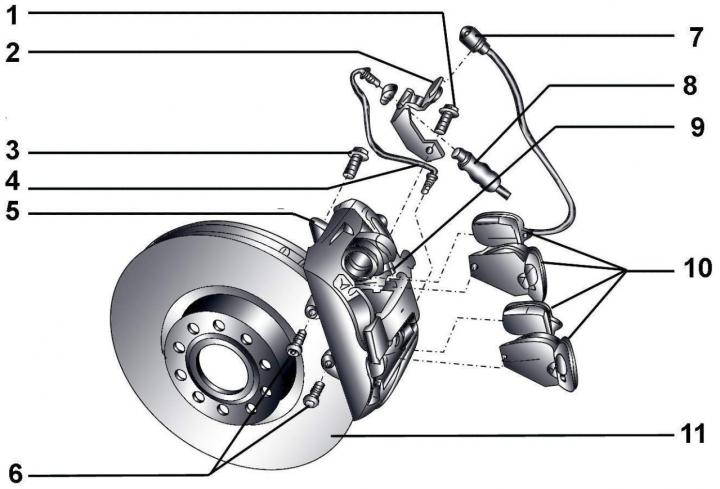
Fig. 15–8. HP-2 front brake: 1 – bolt, 25 Nm; 2 – bracket; 3 – bolt, 200 Nm; 4 – brake hose, 15 Nm; 5 – brake caliper with mass shock absorber; 6 – Torx bolts, 25 Nm; 7 – connector; 8 – brake pipe; 9 – holder; 10 – brake pads equipped with a mass shock absorber and a spring that eliminates high-frequency vibrations (squealing); 11 – brake disc
The front brake device is shown in Fig. 15–8.
Removal
Be sure to replace all the pads on one axle of the vehicle, even if only one pad is worn. The brake pads are equipped with a wear indicator. If the thickness of the brake pads becomes less than 3 mm, a warning lamp lights up in the instrument cluster.
If old brake pads are to be reinstalled, they must be marked before removal.
Loosen the front wheel mounting bolts, then raise the front of the car and secure it on stands. Unscrew the mounting bolts and remove the wheel.
Secure it brake disc, screwing in one wheel mounting bolt.
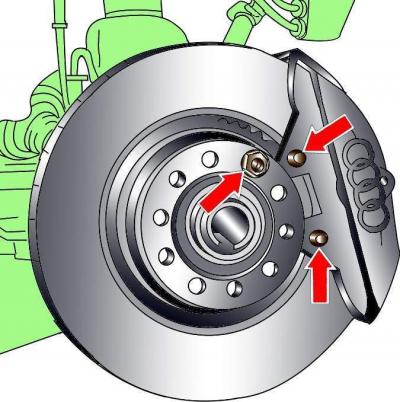
Fig. 15–9. Location of outer brake pad and brake disc mounting bolts
Unscrew the two bolts securing the outer brake pads (Fig. 15–9).
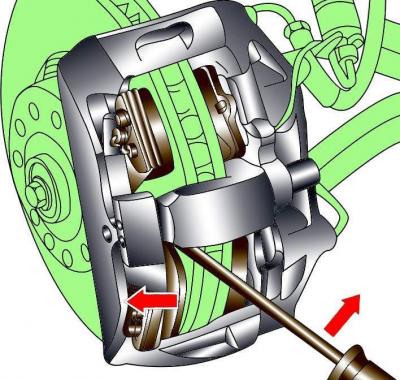
Fig. 15–10. Using a screwdriver to push the pistons into the caliper
Using a screwdriver blade inserted between the caliper and the outer brake shoe, push the pistons into the caliper, moving the caliper outward (Fig. 15-10). When the piston is pushed in, brake fluid is forced out of the brake cylinder into the expansion tank, so constantly monitor the fluid level in the tank and, if necessary, pump out a small amount from the tank.
Remove the outer brake pads from the caliper.
Disconnect the electrical connector of the brake pad wear sensor and remove the wire from the bracket in the caliper. To do this, use a screwdriver blade to push the rubber bushing with the wire out of the bracket and turn it 90° first in one direction, then in the other.
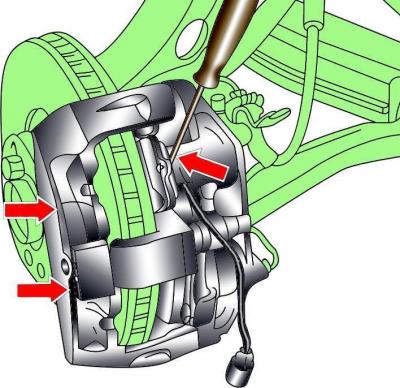
Fig. 15–11 Using a screwdriver to move the caliper toward the vehicle
Using a screwdriver blade inserted between the caliper and the inner brake shoe, move the front brake caliper toward the vehicle (Fig. 15–11).
Remove the inner brake pads from the caliper.
Installation
Do not press the brake pedal when the brake pads are removed.
Clean any dust or dirt from the caliper and any rust from the edge of the brake disc. If the pads are still serviceable, clean them with a wire brush and rag.
Check it out brake disc for cracks, especially around the holes for the wheel mounting bolts, as well as for wear or mechanical damage, and replace it if necessary.
Measure the thickness of the brake disc.
Install the upper inner brake pad with wear sensor into the front brake caliper. Secure the brake pad into the caliper piston. Secure the wear sensor wire into the caliper bracket.
Move the front brake caliper away from the car as far as possible. Remove the protective film from the adhesive layer of the outer brake pads and install them on the caliper, making sure that the brake pad is fixed with a spring.
There is an arrow on the brake pad. It must match the direction of rotation of the disc when the car is moving forward. Otherwise, the brake pads will make extraneous noise during operation.
Secure the floating caliper with new bolts, tightening them to a torque of 25 Nm.
Unscrew the wheel mounting bolt that secures the brake disc. Install the wheel and lower the vehicle to the ground. After cleaning the ribbed bolt heads, tighten the wheel mounting bolts to 120 N·m.
Replace the brake pads on the second front wheel in the same way.
Press the brake pedal several times to press the brake pads against the brake disc.
Check the brake fluid level in the reservoir and top up if necessary.
After installing new brake pads, avoid sudden braking for the first 200 km of the vehicle's mileage.