
Repair Chevrolet Repair Toyota Repair Honda Repair AvtoVAZ Repair Mercedes-Benz Repair BMW Repair Opel
Home  |  Contacts  |  Sitemap  |    
English Русский
Български
Беларускі
Український
Српски
Hrvatski
Română
Polski
Slovenský
Magyar
AudiManual.ru


  • AUDI 80
  • AUDI 100
  • AUDI A3
  • AUDI A4
  • AUDI A6
  • AUDI A8
  • AUDI Q
  • OTHER
  • ARTICLES
D2 (1994-2002)

Checking the ABS sensor rotor (Audi A8 D2)

  • Home
  • Audi A8
  • D2 (1994-2002)
  • Chassis
  • Brake system
  • Checking the ABS sensor rotor
            0
Loosen the front wheel mounting bolts, then raise the front of the car and secure it on stands. Remove the front wheel.

Remove the ABS sensor from the steering knuckle.
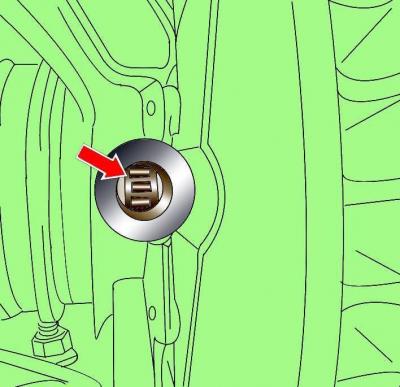
Remove the ABS sensor from the steering knuckle.


Fig. 15–3. Checking the condition of the ABS sensor rotor through the ABS sensor installation hole


While rotating the drive shaft through the ABS sensor installation hole (Fig. 15–3), gradually check the ABS sensor rotor for damage and contamination.

If there is damage to the rotor, it is necessary to replace the outer CV joint of the drive shaft.

If the ABS sensor rotor is dirty, clean it from dirt. To access the ABS sensor rotor, unscrew the bolt securing the drive shaft to the hub and move the shaft inward.

Under no circumstances should the vehicle be lowered onto its wheels with one or two drive shafts removed, as this will damage the wheel hub bearings. If it is necessary to place the vehicle on its wheels and move it with the drive shafts removed, install the outer CV joint instead of the shaft and tighten its mounting bolt to a torque of 50 Nm.

Install the drive shaft into the hub and secure it with a bolt, tightening it to a torque of 190 Nm and turning it an additional 180°.
The article was checked by auto expert Nikita Rudakov
This article is available at russian, bulgarian, belarusian, ukrainian, serbian, croatian, romanian, polish, slovak, hungarian

Share information:
Previous articles
Audi A8 D2: Brake system
Next articles

General recommendations for operation and repair of anti-lock…
Electronic Stability Program (ESP)
Anti-lock braking system (ABS)
General information about the braking system
Replacing the front brake pads FN-3
Replacing the front brake pads HP-2
Replacing the front brake pads Brembo
Replacing rear brake pads


Similar articles on other Audi car models:
Checking the distributor rotor Audi 80 B3 (1986-1991)
Checking the coolant temperature sensor Audi 100 C3 (1982-1990)
Checking the oil pressure and oil pressure gauge sensor Audi A3 Type 8L (1996-2003)
Checking oil pressure and pressure sensor Audi A4 B6 (2000-2006)
Checking oil pressure and oil pressure sensor Audi A6 C5 (1997-2004)
Checking the fuel level sensor «G» Audi Q5 Type 8R (2008-2017)
Checking oil pressure and oil pressure sensor Audi A2 (1999-2005)
Link to this page in different formats


Visitor comments

No comments yet


How much will 17 + 24 =


A8(D2, 1994-2002) 
  • General information
  • User manual
  • Maintenance
  • Power unit
  • Petrol engine 2.8L
  • Petrol engine 3.7L and 4.2L
  • Diesel engine 2.5L
  • Diesel engine 3.3L
  • Ignition and injection (gasoline)
  • Fuel system (diesel)
  • Lubrication system
  • Cooling system
  • Transmission
  • Clutch
  • Car gearbox
  • Drive shafts
  • Cardan gear
  • Car suspension
  • Chassis
  • Wheels and tires
  • Steering
  • Brake system
  • Body
  • Exterior (external elements)
  • Interior (internal elements)
  • Heating and air conditioning
  • Electrical equipment
  • Fuses and relays
  • Lighting and lamps
  • Instruments and switches
 
AudiManual.ru © 2017-2026 · Mobile version · Feedback · Sitemap: EN BG BY UA RS HR RO PL SK HU · Site search · News and articles
80 B2 · 80 B3 petrol · 80 B3 · 80 B4 · 100 C3 diesel · 100 C3 petrol · 100 C3 · 100 C4 petrol · 100 C4 · A3 Type 8L · A4 B5 petrol · A4 B5 · A4 B6 petrol · A4 B6 · A4 B7 · A4 B8 · A6 C4 · A6 C5 · A6 C5 Allroad · A8 D2 · Q5 Type 8R · Q7 Typ 4L · Audi A2 ·
This site uses cookies 🍪. Click the button to accept this fact.