
Removal
1. Drain the coolant.
2. Remove the front bumper (see the relevant chapter).
3. Set the upper front cross member to the service position (see points 3.1-3.6).
4. Remove the mounting clamps (see arrows in the illustration) and remove the left and right parts of the timing gear protective cover.
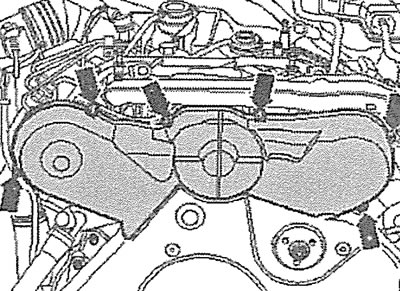
10.4 Remove the mounting clamps (see arrows) and remove the left and right parts of the timing gear protective cover
5. Unscrew the mounting bolts (see arrows in the illustration) and remove the auxiliary drive V-belt protective cover.
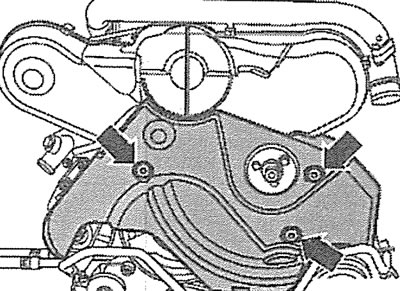
10.5. Unscrew the mounting bolts (see arrows) and remove the auxiliary drive V-belt protective cover
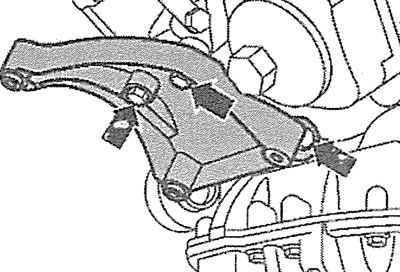
6. Unscrew the mounting bolts (see arrows in the illustration) and remove the front engine mount.
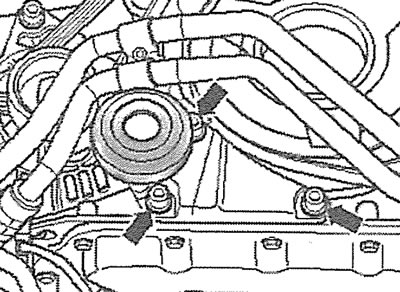
10.6. Unscrew the mounting bolts (see arrows) and remove the front engine mount
7. Remove the A/C compressor drive belt tension roller plug, then loosen the belt tension by loosening the bolt (see arrow in illustration) tension roller fastenings and turning the roller eccentric with a torque wrench, and carefully remove the air conditioning compressor drive belt.
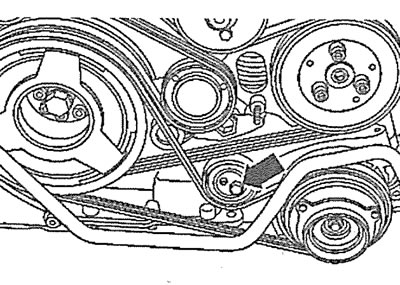
10.7. Loosen the bolt (see arrow) air conditioning compressor drive belt tension roller mounts
Attention! All work related to the air conditioner should be entrusted to a specialized workshop. Do not open the refrigerant circulation circuit yourself - risk of frostbite!
8. Disconnect plug 1 of the air conditioning compressor pressure reducing valve, unscrew the bolts securing the compressor to the bracket (see arrows in the illustration).
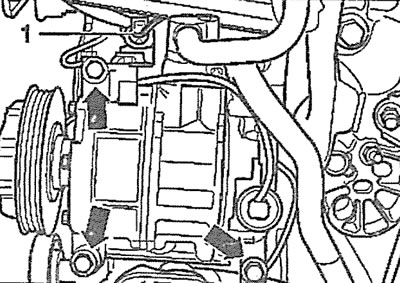
10.8. Disconnect plug 1 of the air conditioning compressor pressure reducing valve, unscrew the bolts securing the compressor to the bracket (see arrows)
9. Tie the air conditioning compressor to the subframe with wire without disconnecting the pipes from it (see arrow in illustration).
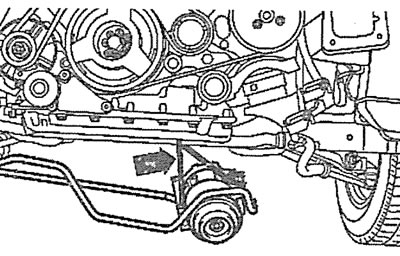
10.9. Tie the air conditioning compressor to the subframe with wire without disconnecting the pipes from it (see arrow)
10. Unscrew the bolts (see arrows in the illustration) and remove the air conditioning compressor bracket.
10.10. Unscrew the bolts (see arrows) and remove the air conditioning compressor bracket
11. Loosen the oil cooler hose clamps (see arrows in the illustration) and slide them onto the hoses.
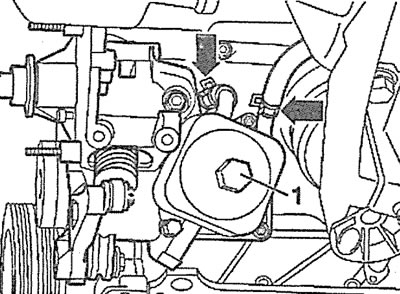
10.11. Loosen the clamps securing the oil cooler hoses (see arrows) and move them onto the hoses
12. Place a container under the engine to collect any leaking oil and coolant.
13. Disconnect the rear hose from the oil cooler.
14. Unscrew bolt 1 of the oil radiator mount and remove the radiator (see illustration 10.11).
[Material republished from the website: AudiManual.ru]