



2. Remove the rear suspension spring (see Section 12).
3. On models with heavy duty suspension, remove the rock guard from the link.
4. Loosen the bolts and separate the parking brake cables from the bracket under the trapezoidal rod.
5. On models with headlight leveling, remove the bolt (1 in illustration 11.2).
6. Separate the wheel sensor wiring guide (2 in the illustration). Remove the bolt (1) while holding the joint with an open-end wrench. Mark the position of the eccentric bolt (5) on the subframe and separate the trapezoidal rod (points 3 and 6).
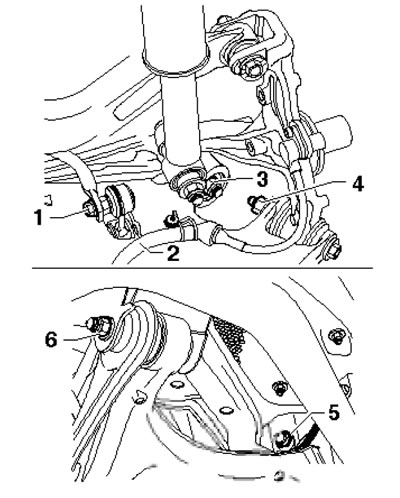
15.6. Trapezoidal traction fastening details
7. To remove the tie rod mounting bolts on AWD models, and when working on the right side, it is necessary to slightly lower the subframe as described below.
8. On AWD models, separate the driveshaft from the rear differential (see chapter 8) and hang it on the wire. Unscrew the bolt securing the shock absorber to the hub holder (see Section 13), separate the parking brake cables from the fuel tank and remove the brake caliper from the anchor bracket without disconnecting the brake hose from it. Remove the right drive shaft heat shield (when working on the right side) and slightly lower the subframe.
9. To remove the left tie rod on FWD models, remove the heat shield from the body at the front of the eccentric bolt and press the shield out to the side.
10. To remove the right tie rod on FWD models, unscrew the shock absorber mounting bolt to the hub holder (see Section 13), remove the brake caliper from the anchor bracket without disconnecting the brake hose from it, and slightly lower the subframe.
11. Remove the trapezoidal rod (points 3 and 6 in illustration 15.6).
12. Install the subframe, shock absorber and brake caliper. Secure the propeller shaft to the rear differential and install the drive shaft heat shield.
13. Tighten the bolts (3, 4 and 6 in Illustration 15.6), install the eccentric bolt in its original position and tighten the nut (5). Install the guide (2), tighten the bolt (1) and install the spring.
14. Further installation is carried out in the reverse order of dismantling the components.