
Sump, oil pump, oil filter
The execution for all 4-cylinder engines is the same. The illustration shows a 1.8L engine without a turbocharger. Diesel engines, unlike the illustration, have a vertical oil filter.
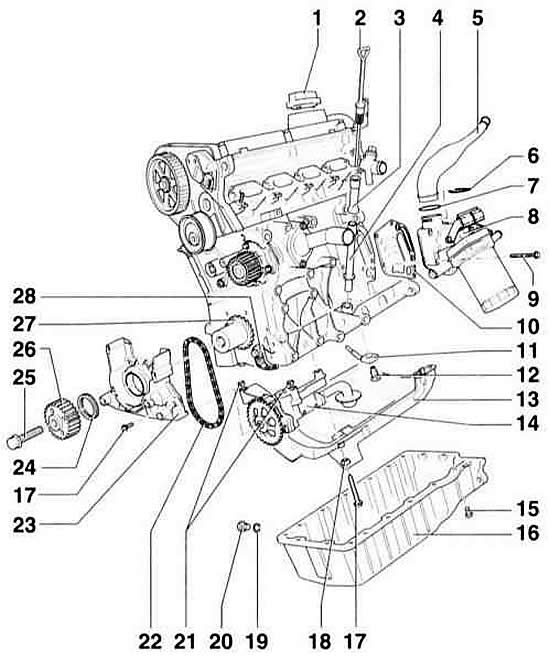
- 1 cover. Replace seal if damaged.
- 2 oil level indicator
- 3 funnel. Remove to suck out oil.
- 4 guide tube
- 5 connecting pipe. For suction hose, 1.8L engines only.
- 6 clamp
- 7 O-ring. Replace if damaged.
- 8 oil filter holder with oil cooler and oil filter
Pay attention to the filter installation instructions indicated on the filter. Attached by hand
- 9 bolt, 25 Nm
- 10 seal with flow sheet. Replace according to the installation position.
- 11 pressure reducing valve, 27 Nm. Opening pressure: 2.5–3.2 bar.
- 12 oil nozzle. for piston cooling.
- 13 flow sheet. 14 oil pump with sprocket
- 15 bolt, 15 Nm
It is turned away with a crank key, for example, AUDI-3185 or HAZET 2528-10.
- 16 sump
Note: The sump does not have a seal. Liquid silicone sealant is applied for sealing «K 176 404 A2».
- 17 bolt, 15 Nm
- 18 spacer
- 19 O-ring. Be sure to replace.
- 20 oil drain plug, 30 Nm
- 21 bushing guide. for centering oil pump/cylinder block
- 22 oil pump drive chain. Before removal, mark the direction of rotation.
- 23 sealing flange front
- 24 o-ring
- 25 center bolt. Always replace, torque 90 Nm + 90° (1/4 turn). Service stations use the AUDI-3099 holding tool, which is attached with two intermediate washers to the toothed belt pulley.
- 26 crankshaft timing belt wheel. Installation is only possible in one position.
- 27 asterisk. Oil pump drive.
- 28 chain tensioner with bar, 25 Nm. If the spring breaks, replace the tensioner as a set.
Withdrawal
Warning: The operation of lifting and placing the vehicle on stands is dangerous! Therefore, before carrying out the operation, read the subsection car jacking.
1. Raise and place the car on stands. Drain the engine oil, refer to subsection Changing the engine oil and oil filter.
Warning: Do not harm the environment. Never throw away used oil or dispose of it with household waste. Oil sales points accept the corresponding amount of used oil free of charge. Therefore, when buying oil, keep the receipt and the oil canister so that you can return the used oil later!
2. Install the oil drain plug with a new O-ring.
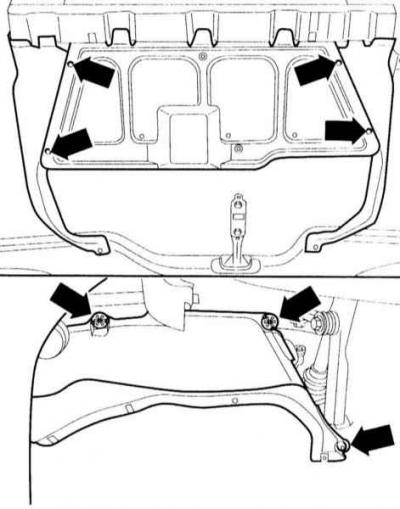
3. Loosen the mounting bolts and remove the bottom and side covers on the right and left of the engine compartment (arrows). The accompanying illustration shows the version for a petrol engine. Remove the bottom cover of an impellent compartment at the diesel engine.
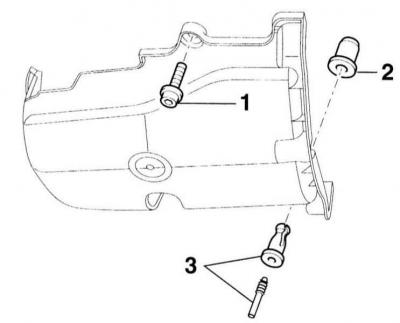
4. Diesel engine: Remove the noise cover of the engine oil pan. To do this, unscrew the bolt -1-. Push in the rivet pin -3- with wire. Take out the rivet. The rubber bush -2- must remain in the cylinder block.
5. Loosen the sump bolts with a socket wrench, eg HAZET 2528-10 and remove. If necessary, use a rubber mallet to pry off the oil pan.
Installation
6. Carefully remove any remaining sealant from the cylinder block with a scraper.
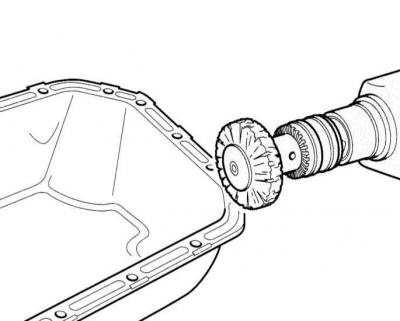
7. Remove any remaining sealant from the oil pan using a rotating brush, such as a handheld machine.
Warning: Wear protective goggles when doing this. There is a risk of injury from residual sealant being removed.
8. Clean sealing surfaces. They must be free of oils and greases.
9. The sump can be positioned more precisely by screwing two M6 pins into the cylinder block flange for guidance.
10. When buying AUDI–D176404 A2 sealant, you need to check its expiration date. The tip of the tube must be cut off so that a hole with a diameter of 3 mm is formed.
Warning: The oil pan must be installed within 5 minutes after applying silicone sealant. After installing the crankcase, the sealant must dry for at least 30 minutes. Only then can oil be poured into the crankcase.
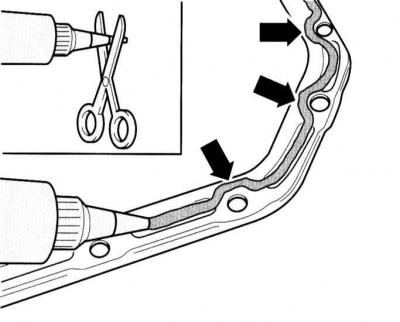
11. Apply silicone sealant to clean sealing surfaces. The sealant bead should be 2-3 mm thick and should run along the inside in the area of the bolt holes.
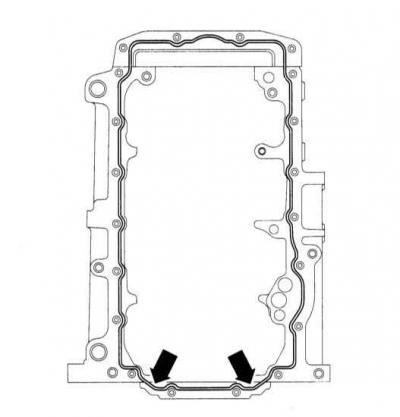
12. The illustration shows the position of the sealant bead on the cylinder block. Apply sealant only to the sealing surface of the oil pan. At the transition to the rear flange, the sealant should be applied especially carefully.
Warning: The sealant bead must not be too thick, otherwise the excess will enter the oil circuit and clog the mesh in the oil pump suction pipe.
13. Immediately install and evenly press the crankcase against the cylinder block with a torque of 5 Nm.
14. Tighten 3 connecting bolts engine-manual transmission in the area of the oil pan with a torque of 45 Nm.
Warning: When installing the oil pan on a removed engine, align the oil pan so that it is flush with the cylinder block on the manual transmission side.
15. Tighten the cylinder block mounting bolts crosswise to 10 Nm, then tighten all bolts in two steps to 15 Nm.
16. Diesel engine: Install the noise cover of the oil pan to the engine and secure it. To do this, remove the pin from the rivet. Insert the rivet and, pressing the pin, secure it. Screw the bolt -1- with a torque of 20 Nm.
17. Pour engine oil into the system, while referring to the subsection Changing the engine oil and oil filter.
18. Install and secure the lower and side left and right engine compartment covers.
Visitor comments