
Table of contents: Removal ↓ Installation ↓
Removal
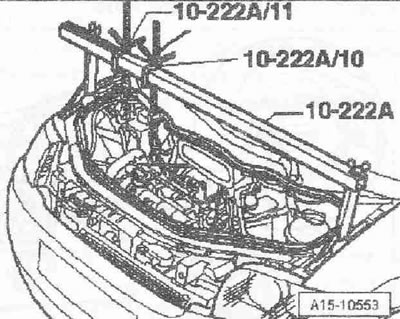
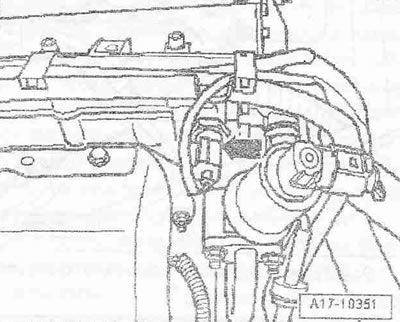
Drain the coolant. Remove the intake manifold. Set the crankshaft to "TDC" and secure the camshafts with the "T10016" camshaft lock. Put the "10.222 A" crossmember with the "10.222 A/10" hook and the "10.222 A/11" spindle on the front fender flanges, as shown in the figure. The lead screws are at the rear. Hang the "hook snap hook" 10.222 A/10- on the right engine eye. The "10.222 A/11" spindle will be used later. Remove the camshaft housing.
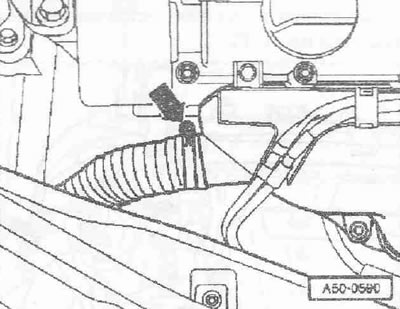
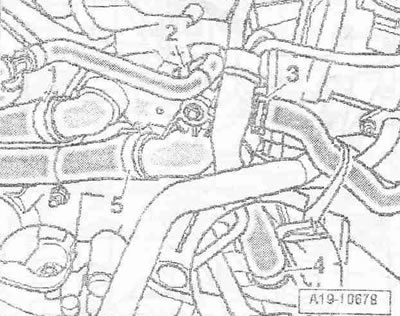
Remove the intake air preheating hose from the "arrow" heat shield.
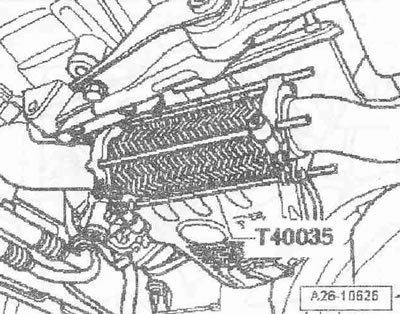
Protect the detachable element from bending with the "T40035" clamp.
Unscrew the bolts "arrows" securing the inlet pipe to the exhaust manifold.
Remove the "arrow" connector of the lambda probe "G39" from the holder and disconnect it.
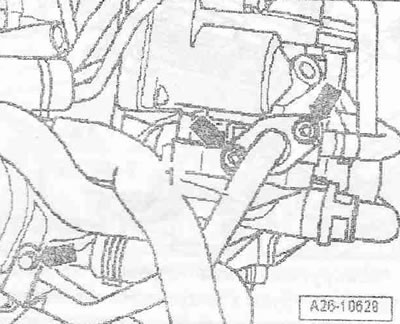
Remove the "arrow" bolt for the exhaust manifold bracket.
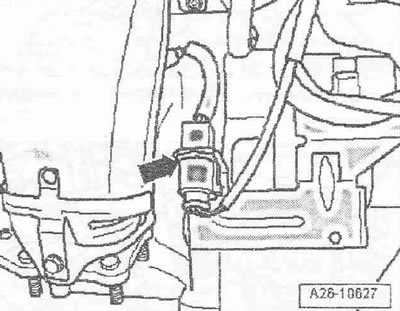
Disconnect the "arrow" connector of the oil pressure sensor "F1".
Unscrew the "arrow" bolts for the exhaust manifold pipe.
Disconnect connector "3". Unscrew nuts "arrows", remove pipe "1" for the EGR system and EGR valve "N18" with EGR potentiometer "G212" pos. "2".

Disconnect coolant hose "5" from the thermostat housing.
Unscrew the thermostat housing arrow bolts.
Remove the throttle valve unit "3338". Unscrew the bolts "arrows" and put the intake manifold slightly back.

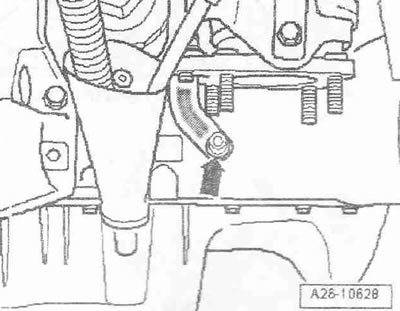
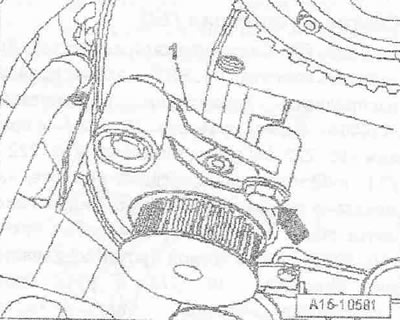
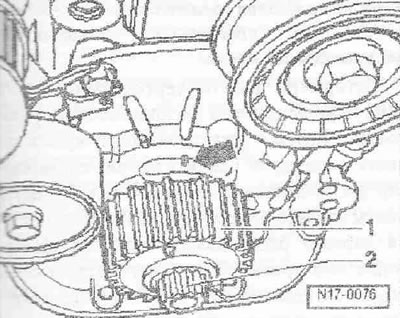
Unscrew the bolt "arrow" and remove the running roller "1" for the main drive toothed belt.
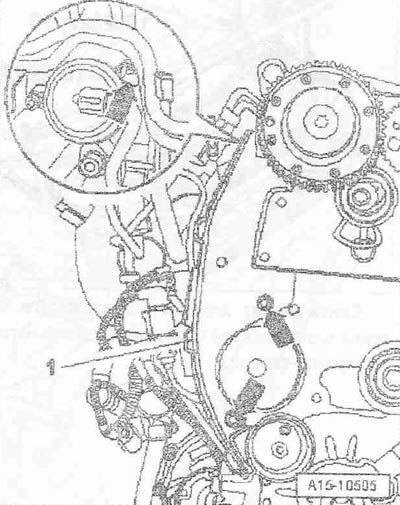
Unscrew the "arrow" bolts and remove the rear cover "1" of the toothed belt.
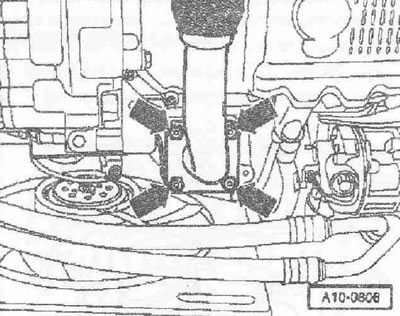
Screw the bracket "T10014", as shown in the figure, with a torque of 40 Nm into the threaded hole in the cylinder block.

Hang the spindle "10.222 A/11" with the additional hook "10.222 A/2" on the right side of the holder "T10014". Create pre-tension with both lead screws, disconnect the additional hook "10.222 A/10" and move it to the side.
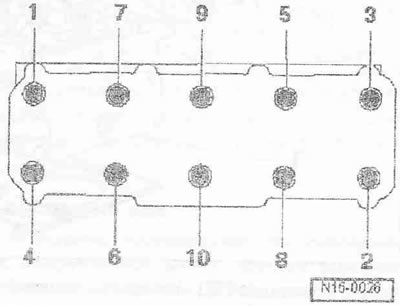
Loosen the cylinder head bolts in sequence 1-10. Unscrew the bolts and carefully remove the cylinder head. Place the cylinder head on a soft pad (foam).
Installation
Caution! Risk of damage to the sealing surface. Carefully remove any sealant residue from the cylinder head and cylinder block. Avoid the formation of long scratches or scoring. Risk of damage to the cylinder block. There must be no oil or coolant in the blind holes of the cylinder head mounting bolts. Risk of leaky cylinder head gasket. During repairs, carefully remove any sealant residue from the cylinder head and cylinder block. Avoid the formation of long scratches or scoring. Carefully remove any emery or sanding residue. Remove the new cylinder head gasket from the packaging immediately before installation. Handle the gasket with particular care to prevent damage to the silicone layer and the grooves of the cylinder head gasket. Risk of damage to open valves When installing an exchange cylinder head, remove the plastic base to protect the open valves only when it is in direct contact with the cylinder head. Replace bolts that were tightened further. Replace self-locking nuts, lip seals, gaskets and O-rings. Replace the mesh oil filter in the cylinder head. Before installing the exchange cylinder head, it is necessary to lubricate the adjacent surfaces of the hydraulic compensators, rocker arms and the working surfaces of the kuliches with oil before installing the housing. camshaft bearings. Secure all hose connections with clamps of the appropriate series. After replacing the cylinder head or cylinder head gasket, it is necessary to: completely replace the coolant and oil. Close open engine parts.
Remove any remaining sealant from the cylinder head and camshaft housing. Clean the mounting surfaces; they should be free of oil and grease.
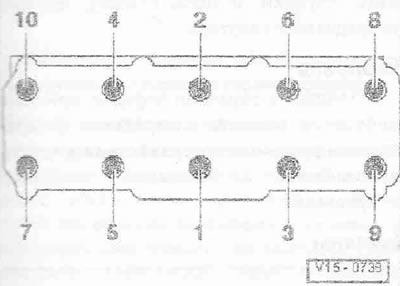
Check the TDC position of the camshaft: the flattened tooth on the toothed belt gear "1" for the crankshaft must match the "arrow" mark on the oil pump housing. Turn the crankshaft back in the direction opposite to the direction of engine rotation by approximately 45°. Install the seal for the thermostat housing. Install the seal for the intake manifold. Install the cylinder head gasket. Watch the dowel pins on the cylinder block. Installation position of the cylinder head gasket: The "top" mark or the part number must be clearly legible. Install the cylinder head. Tighten the cylinder head bolts.
Instructions: After carrying out repair work, do not tighten the cylinder head bolts.
Installation is in the reverse order, in this case it is necessary to install the rear cover for the toothed belt. Install the running roller for the main drive toothed belt. Install the throttle valve unit "J338". Install the thermostat housing. Install the EGR valve "N18" with the EGR potentiometer "G212" and the EGR pipe. Install the bracket for the exhaust manifold, Install the downpipe with the catalytic converter. Install the camshaft housing, Install the toothed belt for the main drive. Install the intake manifold. Change the oil. Change the coolant.
[The original article is located on the online resource audimanual.ru]