Repair Chevrolet Repair Toyota Repair Honda Repair AvtoVAZ Repair Mercedes-Benz Repair BMW Repair Opel
Home  |  Contacts  |  Sitemap  |    
English Русский
Български
Беларускі
Український
Српски
Hrvatski
Română
Polski
Slovenský
Magyar
AudiManual.ru


  • AUDI 80
  • AUDI 100
  • AUDI A3
  • AUDI A4
  • AUDI A6
  • AUDI A8
  • AUDI Q
  • OTHER
  • ARTICLES
A2 (1999-2005)

Removal and installation the camshaft housing (Audi A2)

  • Home
  • Audi
  • A2 (1999-2005)
  • Engine 1.4 l (gasoline)
  • Engine repair
  • Removal and installation the camshaft housing
            0
Table of contents: Removal ↓ Installation ↓

Removal


Remove the timing belt for the mating drive.

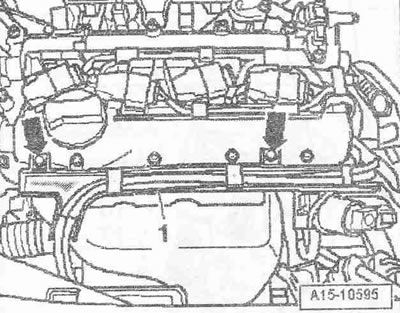
Unscrew the bolt "arrow up" for the rear cover "1" of the toothed belt.

Unscrew the «arrow» bolts and put aside the wiring «1».


Unscrew the "arrow" bolts and put aside the wiring "1".

Install the «T10094 A» puller on all ignition coils - arrow, remove the ignition coils and…


Install the "T10094 A" puller on all ignition coils - arrow, remove the ignition coils and simultaneously disconnect the electrical connectors of the ignition coils of cylinders 1...4.

Remove the oil filler cap. Disconnect connector «4» on the Hall sensor «G40». Unscrew bolt «2» for…


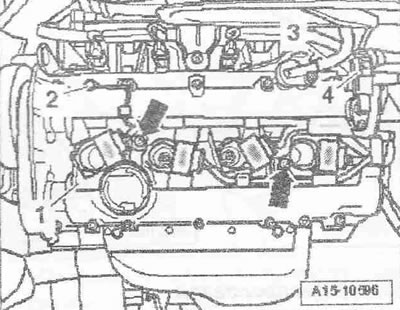
Remove the oil filler cap. Disconnect connector "4" on the Hall sensor "G40". Unscrew bolt "2" for the ground wire and the bolts "arrows" for the wiring. Turn the wiring to the left and remove hose "3" from the check valve.


Loosen the camshaft housing bolts in the sequence «15...2». Carefully lift the camshaft housing.…


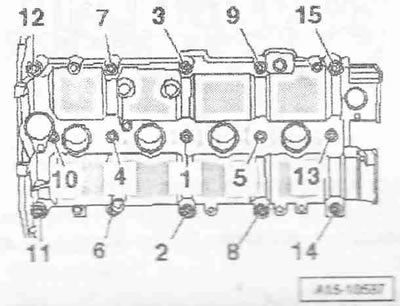
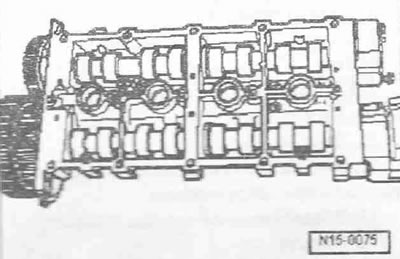
Loosen the camshaft housing bolts in the sequence "15...2". Carefully lift the camshaft housing. Mark the alignment of the valve lever with the hydraulic compensator roller for reassembly. Remove the valve lever with the roller together with the hydraulic compensator and place it on a clean lining.

Installation


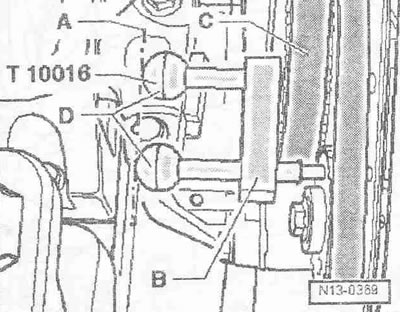
Replace the camshaft bearing housing bolts. Seal open engine parts. Remove any remaining sealant from the cylinder head and camshaft housing. Clean the mounting surfaces; there should be no oil or grease on them. Insert the locking pins "D" of the camshaft lock "T10016" into the gauge holes in the camshaft bearing housing as far as they will go as follows: through the locking hole of the intake camshaft gear "C". Through the locking hole of the exhaust camshaft gear. The handles of the locking pins should be at the same height "line A". Push the holder "B" into the intake camshaft gear as far as it will go.

Check in each case whether the rocker arm fits correctly on the end of the valve stem «1» and…


Check in each case whether the rocker arm fits correctly on the end of the valve stem "1" and whether it is clipped onto the hydraulic compensator "2".


Caution! Risk of blocking lubrication system channels due to excess sealant. Sealant beads must not…


Caution! Risk of blocking lubrication system channels due to excess sealant. Sealant beads must not be thicker than the prescribed size.


Apply a uniform thin layer of sealant to the areas marked in the figure by hatching the clean…


Apply a uniform thin layer of sealant to the areas marked in the figure by hatching the clean sealing surface of the camshaft bearings.

To guide the camshaft bearing housing, screw 2 threaded pins M6x70 «arrows» into the cylinder head.


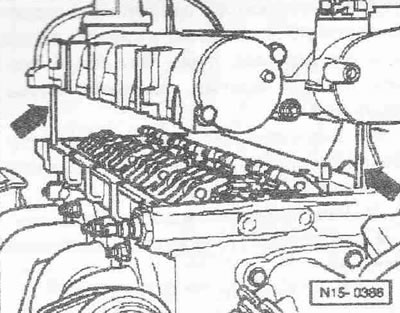
To guide the camshaft bearing housing, screw 2 threaded pins M6x70 "arrows" into the cylinder head.


Caution! Risk of leaks from oil residues. When installing the camshaft housing, make sure that there is no oil on the mounting surfaces.


Carefully place the camshaft bearing housing vertically from above onto the threaded pins and the dowel pins in the cylinder head. Make sure that the camshaft housing does not become skewed. Tighten the camshaft housing bolts. After installing the camshaft housing, allow the sealant to dry for approximately 30 minutes. Install in the reverse order, while installing the rear cover for the toothed belt. Install the toothed belt for the coupled drive.
The article was checked by auto expert Daniil Ushakov
This article is available at russian, bulgarian, belarusian, ukrainian, serbian, croatian, romanian, polish, slovak, hungarian

Share information:
Previous articles
Audi A2: Engine repair
Next articles

Camshaft housing — design description
Removal and installation of the cylinder head
Sequence and tightening torque of cylinder head bolts
Modification of the cylinder head sealing surface
Removal and installation camshafts
Valves — design description
Valve seat machining


Similar articles on other Audi car models:
Camshaft and tappets — removal, inspection and installation Audi 80 B3 (1986-1991, petrol)
Camshaft Cover — Removal and Installation Audi 100 C3 (1982-1990, diesel)
Removal and installation the air filter housing Audi A3 Type 8L (1996-2003)
Evaporator and heater radiator housing — removal and installation Audi A4 B5 (1994-2001)
Camshaft Drive Chains — Removal and Installation Audi A6 C5 Allroad (1999-2005)
Removal and installation the engine Audi A8 D2 (1994-2002)
Removal and installation the climate control system housing Audi Q7 Typ 4L (2005-2015, diesel)
Link to this page in different formats


Visitor comments

No comments yet


How much will 19 + 38 =


Audi A2(1999-2005) 
  • General information
  • Introduction to the guide
  • Maintenance
  • Engine 1.4 l (gasoline)
  • Engine repair
  • Lubrication system
  • Cooling system
  • Exhaust system
  • Engine 1.6 l (gasoline)
  • Engine repair
  • Lubrication system
  • Cooling system
  • Exhaust system
  • Engine 1.2 l (diesel)
  • Engine repair
  • Lubrication system
  • Cooling system
  • Injection and turbocharging
  • Engine 1.4 l (diesel)
  • Engine repair
  • Lubrication system
  • Cooling system
  • Turbocharging system
  • Supply system
  • Fuel injection system
  • Exhaust system
  • Transmission
  • Mechanical gearbox 02J
  • Mechanical gearbox 02T
  • Mechanical gearbox 085 DS
  • Chassis
  • Car suspension
  • Steering
  • Brake system
  • Body
  • Exterior
  • Interior
  • Seats
  • Doors, locks and windows
  • Safety system
  • Heating and air conditioning
  • Electrical equipment
  • Power devices
  • Equipment and devices
  • Wipers and washers
  • Lighting and lamps
  • Breakers and switches
  • Electrical circuits
 
AudiManual.ru © 2017-2026 · Mobile version · Feedback · Sitemap: EN BG BY UA RS HR RO PL SK HU · Site search · News and articles
80 B2 · 80 B3 petrol · 80 B3 · 80 B4 · 100 C3 diesel · 100 C3 petrol · 100 C3 · 100 C4 petrol · 100 C4 · A3 Type 8L · A4 B5 petrol · A4 B5 · A4 B6 petrol · A4 B6 · A4 B7 · A4 B8 · A6 C4 · A6 C5 · A6 C5 Allroad · A8 D2 · Q5 Type 8R · Q7 Typ 4L · Audi A2 ·
This site uses cookies 🍪. Click the button to accept this fact.