
Repair Chevrolet Repair Toyota Repair Honda Repair AvtoVAZ Repair Mercedes-Benz Repair BMW Repair Opel
Home  |  Contacts  |  Sitemap  |    
English Русский
Български
Беларускі
Український
Српски
Hrvatski
Română
Polski
Slovenský
Magyar
AudiManual.ru


  • AUDI 80
  • AUDI 100
  • AUDI A3
  • AUDI A4
  • AUDI A6
  • AUDI A8
  • AUDI Q
  • OTHER
  • ARTICLES
A2 (1999-2005)

Oil pump and crankshaft frame — design description (Audi A2)

  • Home
  • Audi
  • A2 (1999-2005)
  • Engine 1.4 l (diesel)
  • Lubrication system
  • Oil pump and crankshaft frame — design description
            0
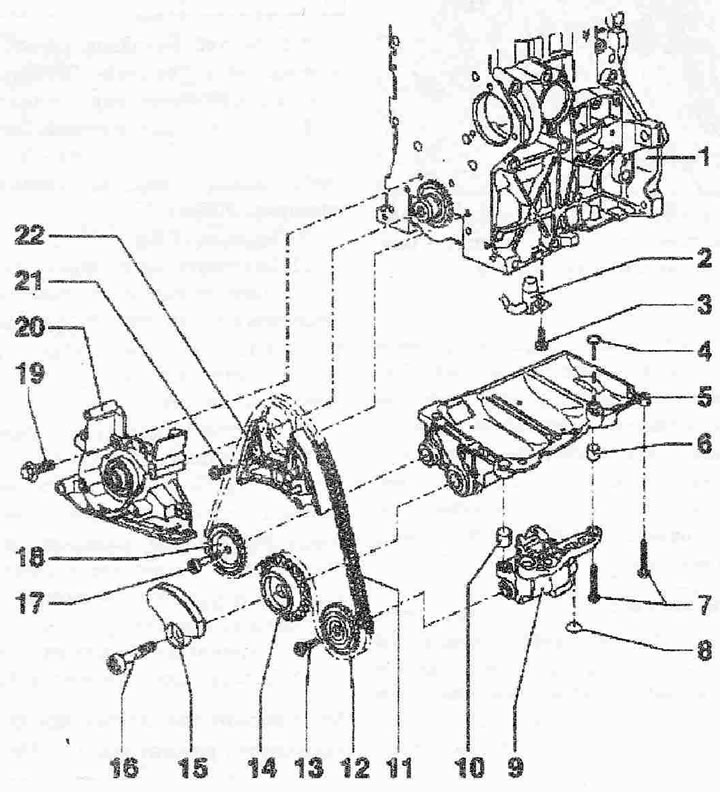
Oil riacoc and crankshaft frame:

Oil riacoc and crankshaft frame:
1. Cylinder block
2. Oil nozzle for piston cooling. Observe the installation position: turn the oil nozzle counterclockwise towards the cylinder block until it stops and tighten it in this position
3. Bolt, tighten without using sealant, 27 Nm
4. O-ring. Replace
5. Crankshaft frame. Before installation, check the presence of centering bushings in the cylinder block and the installation of the sealing ring in the crankshaft frame
6. Centering sleeve
7. Bolt. Oil pump to crankshaft frame: 20 Nm + turn further by +90°; replace bolt. Crankshaft frame to cylinder block: 14 Nm + turn further by +180°; replace bolt
8. Sealing ring. Replace, check for proper fit, lightly lubricate with oil for installation
9. Oil pump with 11.5 bar safety valve. Before installation, check the presence of both centering bushings
10. Centering sleeve
11. Chain. Observe the installation position
12. Oil pump sprocket
13. Bolt, replace, 20 Nm + turn further by +90°
14. Balance shaft sprocket. Installation is possible in only one position
15. Counterweight. Installation is possible in only one position
16. Bolt. Replace, use combination wrench "T10061" to loosen and tighten, 100 Nm + turn further by +90°
17. Bolt, 20 Nm
18. Intermediate sprocket
19. Bolt, 15 Nm
20. The sealing flange on the belt pulley side must be installed on the centering bushings. Replacing the crankshaft seal on the belt pulley side
21. Bolt, Replace. 8 Nm + turn further by +90°
22 Chain tensioner with shoe. To remove, secure with locking pin


[The original article is posted on the resource Audimanual.ru]
The article was checked by auto expert Daniil Ushakov
This article is available at russian, bulgarian, belarusian, ukrainian, serbian, croatian, romanian, polish, slovak, hungarian

Share information:
Previous articles
Audi A2: Lubrication system
Next articles

Removal and installation the oil pan
Engine lubrication system — design description
Removal and installation the oil pump
Oil filter bracket with oil cooler
Removal and installation the oil filter bracket
Removal and installation the oil pressure sensor


Similar articles on other Audi car models:
Front and rear crankshaft seals — replacement Audi 80 B3 (1986-1991, petrol)
Fuel Pump Drive Belt — Removal, Inspection and Installation Audi 100 C3 (1982-1990, diesel)
Checking the crankshaft Audi A3 Type 8L (1996-2003)
Water pump Audi A4 B5 (1994-2001, petrol)
Fuel pump — design description Audi A6 C5 Allroad (1999-2005)
Crankshaft Audi A8 D2 (1994-2002)
Cooling system pump, thermostat, fittings Audi Q5 Type 8R (2008-2017)
Link to this page in different formats


Visitor comments

No comments yet


How much will 20 + 40 =


Audi A2(1999-2005) 
  • General information
  • Introduction to the guide
  • Maintenance
  • Engine 1.4 l (gasoline)
  • Engine repair
  • Lubrication system
  • Cooling system
  • Exhaust system
  • Engine 1.6 l (gasoline)
  • Engine repair
  • Lubrication system
  • Cooling system
  • Exhaust system
  • Engine 1.2 l (diesel)
  • Engine repair
  • Lubrication system
  • Cooling system
  • Injection and turbocharging
  • Engine 1.4 l (diesel)
  • Engine repair
  • Lubrication system
  • Cooling system
  • Turbocharging system
  • Supply system
  • Fuel injection system
  • Exhaust system
  • Transmission
  • Mechanical gearbox 02J
  • Mechanical gearbox 02T
  • Mechanical gearbox 085 DS
  • Chassis
  • Car suspension
  • Steering
  • Brake system
  • Body
  • Exterior
  • Interior
  • Seats
  • Doors, locks and windows
  • Safety system
  • Heating and air conditioning
  • Electrical equipment
  • Power devices
  • Equipment and devices
  • Wipers and washers
  • Lighting and lamps
  • Breakers and switches
  • Electrical circuits
 
AudiManual.ru © 2017-2026 · Mobile version · Feedback · Sitemap: EN BG BY UA RS HR RO PL SK HU · Site search · News and articles
80 B2 · 80 B3 petrol · 80 B3 · 80 B4 · 100 C3 diesel · 100 C3 petrol · 100 C3 · 100 C4 petrol · 100 C4 · A3 Type 8L · A4 B5 petrol · A4 B5 · A4 B6 petrol · A4 B6 · A4 B7 · A4 B8 · A6 C4 · A6 C5 · A6 C5 Allroad · A8 D2 · Q5 Type 8R · Q7 Typ 4L · Audi A2 ·
This site uses cookies 🍪. Click the button to accept this fact.