
Repair Chevrolet Repair Toyota Repair Honda Repair AvtoVAZ Repair Mercedes-Benz Repair BMW Repair Opel
Home  |  Contacts  |  Sitemap  |    
English Русский
Български
Беларускі
Український
Српски
Hrvatski
Română
Polski
Slovenský
Magyar
AudiManual.ru


  • AUDI 80
  • AUDI 100
  • AUDI A3
  • AUDI A4
  • AUDI A6
  • AUDI A8
  • AUDI Q
  • OTHER
  • ARTICLES
A2 (1999-2005)

Removal and installation the oil pan (Audi A2)

  • Home
  • Audi
  • A2 (1999-2005)
  • Engine 1.4 l (diesel)
  • Lubrication system
  • Removal and installation the oil pan
            0
Table of contents: Removal ↓ Installation ↓

Removal


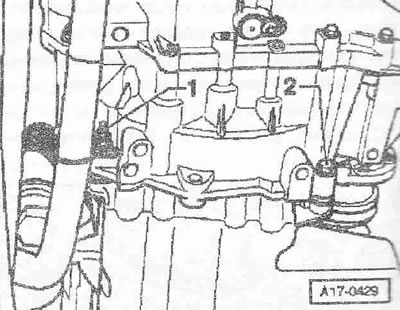
Remove the dipstick. Remove the noise insulation of the "arrow". Place a waste oil collection unit under the engine "V.A.G 1782". Drain the oil. Unscrew bracket "1". Ignore item "2".
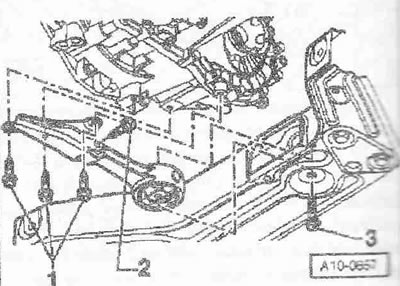
Unscrew bolts «1» of the pendulum support. Ignore pos. «2» and «3».


Unscrew bolts "1" of the pendulum support. Ignore pos. "2" and "3".
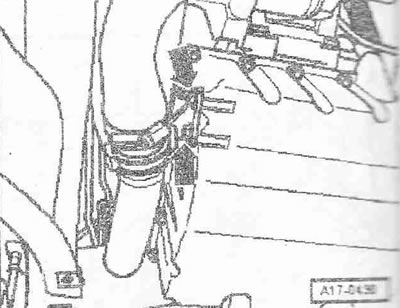
Unscrew the air guide pipe bracket from the oil pan «arrows».


Unscrew the air guide pipe bracket from the oil pan "arrows".
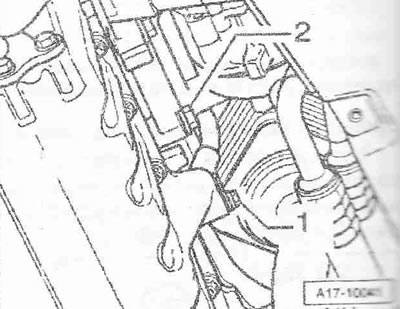
On the oil pan, unscrew bolt «2» of the oil dipstick guide tube fitting. Ignore item «2».


On the oil pan, unscrew bolt "2" of the oil dipstick guide tube fitting. Ignore item "2".


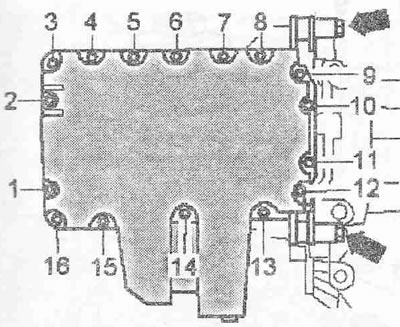
Unscrew the bolts «arrows» connecting the gearbox to the oil pan. Loosen and unscrew crosswise the…


Unscrew the bolts "arrows" connecting the gearbox to the oil pan. Loosen and unscrew crosswise the bolts "1...16".
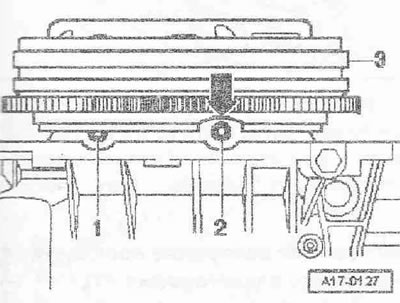
Instructions. You can access the bolts from the gearbox side «1 and 2» through the recess «arrow»…


Instructions. You can access the bolts from the gearbox side "1 and 2" through the recess "arrow" of the dual-mass flywheel "3", to do this, turn the dual-mass flywheel to the required position. The bolts can be unscrewed using the wrench "T10058".


Remove the oil pan and, if necessary, loosen it with light blows of a rubber hammer.

Installation


Installation is in the reverse order, in this case it is necessary to replace the oil dipstick guide tube sealing ring. Replace the oil dipstick guide tube sealing ring.
Remove any remaining sealant from the oil pan and cylinder block, for example using a drill with a…


Remove any remaining sealant from the oil pan and cylinder block, for example using a drill with a plastic bristle brush. Clean the sealing surfaces; there should be no traces of oil or grease on them. Cut off the tube tip at the front mark;about 2 mm).
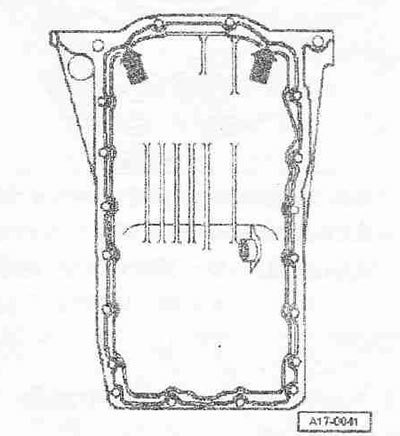


Apply sealant to the clean sealing surface of the oil pan as shown in the figure. Sealant bead…


Apply sealant to the clean sealing surface of the oil pan as shown in the figure. Sealant bead thickness: 2-3 mm.

Instructions. The sealant strip should not be thicker than 3 mm, otherwise excess sealant may get into the oil pan and clog the mesh filter of the oil intake pipe. Be especially careful to apply the sealant strip in the area of the rear sealing flange "arrows". The oil pan must be installed within 5 minutes of applying the sealant.


Install the oil pan and tighten the bolts. First, tighten the oil pan to the cylinder block with bolts "1...16" crosswise with a torque of 5 Nm. Bolt the oil pan to the gearbox "arrows". Tighten bolts "1...16" crosswise.

Instructions. When installing the oil pan with the engine removed, make sure that the flywheel side of the oil pan is flush with the cylinder block. Allow the sealant to dry for approximately 30 minutes after installing the oil pan. Only then can you add oil.


Install the pendulum support. Fill with oil and check its level.

Tightening torques:
  • Oil pan to cylinder block: 15 Nm
  • Oil pan to gearbox: 45 Nm
  • Oil drain plug thread: 30 Nm
  • Oil dipstick guide tube fitting to oil pan: 9 Nm
  • Air guide pipe to oil pan: 8 Nm


The original text is available on the website AUDImanual
The article was checked by auto expert Daniil Ushakov
This article is available at russian, bulgarian, belarusian, ukrainian, serbian, croatian, romanian, polish, slovak, hungarian

Share information:
Previous articles
Audi A2: Lubrication system
Next articles

Engine lubrication system — design description
Oil pump and crankshaft frame — design description
Removal and installation the oil pump
Oil filter bracket with oil cooler
Removal and installation the oil filter bracket


Link to this page in different formats


Visitor comments

No comments yet


How much will 28 + 25 =


Audi A2(1999-2005) 
  • General information
  • Introduction to the guide
  • Maintenance
  • Engine 1.4 l (gasoline)
  • Engine repair
  • Lubrication system
  • Cooling system
  • Exhaust system
  • Engine 1.6 l (gasoline)
  • Engine repair
  • Lubrication system
  • Cooling system
  • Exhaust system
  • Engine 1.2 l (diesel)
  • Engine repair
  • Lubrication system
  • Cooling system
  • Injection and turbocharging
  • Engine 1.4 l (diesel)
  • Engine repair
  • Lubrication system
  • Cooling system
  • Turbocharging system
  • Supply system
  • Fuel injection system
  • Exhaust system
  • Transmission
  • Mechanical gearbox 02J
  • Mechanical gearbox 02T
  • Mechanical gearbox 085 DS
  • Chassis
  • Car suspension
  • Steering
  • Brake system
  • Body
  • Exterior
  • Interior
  • Seats
  • Doors, locks and windows
  • Safety system
  • Heating and air conditioning
  • Electrical equipment
  • Power devices
  • Equipment and devices
  • Wipers and washers
  • Lighting and lamps
  • Breakers and switches
  • Electrical circuits
 
AudiManual.ru © 2017-2026 · Mobile version · Feedback · Sitemap: EN BG BY UA RS HR RO PL SK HU · Site search · News and articles
80 B2 · 80 B3 petrol · 80 B3 · 80 B4 · 100 C3 diesel · 100 C3 petrol · 100 C3 · 100 C4 petrol · 100 C4 · A3 Type 8L · A4 B5 petrol · A4 B5 · A4 B6 petrol · A4 B6 · A4 B7 · A4 B8 · A6 C4 · A6 C5 · A6 C5 Allroad · A8 D2 · Q5 Type 8R · Q7 Typ 4L · Audi A2 ·
This site uses cookies 🍪. Click the button to accept this fact.