
Repair Chevrolet Repair Toyota Repair Honda Repair AvtoVAZ Repair Mercedes-Benz Repair BMW Repair Opel
Home  |  Contacts  |  Sitemap  |    
English Русский
Български
Беларускі
Український
Српски
Hrvatski
Română
Polski
Slovenský
Magyar
AudiManual.ru


  • AUDI 80
  • AUDI 100
  • AUDI A3
  • AUDI A4
  • AUDI A6
  • AUDI A8
  • AUDI Q
  • OTHER
  • ARTICLES
Q7 Typ 4L (2005-2015, diesel) Q5 Type 8R (2008-2017)

Removal the battery (Audi Q5-8R)

  • Home
  • Audi Q
  • Q5 Type 8R (2008-2017)
  • Electrical equipment
  • Power devices
  • Removal the battery
            0
Switch off ignition. Remove trunk floor "3". If present, remove mud tray. If present, remove Bassbox "2". Bend back floor covering "1" above cover. Remove battery module cover. Connect battery charger in battery buffer compensation mode. Remove on-board tool "2" with tool mount. Open cover "7" above negative battery terminal.

Loosen nut "6" a few turns and disconnect the ground wire terminal clamp from the battery terminal. Remove hose "8" of the central gas removal system. Unscrew the "arrow" bolts from the battery mounting bracket "1". Slightly remove battery "5" from the mounting socket. Open cover "4" above the positive terminal. Loosen nut "3" a few turns and disconnect the terminal terminal with fuse holder A "SA" from the terminal. Remove the battery from the trunk.
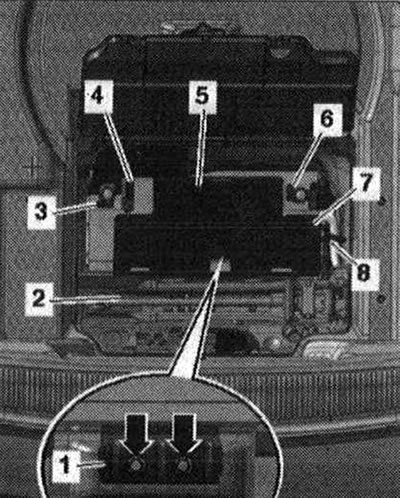
Loosen nut «6» a few turns and disconnect the ground wire terminal clamp from the battery terminal.…


Installation


Note: Only installation of maintenance-free batteries according to the "TL82506" standard is permitted (since December 1997.) and "VW75073" (since August 2001.). The batteries in the Audi spare parts program have a support bar adapter for adaptation to various mounting bars. Information on the availability and use of the support bar adapter is provided in the battery operating manual.


Install the battery in the seat so that the lower edge of the battery fits into the locking bar of the seat "arrow". The battery should not move any more.
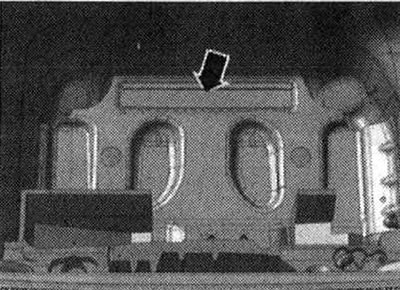
Install the battery in the seat so that the lower edge of the battery fits into the locking bar of…


Install the battery mounting bracket "1". The protrusion in the battery mounting bracket must fit into the recess on the battery housing support plate. Tighten the bolts "arrows" of the battery mounting bracket. Attach the hose "8" to the center of the battery gas outlet, follow the instructions from. Connect the battery terminals "5" with the ignition off and electrical consumers disconnected in the following sequence: first, manually attach the pole tip "3" of the positive wire to the positive pole of the battery "+" and tighten the nut. Disconnect the electrical plug connection "2" used for checking the battery "J367" "pos. 3". When connecting manually, attach the pole tip of the ground wire to the negative pole of the battery and tighten the nut "1".
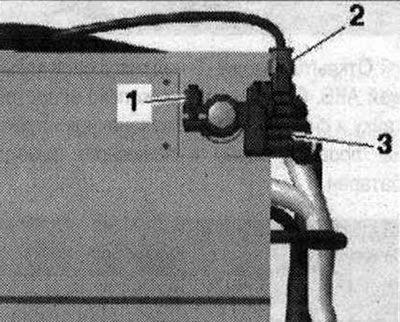
Install the battery mounting bracket «1». The protrusion in the battery mounting bracket must fit…


Connect the electrical plug connection to the battery monitoring control unit "J367". After installation, check that the battery is securely fastened. Install the battery module cover. After replacement, adapt the battery in the "Guided Fault Finding" or "Guided Functions" mode. Follow the further instructions on the tester display with the new battery. If the wires are reconnected to the battery terminals, the following steps must be performed: Activate the automatic up/down mode of the electric window lifter. Interrogate the event memory of all control units and delete the "Low Voltage" fault message. After reconnecting the power supply, the ESP warning lamp may not go out until after driving for several meters.

The original text of the material can be found on the website audimanual.ru
The article was checked by auto expert Timur Bazhenov
This article is available at russian, bulgarian, belarusian, ukrainian, serbian, croatian, romanian, polish, slovak, hungarian

Share information:
Previous articles
Audi Q Q5 Type 8R: Power devices
Next articles

Disconnecting and connecting the battery
Preparatory work before charging the battery
Generator without sliding bushings
Overview of Generator Installation with Sliding Bushings
Removal the starter. Cars with a 2.0 l TDI engine


Similar articles on other Audi car models:
Battery — removal and installation Audi 80 B3 (1986-1991, petrol)
Battery Audi 100 C3 (1982-1990, diesel)
Checking battery condition, care and charging Audi A3 Type 8L (1996-2003)
Battery, starter, alternator Audi A4 B5 (1994-2001, petrol)
Replacing the battery in the remote control key Audi A6 C5 (1997-2004)
Rechargeable battery Audi A8 D2 (1994-2002)
Teiematik — replacement of emergency battery Audi A2 (1999-2005)
Link to this page in different formats


Visitor comments

No comments yet


How much will 48 + 23 =


Q7 4L(2005-2015, diesel) 
  • General information
  • Operating instructions
  • Maintenance
  • Power unit
  • Diesels 3.0 l (BUG, BUN, CAS)
  • Diesels 3.0 l (CATA, CCMA)
  • Diesels 3.0 l (CJGA/CJGC)
  • Diesels 4.2 l (BTR, CCFA/CCFC)
  • Cooling system
  • Fuel and exhaust system
  • Engine management system
  • Starting and charging
  • Transmission
  • Automatic gearbox
  • Drive shafts
  • Chassis
  • Brake system
  • Front suspension
  • Rear suspension
  • Steering system
  • Body
  • Air conditioner
  • Exterior
  • Interior
  • Electrical equipment
  • Equipment and devices
  • Electrical circuits
 
Q5 8R(2008-2017) 
  • General information
  • User manual
  • Power unit
  • Petrol engine 2.0 l
  • Petrol engine 3.2 l
  • Fuel system (petrol)
  • Diesel 2.0 liter (CA)
  • Diesel 2.0 liter (CG/CJ/CM)
  • Diesel engine 3.0 l
  • Fuel system (diesel)
  • Transmission
  • Manual gearbox 0B1
  • Manual gearbox 0B2
  • Automatic gearbox 0B5
  • Automatic gearbox 0B6
  • Chassis
  • Front suspension
  • Rear suspension
  • Brake system
  • Steering
  • Body
  • Exterior
  • Interior
  • Doors, locks and windows
  • Safety system
  • Ventilation and heating
  • Electrical equipment
  • Power devices
  • Equipment and devices
  • Lighting and alarm
  • Audio system
  • Electrical circuits
 
AudiManual.ru © 2017-2026 · Mobile version · Feedback · Sitemap: EN BG BY UA RS HR RO PL SK HU · Site search · News and articles
80 B2 · 80 B3 petrol · 80 B3 · 80 B4 · 100 C3 diesel · 100 C3 petrol · 100 C3 · 100 C4 petrol · 100 C4 · A3 Type 8L · A4 B5 petrol · A4 B5 · A4 B6 petrol · A4 B6 · A4 B7 · A4 B8 · A6 C4 · A6 C5 · A6 C5 Allroad · A8 D2 · Q5 Type 8R · Q7 Typ 4L · Audi A2 ·
This site uses cookies 🍪. Click the button to accept this fact.