Repair Chevrolet Repair Toyota Repair Honda Repair AvtoVAZ Repair Mercedes-Benz Repair BMW Repair Opel
Home  |  Contacts  |  Sitemap  |    
English Русский
Български
Беларускі
Український
Српски
Hrvatski
Română
Polski
Slovenský
Magyar
AudiManual.ru


  • AUDI 80
  • AUDI 100
  • AUDI A3
  • AUDI A4
  • AUDI A6
  • AUDI A8
  • AUDI Q
  • OTHER
  • ARTICLES
Q7 Typ 4L (2005-2015, diesel) Q5 Type 8R (2008-2017)

Removal and installation the tie rod end (Audi Q5-8R)

  • Home
  • Audi Q
  • Q5 Type 8R (2008-2017)
  • Chassis
  • Steering
  • Removal and installation the tie rod end
            0
Two different tie rod end housings were installed in series, they differ in the length of the thread on the joint pin. When replacing the tie rod end, ensure that the thread length on the tie rod end is sufficient (it is necessary to ensure a sufficient number of free threads, approx. 5 mm) Otherwise, it is necessary to install a new tie rod end with a longer thread on the joint pin. Place the car on a lift. Remove the wheel. Measure and record the dimension "a" between the tie rod end "1" and the tie rod "2" on the left and right. The dimension "a" after installation on the left and right must be the same.

Two different tie rod end housings were installed in series, they differ in the length of the…


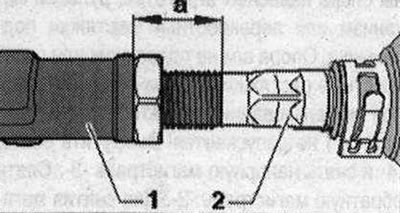
If necessary, the "longer" tie rod end should be shortened (screw deeper into the tie rod). Loosen nut "1" of tie rod end pin "2" until it is flush with the pin thread. If necessary, hold it from turning while loosening.

If necessary, the «longer» tie rod end should be shortened (screw deeper into the tie rod). Loosen…


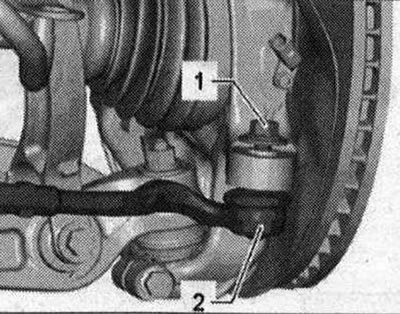
To protect the thread, leave the nut on the pin screwed on for a few turns: Press out the end of the transverse steering rod from the hub bearing housing using the ball joint puller "T40010 A". Then unscrew the nut.


To protect the thread, leave the nut on the pin screwed on for a few turns: Press out the end of…


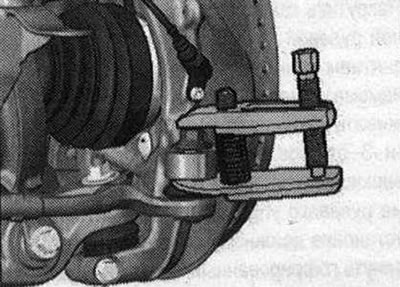
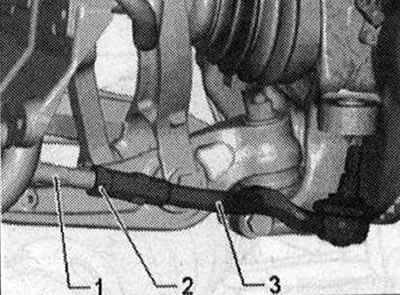
Ensure that both arms of the puller lever are parallel to each other at the moment of maximum force application; correct the position if necessary. Only loosen nut "2". At the same time, hold the end of the transverse steering rod "3" from turning. Unscrew the end of the transverse steering rod "3".

Ensure that both arms of the puller lever are parallel to each other at the moment of maximum force…


Installation


Installation is carried out in the reverse order. In this case, it is necessary to take into account the tightening torques. Screw the end of the transverse tie rod "1" onto the transverse tie rod "2" so that the dimension "a" corresponds to the value during removal. Align the end of the transverse tie rod "2" so that the pin is in the installation position. Install the end of the transverse tie rod in the hub bearing housing until it stops. Tighten nut "1". If necessary, hold it against turning while tightening. Tighten nut "2". Install the wheel and tighten the mounting bolts. It is necessary to adjust the wheel alignment angles.

(The full version is posted on the resource «AUDIMANUAL.RU»)
The article was checked by auto expert Timur Bazhenov
This article is available at russian, bulgarian, belarusian, ukrainian, serbian, croatian, romanian, polish, slovak, hungarian

Share information:
Previous articles
Audi Q Q5 Type 8R: Steering
Next articles

Adjusting the hydraulic power steering
Removal the Servotronic solenoid valve «N119»
Repair of hydraulic power steering
Removal the hydraulic power steering
Removal the tie rods
Removal the corrugated cover
Checking the power steering fluid level
Bleeding the steering after reinstallation


Similar articles on other Audi car models:
Engine — removal and installation Audi 80 B3 (1986-1991, petrol)
Toothed drive belt — removal, inspection and installation Audi 100 C3 (1982-1990, diesel)
Removal and installation the lower engine compartment cover Audi A3 Type 8L (1996-2003)
Installation and removal of the cylinder head Audi A4 B5 (1994-2001, petrol)
Removal and installation the timing belt — Diesel engine… Audi A6 C5 (1997-2004)
Removal and installation the engine Audi A8 D2 (1994-2002)
Removal and installation the engine Audi A2 (1999-2005)
Link to this page in different formats


Visitor comments

No comments yet


How much will 38 + 32 =


Q7 4L(2005-2015, diesel) 
  • General information
  • Operating instructions
  • Maintenance
  • Power unit
  • Diesels 3.0 l (BUG, BUN, CAS)
  • Diesels 3.0 l (CATA, CCMA)
  • Diesels 3.0 l (CJGA/CJGC)
  • Diesels 4.2 l (BTR, CCFA/CCFC)
  • Cooling system
  • Fuel and exhaust system
  • Engine management system
  • Starting and charging
  • Transmission
  • Automatic gearbox
  • Drive shafts
  • Chassis
  • Brake system
  • Front suspension
  • Rear suspension
  • Steering system
  • Body
  • Air conditioner
  • Exterior
  • Interior
  • Electrical equipment
  • Equipment and devices
  • Electrical circuits
 
Q5 8R(2008-2017) 
  • General information
  • User manual
  • Power unit
  • Petrol engine 2.0 l
  • Petrol engine 3.2 l
  • Fuel system (petrol)
  • Diesel 2.0 liter (CA)
  • Diesel 2.0 liter (CG/CJ/CM)
  • Diesel engine 3.0 l
  • Fuel system (diesel)
  • Transmission
  • Manual gearbox 0B1
  • Manual gearbox 0B2
  • Automatic gearbox 0B5
  • Automatic gearbox 0B6
  • Chassis
  • Front suspension
  • Rear suspension
  • Brake system
  • Steering
  • Body
  • Exterior
  • Interior
  • Doors, locks and windows
  • Safety system
  • Ventilation and heating
  • Electrical equipment
  • Power devices
  • Equipment and devices
  • Lighting and alarm
  • Audio system
  • Electrical circuits
 
AudiManual.ru © 2017-2026 · Mobile version · Feedback · Sitemap: EN BG BY UA RS HR RO PL SK HU · Site search · News and articles
80 B2 · 80 B3 petrol · 80 B3 · 80 B4 · 100 C3 diesel · 100 C3 petrol · 100 C3 · 100 C4 petrol · 100 C4 · A3 Type 8L · A4 B5 petrol · A4 B5 · A4 B6 petrol · A4 B6 · A4 B7 · A4 B8 · A6 C4 · A6 C5 · A6 C5 Allroad · A8 D2 · Q5 Type 8R · Q7 Typ 4L · Audi A2 ·
This site uses cookies 🍪. Click the button to accept this fact.