
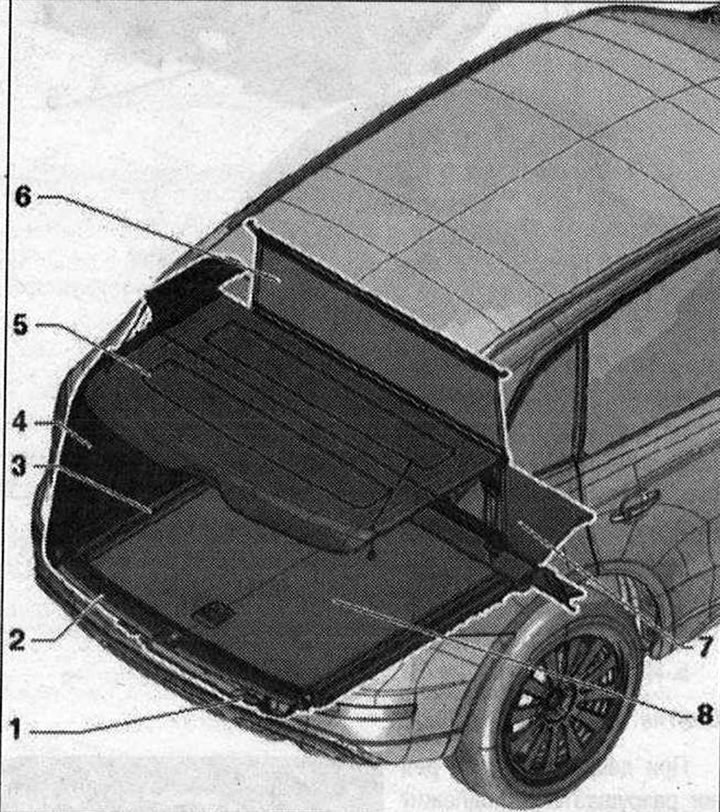
Trunk linings 1. Spare wheel niche trim; 2. Rear body edge trim; 3. Slotted cover or mounting rail; 4. Side trim of the trunk; 5. Trunk lining. There are 2 different versions. Replace the attachments; 6. Partition mesh; 7. Front part of the trunk floor; 8. Rear part of the trunk floor
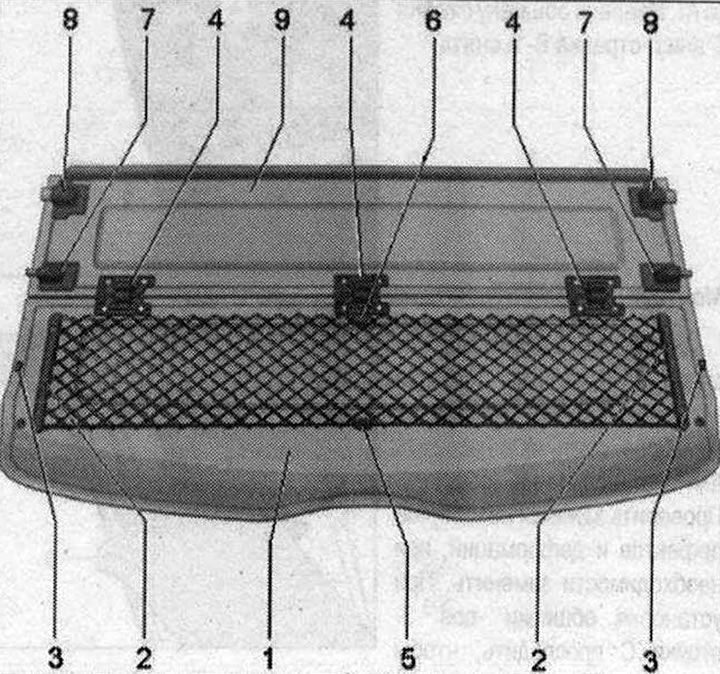
Trunk lining installation diagram 1. Rear trunk trim. There are 2 different versions of the trunk trim. Option 1: the bottom side is smooth, all the attachments are screwed on. The hinges are screwed on with a large bolt, the attachments for the luggage net are screwed on with small bolts. Option 2: the bottom side is fabric, all the attachments, except for the D-pillar protection, are connected with rivets. For option 2, only the D-pillar protection can be replaced. The parts connected with rivets cannot be replaced; 2. Tire for cargo net 2 pcs. Depending on the option, screwed or connected with rivets. Small bolt. 1.6 N·m. Tires of option 1 and 2 are different; 3. D-pillar protection 2 pcs. Connected with bolts. 1.6 N·m; 4. Hinge (3 pcs.). Depending on the version, screwed or connected with rivets. The bolt is large. 1.6 N·m. Both outer hinges are the same, the central one is different; 5. The eye for hanging the cargo net is screwed or riveted depending on the option. Small bolt. 1.6 N·m; 6. The support for the cargo net is screwed or riveted depending on the version. Small bolt. 1.6 N·m; 7. Small bearing 2 pcs. Depending on the version, screwed or connected with rivets. Large bolt. 1.6 N·m; 8. Large bearing 2 pcs. Depending on the version, screwed or connected with rivets. Large bolt. 1.6 N·m; 9. Front trunk trim. There are 2 different versions of the trunk trim. Option 1: the bottom side is smooth, the hinges and bearings are screwed with a large bolt. Option 2: the bottom side is fabric, all the hanging parts are connected with rivets. For option 2, only the D-pillar protection can be repaired. The parts connected with rivets cannot be replaced
(The original article is available on the website «AudiManual.ru»)