Repair Chevrolet Repair Toyota Repair Honda Repair AvtoVAZ Repair Mercedes-Benz Repair BMW Repair Opel
Home  |  Contacts  |  Sitemap  |    
English Русский
Български
Беларускі
Український
Српски
Hrvatski
Română
Polski
Slovenský
Magyar
AudiManual.ru


  • AUDI 80
  • AUDI 100
  • AUDI A3
  • AUDI A4
  • AUDI A6
  • AUDI A8
  • AUDI Q
  • OTHER
  • ARTICLES
Q7 Typ 4L (2005-2015, diesel) Q5 Type 8R (2008-2017)

Rear body trim (Audi Q5-8R)

  • Home
  • Audi Q
  • Q5 Type 8R (2008-2017)
  • Body
  • Interior
  • Rear body trim
            0
Table of contents: Removal ↓ Installation ↓ Removal ↓ Installation ↓
Rear body trim 1. Centering protrusions; 2. Clamp. 4 pcs. Insert into the trim. Replace if damaged…

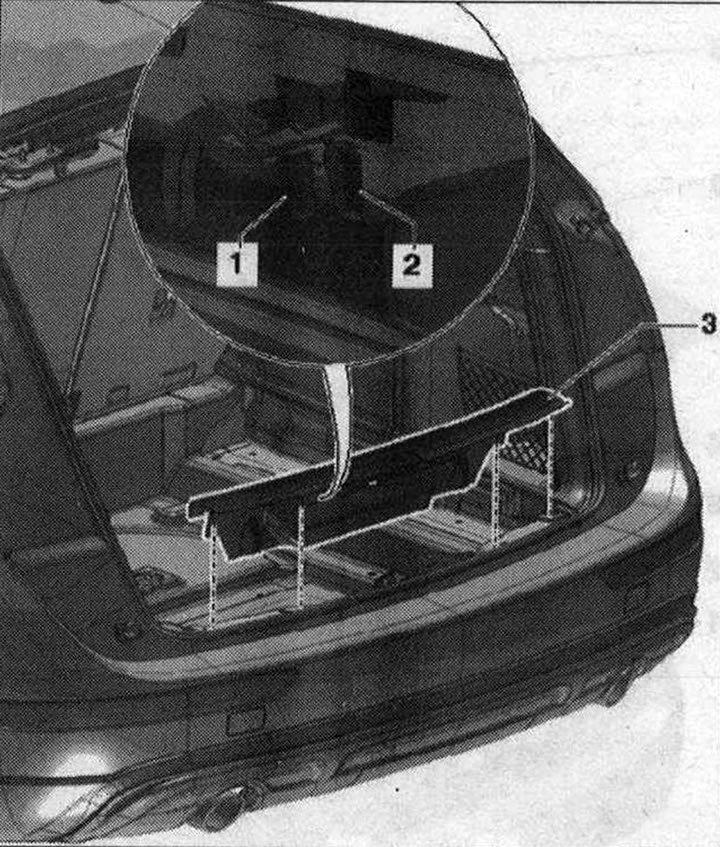
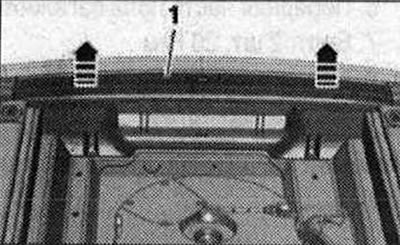
Rear body trim 1. Centering protrusions; 2. Clamp. 4 pcs. Insert into the trim. Replace if damaged or deformed; 3. Rear body edge trim


Removal


Removal


Removing the rear part of the boot floor. Unfasten the boot rear wall trim "1" with the lever "80-200" vertically upwards "arrows".

Carefully remove the rear panel trim of the trunk upwards and disconnect the electrical connector of the trunk lid closing sensor "G525" / "G526".

Installation


Reverse installation: If the trim clips remain in the bodywork mounting points, remove them and push them onto the trim for installation. Check the clips for defects and deformations, replace if necessary. Press the rear body trim until it clicks and insert the trunk lid seal over the rear body trim.


Side trim of the trunk 1. Side trim of the trunk; 2. Clamp. 3 pcs. Insert into the trim. Replace if…

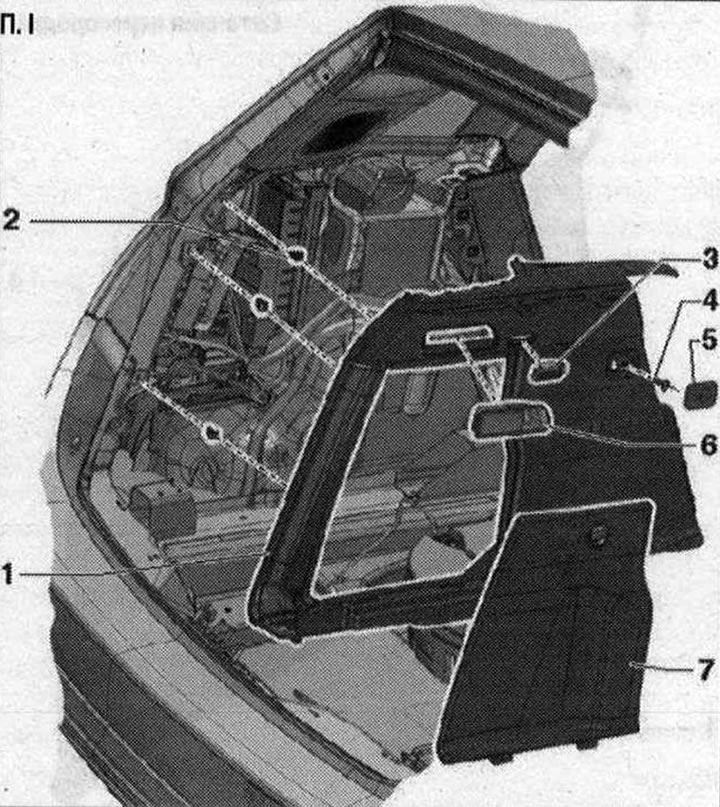
Side trim of the trunk 1. Side trim of the trunk; 2. Clamp. 3 pcs. Insert into the trim. Replace if damaged or deformed; 3. Trunk light; 4. Bolt 3 Nm; 5. Bag hook; 6. Rear seat back release mechanism; 7. Trunk side trim lid


Removal


Removal


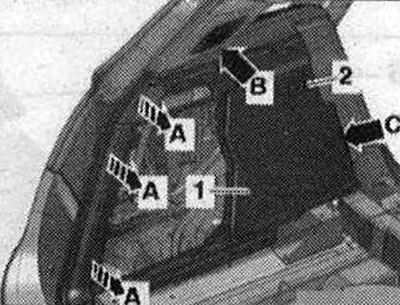
Option complete with mesh partition: remove the mesh partition. Fold the back of the rear seat forward. Remove the trim of the rear wall of the trunk. Remove the slot trim. Remove the parts for unlocking the back of the rear seat and hang it with the cable connected. Remove the trunk lamp. Remove the pocket hooks. Remove the trunk side trim cover. Unscrew bolt "2". Separate the side trim of the trunk "1" with the release lever "80-200" from the body "arrow A". Detach the side trim of the trunk with wedge "3409" in the area of the D-pillar trim "arrow B", detach the rear threshold trim "arrow C" and remove.


Installation


Installation in reverse order: if the trim clips remain in the attachment points on the body, remove them and place them on the trim for installation. Check the clips for defects and deformations, replace if necessary. Place the side trim of the trunk and press until you hear a click. Insert the trunk lid seal over the side trim of the trunk.

Mesh partition 1. Mounting eye; 2. Fastening loops. 4 pcs. For mesh partition; 3. Bolt. 4 pcs. 9…

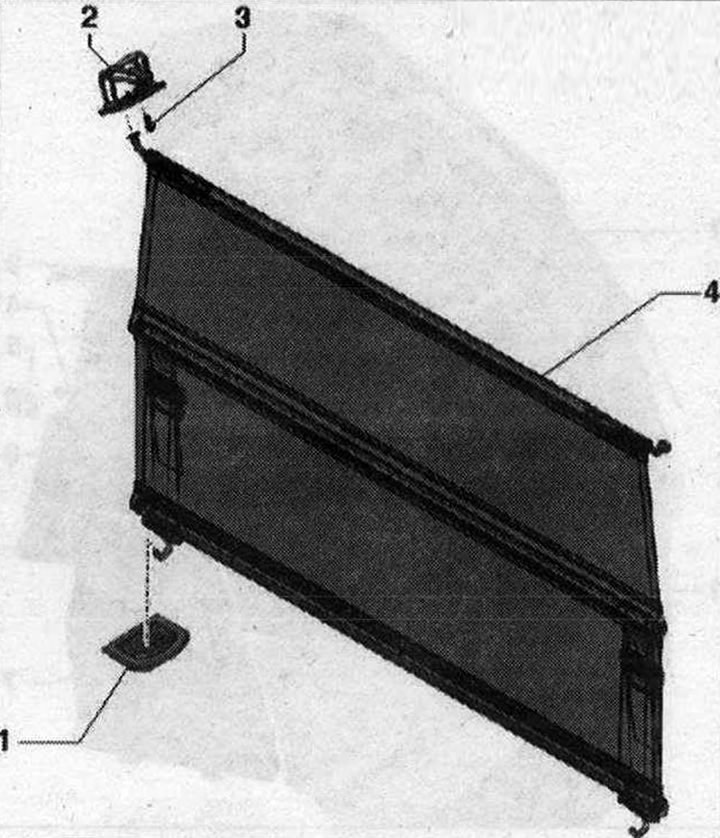
Mesh partition 1. Mounting eye; 2. Fastening loops. 4 pcs. For mesh partition; 3. Bolt. 4 pcs. 9 N·m; 4. Mesh partition. Replaceable only as a set. Fastened in lugs


Trunk floor with slotted lining. Complete set option. 1. Bolt. 2 pcs.; 2. Slotted overlay; 3.…

Trunk floor with slotted lining. Complete set option. 1. Bolt. 2 pcs.; 2. Slotted overlay; 3. Mounting eye. 2 pcs.; 4. Bolt. 4 pcs. 6 N·m; 5. Rear part of the trunk floor; 6. Front part of the trunk floor; 7. Bolt. 2 pcs. 20 Nm; 8. Front bracket; 9. Rear bracket


Trunk floor with support rail. Complete set option. 1. Bolt. 2 pcs.; 2. Slotted overlay; 3. Holder…

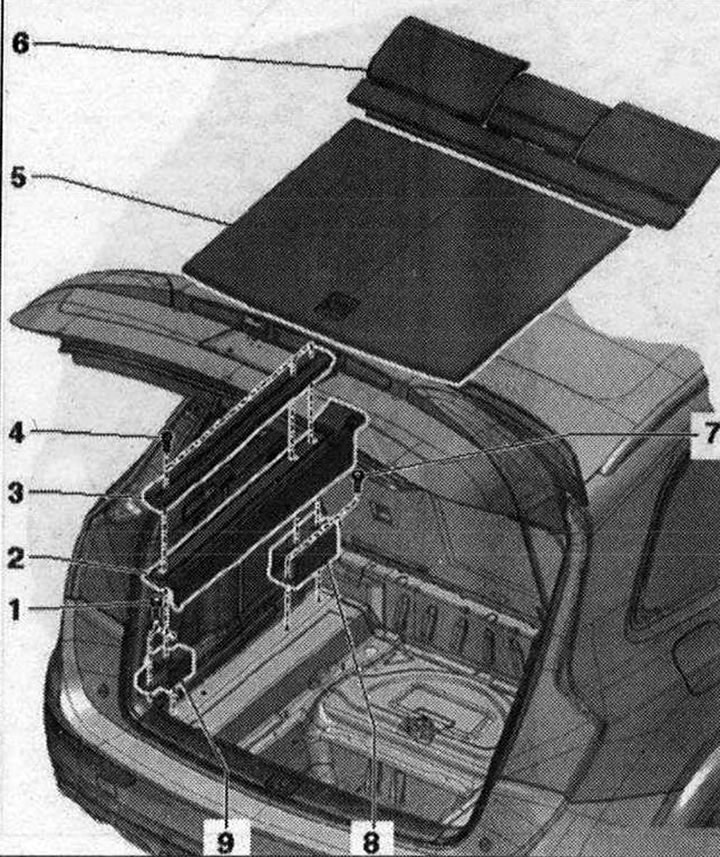
Trunk floor with support rail. Complete set option. 1. Bolt. 2 pcs.; 2. Slotted overlay; 3. Holder bar; 4. Bolt. 3 pcs. 7 N·m; 5. Rear part of the trunk floor; 6. Front part of the trunk floor; 7. Bolt. 2 pcs. 20 Nm; 8. Front bracket; 9. Rear bracket


Trunk trim, battery compartment cover 1. Battery compartment cover; 2. Spare wheel niche trim; 3.…

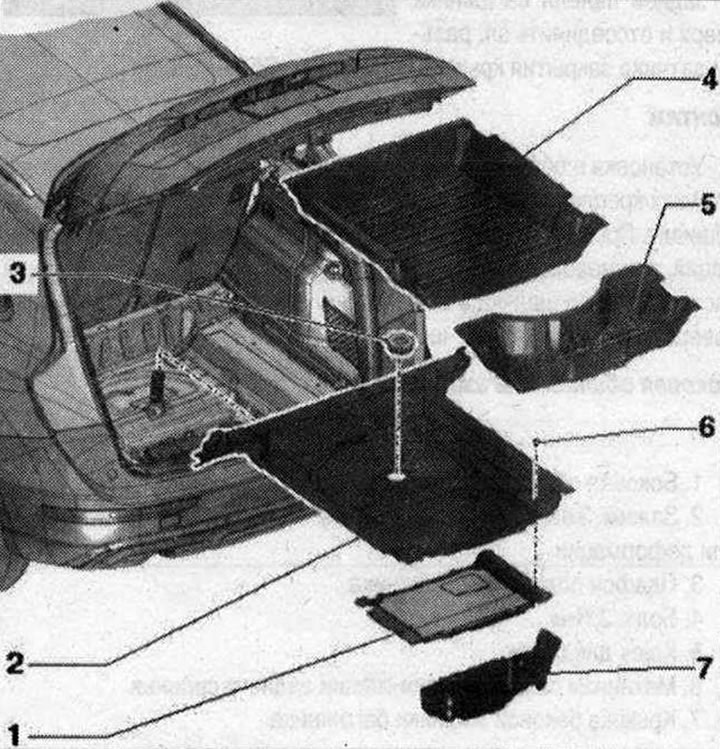
Trunk trim, battery compartment cover 1. Battery compartment cover; 2. Spare wheel niche trim; 3. Nut for fastening the spare wheel. When turning it should click, otherwise tighten it further; 4. Large mud tray; 5. Small mud collector; 6. Clamp; 7. Tool box


(The original text of the material can be found on the website: Audimanual.ru)
The article was checked by auto expert Timur Bazhenov
This article is available at russian, bulgarian, belarusian, ukrainian, serbian, croatian, romanian, polish, slovak, hungarian

Share information:
Previous articles
Audi Q Q5 Type 8R: Interior
Next articles

Trunk linings
Footrest and floor covering
D-pillar trim
C-pillar lining
Trunk lid trim
Upper trim of the trunk lid
Ceiling lining
Removal the handle in the roof frame


Similar articles on other Audi car models:
Rear view mirrors Audi 80 B3 (1986-1991, petrol)
Replacing the rear decorative trim with a niche for the license… Audi 100 C3 (1982-1990)
Removal and installation the rear roof trim Audi A3 Type 8L (1996-2003)
Removal and installation the rear door trim Audi A4 B6 (2000-2006)
Rear wheel well trim Audi A6 C5 (1997-2004)
Rear drive shafts Audi A8 D2 (1994-2002)
Rear view mirror inner trim Audi A2 (1999-2005)
Link to this page in different formats


Visitor comments

No comments yet


How much will 35 + 12 =


Q7 4L(2005-2015, diesel) 
  • General information
  • Operating instructions
  • Maintenance
  • Power unit
  • Diesels 3.0 l (BUG, BUN, CAS)
  • Diesels 3.0 l (CATA, CCMA)
  • Diesels 3.0 l (CJGA/CJGC)
  • Diesels 4.2 l (BTR, CCFA/CCFC)
  • Cooling system
  • Fuel and exhaust system
  • Engine management system
  • Starting and charging
  • Transmission
  • Automatic gearbox
  • Drive shafts
  • Chassis
  • Brake system
  • Front suspension
  • Rear suspension
  • Steering system
  • Body
  • Air conditioner
  • Exterior
  • Interior
  • Electrical equipment
  • Equipment and devices
  • Electrical circuits
 
Q5 8R(2008-2017) 
  • General information
  • User manual
  • Power unit
  • Petrol engine 2.0 l
  • Petrol engine 3.2 l
  • Fuel system (petrol)
  • Diesel 2.0 liter (CA)
  • Diesel 2.0 liter (CG/CJ/CM)
  • Diesel engine 3.0 l
  • Fuel system (diesel)
  • Transmission
  • Manual gearbox 0B1
  • Manual gearbox 0B2
  • Automatic gearbox 0B5
  • Automatic gearbox 0B6
  • Chassis
  • Front suspension
  • Rear suspension
  • Brake system
  • Steering
  • Body
  • Exterior
  • Interior
  • Doors, locks and windows
  • Safety system
  • Ventilation and heating
  • Electrical equipment
  • Power devices
  • Equipment and devices
  • Lighting and alarm
  • Audio system
  • Electrical circuits
 
AudiManual.ru © 2017-2026 · Mobile version · Feedback · Sitemap: EN BG BY UA RS HR RO PL SK HU · Site search · News and articles
80 B2 · 80 B3 petrol · 80 B3 · 80 B4 · 100 C3 diesel · 100 C3 petrol · 100 C3 · 100 C4 petrol · 100 C4 · A3 Type 8L · A4 B5 petrol · A4 B5 · A4 B6 petrol · A4 B6 · A4 B7 · A4 B8 · A6 C4 · A6 C5 · A6 C5 Allroad · A8 D2 · Q5 Type 8R · Q7 Typ 4L · Audi A2 ·
This site uses cookies 🍪. Click the button to accept this fact.