
Table of contents: Fuse box in the car interior ↓ Main fuse on the positive potential… ↓ Purpose of fuses ↓
To avoid short circuits, damage to wiring and electrical equipment due to network overload, individual electrical circuits are protected by fuses with fusible links. Fuses of different ratings with so-called blade contacts are used. A blown fuse can be identified by a melted metal insert.
Before replacing a fuse, always switch off the corresponding consumer and the ignition.
Fuse box in the car interior
The fuse box is located on the driver's side and is covered by a pocket. The fuse assignment table is on the inside of the box cover (see illustration 23.0).
Removal
1. Disconnect the negative (-) battery terminal from the battery.
2. Remove the pocket on the driver's side that covers the fuse box.
3. Unscrew the bolts B securing the fuse box A (see illustration).
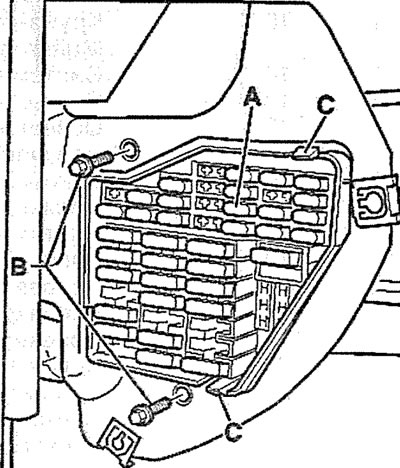
23.3. Unscrew the bolts B securing the fuse box A
4. Press the C tabs together and remove the fuse box from the instrument panel by disconnecting the connector on the back of the box (see illustration 23.3).
5. Cut the clamp 1 of the wire fastening, then press the clamps (see arrows in the illustration) and open the fuse box cover.
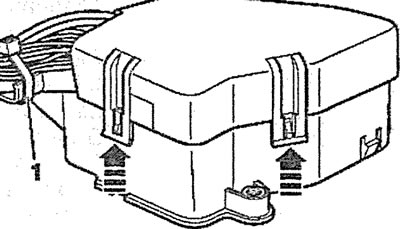
23.5. Cut the clamp 1 of the wire fastening, then press the clamps (see arrows) and open the fuse box cover
6. Remove the blown fuse using plastic tweezers.
7. Insert a new fuse rated for the same amperage as the blown fuse. The fuse rating is indicated on the back of the housing. In addition, the housing has a marking applied in paint, the color of which corresponds to a certain rating.
If the new fuse also burns out after a short period of time, the corresponding electrical circuit must be checked.
Never replace fuses with wire or other similar means, as this may cause serious damage to electrical equipment.
It is recommended to always carry a set of spare fuses of different ratings with you.
Installation
The fuse box is installed in the reverse order of removal.
Main fuse on the positive potential (+) wire of the battery
Removal
8. Disconnect the negative (-) battery terminal from the battery.
9. Remove the rubber seal of the fairing grille (see arrows in the illustration).
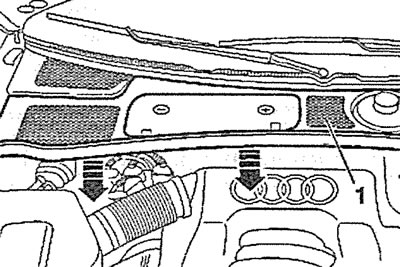
23.9. Remove the rubber seal of the fairing grille (see arrows)
10. Remove the grille 1 of the fairing by pushing it forward (see illustration 23.9).
11. Open the protective cover 2 of the main fuse, unscrew the nut 3 (see illustration).
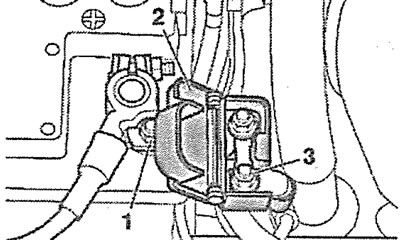
23.11. Open protective cover 2 of the main fuse, unscrew nut 3. Tightening torque of the nut - 7.5 Nm
12. Unscrew nut 1 of the main fuse holder and remove the fuse (see illustration 23.11). The tightening torque of the nut is 7.5 Nm.
Installation
The main fuse is installed in the reverse order of removal.
Purpose of fuses
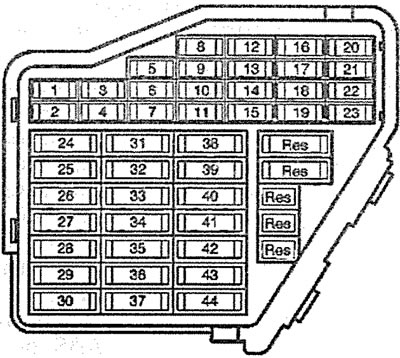
23.0. Table with the purpose of fuses
| № | Ampere | Consumer |
| 1 | 5 | Heater for jets, mirrors |
| 2 | 10 | Direction indicators |
| 3 | 5 | Lighting. Headlight washer relay |
| 4 | 5 | License plate lighting |
| 5 | 10 | Instrument cluster, heated seats, cruise control diagnostic plug, light bulb control unit, catalytic converter, switch illumination, gear indicator, airbag warning light, outside temperature gauge, air conditioning, parking heater, rear window blind, sunroof, parking assist sensors, heater, navigation system |
| 6 | 5 | Central lock |
| 7 | 10 | ABS, brake light switch. Clutch pedal switch |
| 8 | 5 | Telephone |
| 9 | 10 | Rear view mirror heater |
| 10 | 5 | Automatic headlight range control |
| 11 | 10 | Cruise control (cars with automatic transmission), multitronic gearbox control unit |
| 12 | 10 | Self-diagnosis system |
| 13 | 10 | Brake lights |
| 14 | 10 | Interior lighting, reading lights, security alarm, vanity mirror lighting, seat position memory |
| 15 | 10 | Instrument cluster, air conditioning, seat and rear view mirror position memory, parking heater timer, navigation system |
| 16 | 5 | Vehicle stability control system |
| 17 | 10 | Navigation system, ride height control |
| 18 | 10 | Right high beam headlight |
| 19 | 10 | Left high beam headlight |
| 20 | 15 | Right low beam headlight, headlight aiming adjuster |
| 21 | 15 | Left low beam headlight, headlight aiming adjuster |
| 22 | 5 | Right side/parking light |
| 23 | 5 | Left side light/parking light |
| 24 | 25 | Windscreen wiper, washer pump, interval relay |
| 25 | 30 | Heater/Air Conditioner Fan, Parking Heater |
| 26 | 30 | Rear window defroster, interior air recirculation mode |
| 27 | 15 | Steering wheel heater, rear window wiper |
| 28 | 20 | Fuel pump, additional pump for vehicles with diesel engine |
| 29 | 30 | Engine control unit. |
| 30 | 20 | Luke |
| 31 | 15 | Reversing lights, cruise control, automatic transmission, diagnostic socket |
| 32 | 20 | Engine control unit |
| 33 | 15 | Cigarette lighter |
| 34 | 15 | Engine control unit |
| 35 | 30 | Towing hitch socket |
| 36 | 15 | Fog lights, rear fog light |
| 37 | 20 | Telephone, radio |
| 38 | 20 | Trunk light, central locking |
| 39 | 15 | Emergency light signaling |
| 40 | 25 | Sound signal |
| 41 | 25 | ABS, stability control system |
| 42 | 25 | Vehicle stability control system |
| 43 | 5 | Terminal S of the radio receiver |
| 44 | 30 | Seat heater, parking heater |
| Nominal current | Color coding |
| 5 A | beige/light brown |
| 7.5 A | brown |
| 10 A | red |
| 15 A | blue |
| 20 A | yellow |
| 25 A | white |
| 30 A | green |