
Removal
1.. Remove the door trim by pressing it with a plastic wedge at point 1, and then at points 2, 3 and 4 (see illustration).
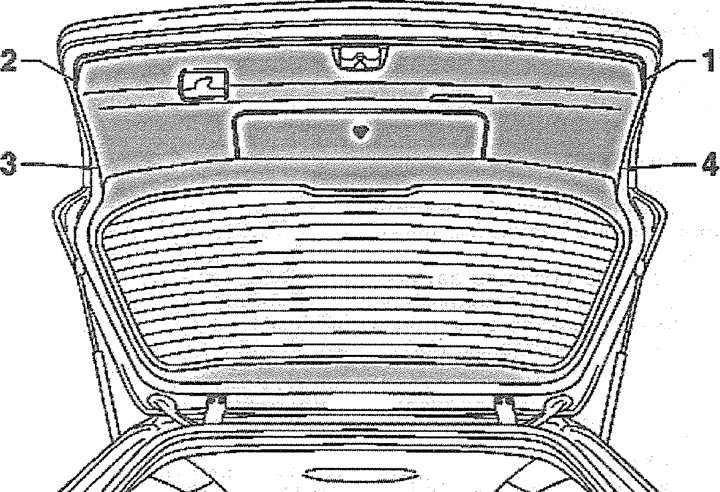
14.1. Remove the door trim by pressing it with a plastic wedge at point 1, and then at points 2, 3 and 4
2. Disconnect the rear window defroster and jet connectors.
3. Disconnect the low-pressure hose of the central lock and the hose for supplying the washing liquid. Attention! To facilitate subsequent laying of the wires in the cavity of the door, it is recommended to tie a string to the ends of the wires, which remains in the cavity of the door when pulling out the harness.
4.. Open the rear door and prop it up securely.
5. Disconnect the upper support of the gas-filled door stop 1 by pulling the retainer 3 with a screwdriver and then removing the support from the pin 2 with a spherical head (see illustration).
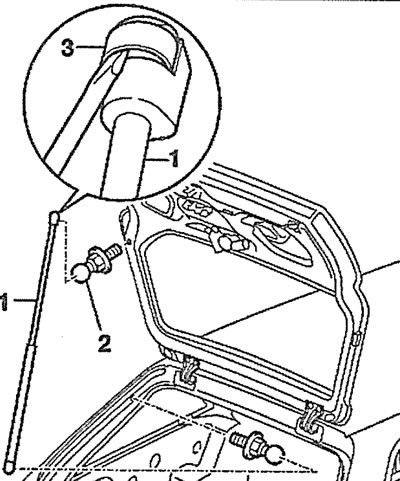
14.5. Disconnect the upper support of the gas-filled door stop 1 by pulling the retainer 3 with a screwdriver and then removing the support from the pin 2 with a spherical head
Attention! If necessary, the stop pins can be unscrewed. Tightening torque 15 Nm.
6. Mark the position of the rear drop door in the hinges 2 by tracing the contact points of the bolt heads 1 of the hinges with a felt-tip pen or marker (see illustration).
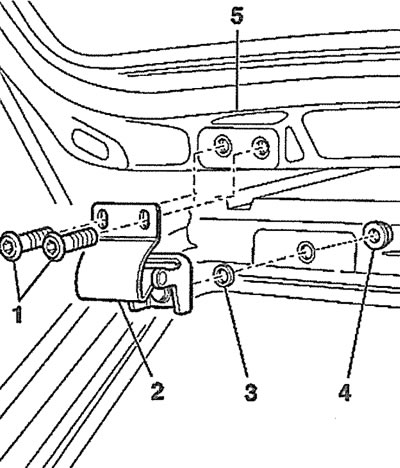
14.6. Mark the position of the rear hinged door in hinges 2 by circling the areas where the heads of the hinge bolts 1 meet with a felt-tip pen or marker:
3 - seal
4 - hinge fastening nut
5 - door
7. Unscrew the bolts 1 with a table with an internal Allen key under the socket wrench (see illustration 14.6).
8. Remove the rear hatch 5, working with an assistant (see illustration 14.6). Installation
9. Using the help of an assistant, install the rear door back into place.
10. Screw in bolts 1, but do not tighten them (see illustration 31.6).
11. Reinstall the rear door gas struts.
Attention! If the stops were removed completely, then when installing it, remember that the stop rod must be facing upwards.
12. Align the rear door using the marks made before removal. Tightening torque for the door hinge bolts is 21 Nm. When installing a new door, it will need to be adjusted.
13. Pull the wiring harness and hoses of the washer and central lock into the door cavity and connect them.
14. Check the operation of the washer and central lock.
15. Reinstall the tailgate trim.
Fit
Attention! The rear door must be fitted with the stop installed.
16. Remove the trunk sill trim.
17. Unscrew nuts 1 and remove the cover of the bracket 2 of the lock (see illustration).
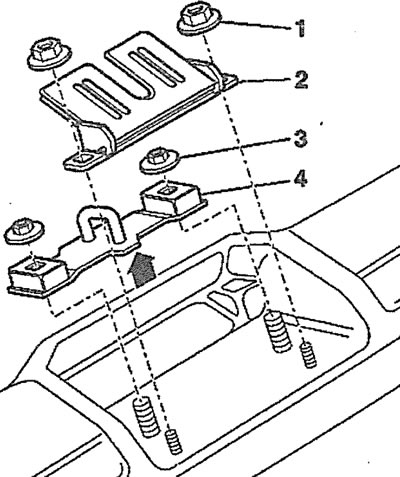
14.17. Unscrew nuts 1 and remove the cover of the bracket 2 of the lock
18. Slightly loosen the nuts 3 so that the bracket 4 can be moved by applying a certain amount of force (see illustration 14.17).
Attention! If the bracket was removed, then when installing it, it should be secured so that the protrusion (see arrow in illustration 14.17) was facing backwards.
19. Unscrew bolt 5 and remove the upper part 4 of stop 3 (see illustration).
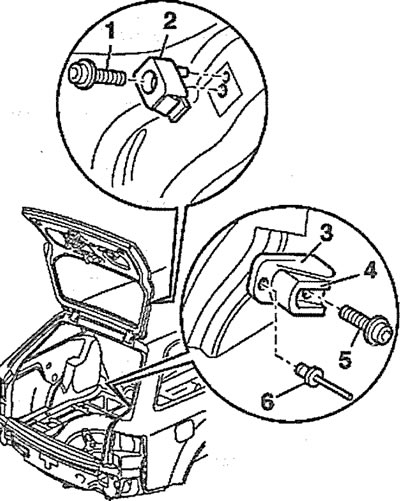
14.19. Unscrew bolt 5 and move the upper part 4 of stop 3:
1 - mounting bolt
2 - door stop
6 - stop rivet 3
20. Screw in bolt 5 and tighten it lightly (see illustration 14.19). Close the rear door and press it so that its edge extends beyond the body line by approximately 2 mm.
21. Open the door and move the top part of the 4 stops onto the three stop grooves (see illustration 14.19).
22. Tighten bolt 5 in this position with a force of 8 Nm. Stop 2 is secured with bolt 1 with a tightening torque of 8 Nm (see illustration 14.19).
23. Move the lock bracket slightly upwards.
24. Close the door and adjust it so that its height is level with the adjacent body parts.
25. Carefully open the door and tighten the door hinge nuts to 21 Nm.
26. Check the door gaps and, if necessary, align its position by loosening the hinges.
27. Install the cover on the lock bracket and tighten the fastening nuts with a force of 5 Nm.
(The original version is on the portal: AudiManual.ru)