
Table of contents: Checking the electrolyte level ↓ Checking the fastening of the… ↓ Checking the quiescent voltage ↓ Checking the battery under load ↓ Checking the density of the… ↓ Charging the battery ↓ Charger ↓ Notes for battery with plugs ↓ Charging a deeply discharged and… ↓ Fast Charging/Start Assist ↓
Checking the electrolyte level
Distilled water may be required to carry out the work.
In serial storage batteries, the electrolyte once filled, under normal conditions, is sufficient for the entire service life of the battery. However, at high outside temperatures and after charging the battery, as well as during maintenance, it is necessary to check the electrolyte level.

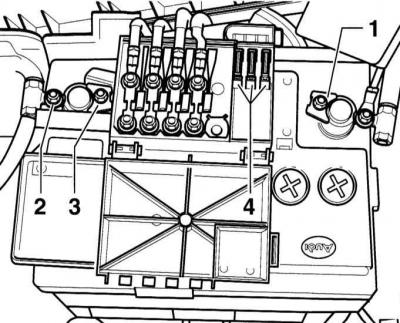
1. The battery is located in the engine compartment. Open the battery cover by releasing the clips and pressing the cover down.
2. Check the electrolyte level from the outside through the transparent battery case. If the electrolyte level in one of the sections has dropped below the MIN mark, unscrew the plug.
Warning: If the electrolyte level cannot be determined, remove the plug and look into the battery. Do not use an open flame. There is a risk of explosion!
3. The middle plugs are covered by the fuse box. To remove the box, squeeze the strips and flip the cover.
4. Disconnect the negative (–) battery cable with the ignition off.
Warning: This will erase information from electronic memory units, such as the radio code. Without the code, the radio can only be switched on by the manufacturer or at an AUDI service station. Therefore, please read the notes in the subsection Removal and installation the battery.
5. As a result, information is erased from electronic memory units, such as the radio receiver code. Without the code, the radio receiver can only be switched on by the manufacturer or at an AUDI service station. Therefore, read the notes in the subsection Removal and installation the battery.
6. Fill each section separately with distilled water up to the MAX mark.
7. Screw in and tighten the plug.
8. Replace the main fuse box and secure it with nut –2–.
9. Finally, charge the battery, referring to the subsection Checking battery condition, care and charging.
10. If you suspect a faulty battery, measure the resting voltage and refer to the following subsection.
11. Connect the negative (–) cable to the battery.
Warning: Activate the automatic power window safety system, enter the radio code, set the clock, and refer to the Automatic Transmission and All-Wheel Drive Models section.
12. Secure the battery cover with clamps.
Checking the fastening of the battery terminals and holder
Warning: If the battery is not properly secured or the terminals are not secured, the result may be premature failure of the battery due to vibration, cable fire or electrical equipment malfunction. Since the data of electronic memory units, such as the radio, is erased when the battery is not connected, please read the subsection Removal and installation the battery and subsection Entering the radio code.
1. Move the battery terminals in different directions and check the reliability of their fastening, tighten if necessary.
2. If the battery is not securely fastened, tighten the mounting bolt to 20 Nm.
Checking the quiescent voltage
The condition of the battery is checked by measuring the voltage with a voltmeter connected between the battery terminals.
1. Disconnect the battery, refer to the subsection Removal and installation the battery.
2. The battery must be disconnected 2 hours before testing.
3. Connect a voltmeter to the battery terminals and measure the voltage.
4. Estimation of voltage magnitude:
- 12.5V or more - battery in good condition
- 12.4 V or less - the battery is in poor condition and needs to be charged or replaced with a new one.
5. Connect the negative (–) cable.
Warning: Activate the automatic electric windows, and also set the clock and enter the radio code, while referring to the subsection Removal and installation the battery and subsectionEntering the radio code.
Checking the battery under load
1. Connect a voltmeter to the battery terminals.
2. Start the engine and check the voltage.
3. When starting the engine with a fully charged battery, the voltage should not fall below 10 V (at an electrolyte temperature of about +20°C).
4. If the voltage drops sharply and the density of the electrolyte in different sections is different, the battery is damaged and must be replaced.
Checking the density of the electrolyte
The density of the electrolyte in combination with the voltage gives an accurate idea of the state of charge of the battery. A densimeter is used to check the density of the electrolyte. When checking the battery, the temperature of the electrolyte should be at least +10°C.
1. Turn off the ignition.
2. Unscrew all the plugs from the battery. If there is a roof, remove it first with a screwdriver.
3. Insert the densimeter into one of the battery sections and draw up a quantity of electrolyte sufficient for the float to float. The higher the specific gravity (density) of the electrolyte, the more the float floats. The electrolyte density can be read from the scale in units of specific gravity (g/ml) or in Baume degrees (+°Be).
4. The density of the electrolyte must be at least 1.24 g/ml – refer to Specifications. If the density is low, the battery must be charged.
5. Check each section in order. All sections should have the same density (the largest difference is 0.04 g/ml). If the difference is greater, the battery is faulty.
Charging the battery
Warning: Before charging the battery, read the safety notes in the subsection Removal and installation the battery.
1. Do not disconnect the battery while the engine is running.
2. Never short-circuit the battery, i.e. connect the positive (+) and negative (–) poles together. This will cause the battery to heat up and may crack.
3. Do not use open flame near the battery. The electrolyte is poisonous. Do not allow it to come into contact with your eyes, skin or clothing. Otherwise, rinse the electrolyte thoroughly with water.
4. In a battery with a central gas outlet, when charging, plugs (phillips head) don't turn it inside out.
5. Before charging a frozen battery, let it thaw. A charged battery freezes at about 65°C, a half-charged battery at about 30°C, and a discharged battery at about 12°C. After thawing, check the battery for cracks. Replace if necessary.
6. When charging the battery with a normal charger or a fast charger, remove the battery. At a minimum, disconnect the negative (-) and positive (+) cables.
When using a portable charger (low current) charging can be done without removing the battery. There is no need to disconnect the connecting cable to the vehicle electrical system. Naturally, the battery manufacturer's data must be taken into account.
Charger
1. Remove the battery.
2. Check the electrolyte level. If necessary, add distilled water, referring to the relevant Section.
3. Charge the battery only in a well-ventilated area or outdoors. When charging the battery without removing it from the car, open the hood.
4. Check that the gas outlet hose is not pinched or that the gas outlet pipe is not clogged.
5. If the fast charger has adjustable current, set the charging current to 10% of the battery capacity, i.e. for a capacity of 50 Ah, set the current to about 5 A. The charging time can be taken as 10 hours.
6. With the device turned off, connect the positive cable (+) of the device to the positive pole (+) of the battery. Connect the negative cable (–) of the device to the negative pole (–) of the battery.
7. Insert the power plug of the charging device into the socket. If necessary, turn on the device.
8. If the battery is charged with constant current, check the battery temperature by placing your palm on it. The electrolyte temperature during charging should not exceed +55°C. Otherwise, interrupt the charging process or reduce the charging current.
9. After charging is complete, turn off the device (if possible) and disconnect the power plug from the charger.
10. Disconnect the charger cable from the battery.
11. Check the battery charge, refer to the subsection Checking battery condition, care and charging.
12. Install the battery back into place, referring to the appropriate Section.
Notes for battery with plugs
1. Before charging, unscrew the plugs from the battery or remove the cover with a narrow screwdriver and slightly close the holes with it. This will prevent splashing of electrolyte due to gas formation.
2. Continue charging until gas flows abundantly from all sections, and the voltage and density of the electrolyte do not change during three measurements taken one after another over a period of three hours.
3. After the battery is fully charged, let it vent for 20 minutes. Then close the caps.
Charging a deeply discharged and sulfated battery
Battery that has not been used for a long time (for example, when the car is parked for a long time), discharges and sulfates over time. If the open circuit voltage of the battery is below 11.6 V, the battery is considered deeply discharged. Check the resting voltage. In a deeply discharged battery, the electrolyte consists almost entirely of water.
Warning: At sub-zero temperatures, such a battery may freeze and the battery case may crack.
Warning: A heavily discharged battery becomes sulfated, i.e. large, poorly soluble lead sulfide crystals form on the surface of the electrodes. The electrolyte loses its transparency and becomes a faint white color.
Warning: If a deeply discharged battery is charged immediately after discharge, sulfation occurs again. Otherwise, the battery plates continue to harden and the ability to charge the battery for a long time remains limited.
Warning: A heavily discharged and sulphated battery should be charged with a reduced current of about 5%, i.e., for example, with a battery capacity of 60 Ah, the charging current should be 3 A.
Warning: The charging voltage should be no more than 14.4V.
Warning: Never charge a deeply discharged battery with a fast charger.
Fast Charging/Start Assist
1. Use a fast charger to charge the battery only to start the vehicle. The charging current should be 20% or more of the battery capacity. This will damage the battery because it is exposed to high currents. A battery that has not been used for a long time and is very discharged should not be charged with a fast charger because this will cause sulfation.
Storage of the battery
2. If the car has not been used for more than two months, the battery must be removed and charged. The optimal storage temperature for the battery is from 0 to +27°C. At these temperatures, self-discharge of the battery is minimal. The battery must be charged at least once every two months, otherwise it becomes unusable.
A battery that has not been used for a long time (for example, the car was not used), discharges and can also become sulfated. If such a battery is charged with a fast charger, it will not accept the charging current or, due to sulfation, it will become "fully" charged too quickly. In fact, the battery is damaged.
Before you determine that the battery is damaged, you should check the following:
3. Electrolyte density. If the difference between the densities in individual sections does not exceed 0.04 g/ml, then the battery must be charged with a normal charger.
4. After charging, check the battery under load. If the battery characteristics are lower than those listed in the Specifications, the battery is damaged.
5. If the density of the electrolyte in one or two adjacent sections differs significantly (for example, in five sections 1.16 g/ml, and in the sixth 1.08 g/ml) the battery is shorted and needs to be replaced.
This publication is borrowed from the resource AUDImanual.ru