
Generator
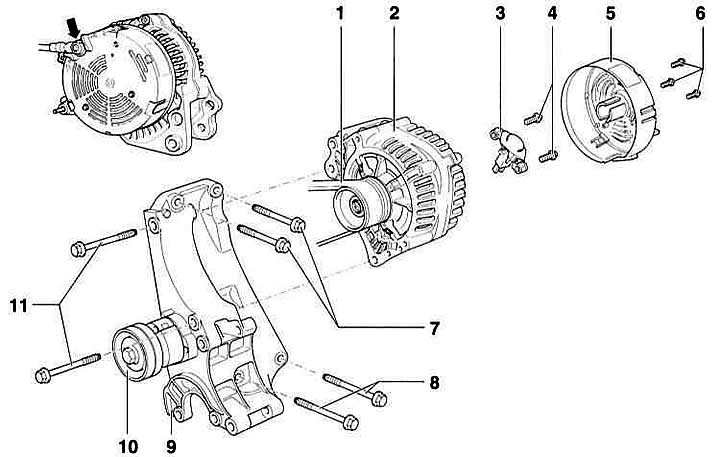
- 1 - V-belt
- 2 - generator
- 3 - voltage regulator
- 4 - bolts
- 5 - protective cover
- 6 - bolts
- 7 - bolts, 50 Nm
- 8 - bolts, 50 Nm
- 9 - holder
- 10 - tensioner
- 11 - bolts, 45 Nm
Gasoline engine
Removal
1. Disconnect the battery ground (–) cable with the ignition off.
Warning: This erases data in electronic memory units, such as the radio receiver code. Without the code, only the manufacturer can turn on the radio receiver, such as the AUDI radio AUDI service station. Therefore, read the instructions in the subsection Removal and installation the battery.
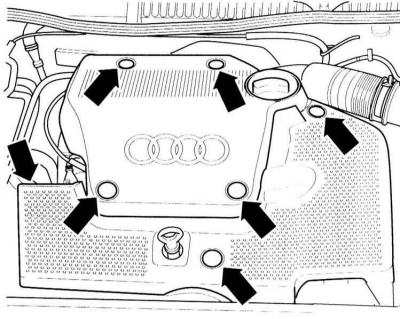
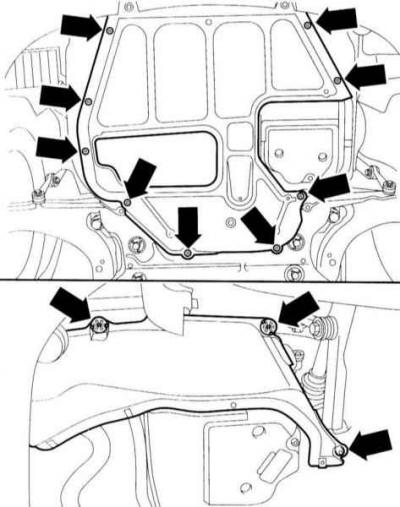
2. Unscrew the mounting bolts and remove the engine cover. To do this, remove the plugs and unscrew the nuts (arrows in the illustration). The illustration shows the 1.6L AEN engine.
3. Mark the direction of rotation of the V-belt. To do this, use chalk to draw an arrow in the direction of rotation. The V-belt, when viewed from the belt side, rotates clockwise.
4. Remove the V-belt, refer to subsection Removal and installation a ribbed V-belt.
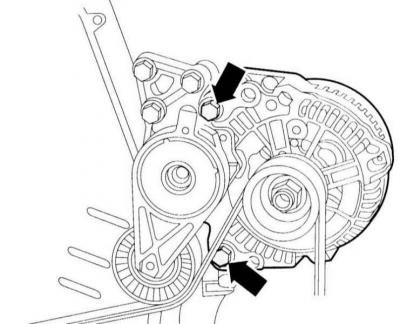
5. Unscrew the 3 bolts securing the V-belt tensioner.
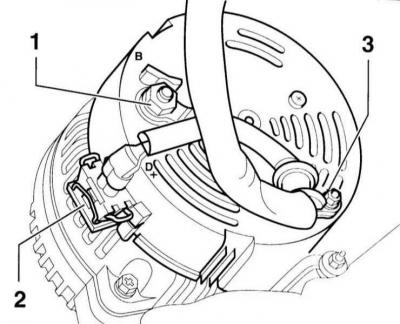
6. Disconnect the electrical wire –1– (terminal 30/B+).
7. Disconnect the cable clamp –3–.
8. Disconnect connector –2– by pressing in the wire clamp.
9. Loosen the mounting bolts and remove the generator from the holder.
Installation

10. Before installation, drive in the threaded bushings of the generator mounting bolts by approximately 1 mm (B).
11. Install the generator on the holder and secure with a torque of 25 N•m.
12. Tighten the electrical wires to 15 Nm and connect. Tighten the cable clamp to 15 Nm.
13. Tighten the V-belt tensioner to 25 Nm.
14. Install the V-belt, refer to the subsection Removal and installation a ribbed V-belt.
15. Install the engine cover and secure it with bolts.
16. Connect the battery ground (–) cable.
Warning: Activate the high-altitude automatic electric window lifter, and also set the clock and enter the radio code, refer to the subsection Removal and installation the battery.
Diesel engine
Removal
17. Disconnect the battery ground (–) cable with the ignition off.
Warning: This erases data in electronic memory units, such as the radio receiver code. Without the code, only the manufacturer can turn on the radio receiver, such as the AUDI radio AUDI service station. Therefore, read the instructions in the subsections Removal and installation the battery and Entering the radio code.
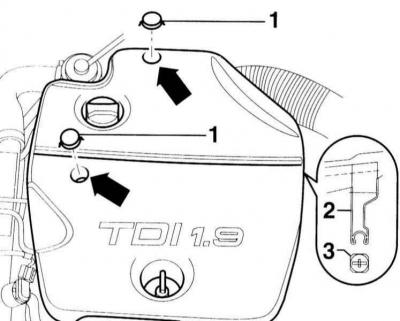
18. Remove the engine cover as follows (refer to the accompanying illustration):
- Remove plug –1–.
- Unscrew the nuts (arrows).
- Remove the clamp –2– from the pin –3– and remove the cover.
19. Remove the noise-absorbing element in the center and on the right.

20. Disconnect the electrical wire –1– (terminal 30/B+), refer to the illustration.
21. Disconnect the cable clamp –3–.
22. Disconnect connector –2– by pressing in the wire clamp.
23. Mark the direction of rotation of the V-belt. To do this, use chalk to draw an arrow in the direction of rotation. The V-belt, when viewed from the belt side, rotates clockwise.
24. Remove the V-belt, refer to subsection Removal and installation the V-belt.
25. Unscrew the 3 bolts securing the V-belt tensioner.

26. Air conditioner: Loosen the mounting bolts (A) and remove the compressor and hang it on the body with the wires attached.
27. Cars with enhanced cooling: Remove the additional fan on the right. Protect the radiator from damage with cardboard.
28. All cars: Loosen the mounting bolts and remove the generator, lift it upward.
Installation
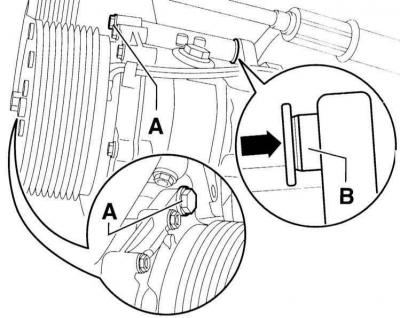
29. Before installation, drive in the threaded bushings of the mounting bolts at the generator by approximately 1 mm, see also (B).
30. Install the generator on the holder and secure with a torque of 25 Nm.
31. Vehicles with enhanced cooling: Install the right additional fan, remove the cardboard.
32. Air conditioner: Secure the compressor to the holder with a torque of 45 Nm.
33. Tighten the belt tensioner to a torque of 25 Nm.
34. Install the V-belt, refer to subsection Removal and installation the V-belt.
35. Tighten the electrical wires to 15 Nm and connect them. Tighten the cable clamp to 15 Nm.
36. Install noise damper in the center and right.
37. Secure the engine cover and press in the plugs.
38. Connect the battery ground (–) cable.
Warning: Activate the high-altitude automatic electric window lifter, and also set the clock and enter the radio code, refer to the subsection Removal and installation the battery.
The original article is posted on the resource: AUDImanual.ru