



Table of contents: Removal ↓ Installation ↓ Note for batteries with vented caps ↓ Purchasing a new battery ↓
The battery is located in the engine compartment, behind the left headlight.
Warning: Disconnecting the battery erases data from some electronic memory units, such as the engine and gearbox fault memory and the anti-lock braking system. Before disconnecting the battery, have the memory units read out at an AUDI service station. If these faults occur again while driving the vehicle, they are written back into the memory.
The automatic electric windows should be activated again after the battery is reconnected.
The serially installed radio receivers have a security lock. It prevents unauthorized use of the device if its power supply is interrupted. The power supply is interrupted not only when the battery is disconnected, but also when the radio receiver is removed or if the radio receiver fuse is damaged.
If the radio is coded, the radio code must be set before disconnecting the battery. If the code is unknown, the radio can be switched on at an AUDI service station, also refer to the subsection Entering the radio code.
Before disconnecting the battery, write down the settings of the radio transmitters stored in memory.
If the battery needs to be replaced:
– If possible, use a modern battery with a central gas outlet. In this case, the gases formed in the battery are discharged through a hose.
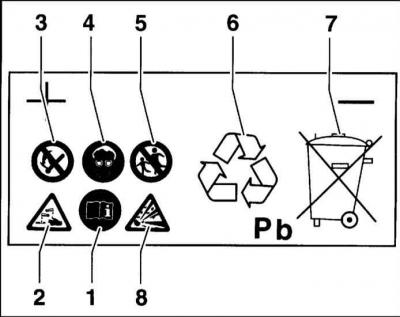
- 1 - When servicing the battery, it is necessary to follow the safety instructions set out in the operating manual.
- 2 - The battery contains corrosive acid and care must be taken to prevent acid from spilling from the battery.
- 3 - Do not use open fire near the battery.
- 4 - When working with the battery, use safety glasses.
- 5 - Keep the battery out of reach of children.
- 6 - When disposing of the battery, take it only to designated collection points.
- 7 - Do not dispose of the battery with household waste.
- 8 - The gases released during battery charging are explosive.
– If a battery with ventilated plugs is installed, make sure that the plugs are protected from splashes of water by a plastic cover.
Removal
1. Turn off the ignition.
2. Open the hood.
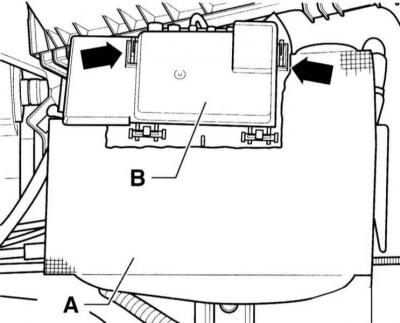
3. Remove the battery cover (A) by opening the clip.
4. Open the main fuse box cover (B) forwards. To do this, press the locking strips on the left and right of the cover (arrows).
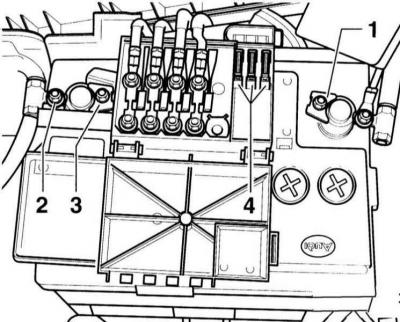
5. Disconnect the negative battery cable (–) and move it to the side. To do this, loosen the nut –1– (key 10 mm).
6. Unscrew the nut –2– (key 10 mm). Disconnect the main fuse box from the front and rear of the battery and remove.
7. Disconnect the positive (+) battery cable by unscrewing nut –3– (key 10 mm). 4 – fuses.
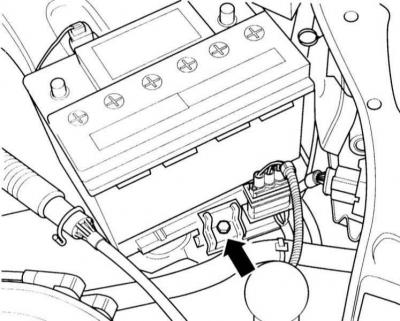
8. Loosen the mounting plate bolts at the base of the battery (arrow on the accompanying illustration) and take it out.
9. Move the battery away from the mounting plate and remove it. The plate is opposite the removed holder.
Installation
10. Check that the ignition and all power consumers are switched off; switch them off if necessary.
Warning: When installing the battery, make sure that the central gas outlet hose is not pinched. This is the only way to ensure that the gases produced during battery charging can be discharged unhindered via the gas outlet hose. The battery shown in the illustration is not the one installed in the AUDI A3.
Warning: In the hose connection (arrow on the illustration) there is a fire protection device that prevents the hydrogen released from the battery through the gas outlet hose from igniting. Therefore, the gas outlet hose should not be removed.
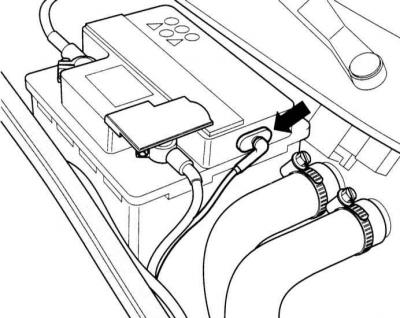
11. Insert the battery into the holder –1–.
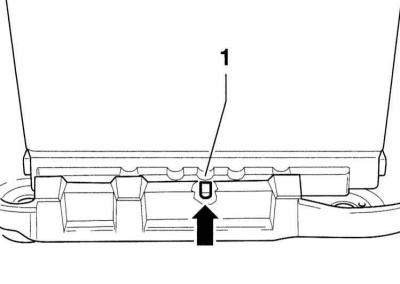
Warning: When installing the battery, make sure that the battery holder tab (arrow on the illustration) entered the groove of the support bar –1–. After this, do not move the battery to the left or right.
12. The battery is installed correctly if the central groove of the battery support bar matches the threaded hole.
13. For a battery with a hose for central gas outlet, make sure that the hose is not pinched and that nothing interferes with the degassing process.
14. For batteries without a central gas outlet hose, ensure that the hole at the top of the cover is not clogged.
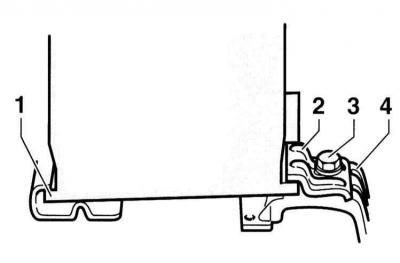
15. Install the holder –2– on the block –4– to secure the battery and secure with the bolt –3– to a torque of 20 Nm (1 – support bracket).
16. Check the battery installation by moving it around. If the battery is not securely installed, its service life will be reduced. In addition, the impact safety will be reduced.
17. Reinstall the heat shield if it was removed.
Warning: Incorrect battery connection can cause serious damage to the generator and electrical components.
18. Connect the positive cable to the positive pole (+), tightening torque 6 Nm.
Warning: Press the terminal carefully to avoid damaging the battery case. Do not lubricate the battery terminals.
Warning: The negative cable is only connected after the safety holder has been installed.
19. Install the safety holder onto the battery, placing the conductive plate onto the positive battery terminal mounting bolt.
20. Secure the safety holder clamp clamp to the battery.
21. Tighten the positive (+) terminal conductive plate mounting bolt.
22. Connect the fuses to the electrical wires and secure.
23. Connect the multi-pin connector.
24. Connect the negative (–) cable and tighten to a torque of 6 Nm.
Warning: Press the terminal carefully to avoid damaging the battery case. Do not lubricate the battery terminals.
25. If necessary, program the radio receiver, refer to the subsection Entering the radio code.
26. Set the clock.
27. Activate automatic operation of the electric windows.
28. Lock the vehicle from the outside through the driver's or front passenger's door. Make sure all doors and windows are completely closed.
29. Open the car and close it again, keeping the key in the lock position for at least 1 second.
Warning: If any malfunction occurs in the operation of the electric windows, the lights in the doors will flash.
Note for batteries with vented caps
30. If possible, install only a battery with a central gas outlet.
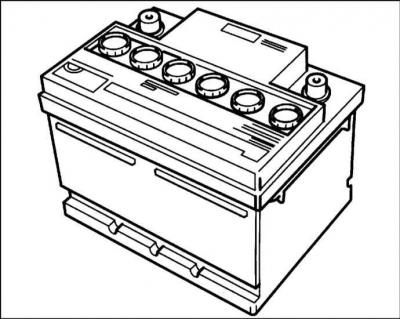
31. In the case of a battery of the type shown in the illustration, with ventilated and retractable plugs, plastic covers must be installed over the plugs to protect against water penetration and leaking and corrosive electrolyte.
For a battery with a central gas outlet (flat plugs that can only be turned out with a screwdriver) these covers are not needed.
Purchasing a new battery
Probably the most important thing that a buyer should pay attention to is the battery characteristics. There are three of them. The first is the nominal voltage, it is the same for all batteries, and it is impossible to make a mistake. When buying, it is advisable to check the battery with a load fork. The second is the capacity, measured in ampere/hours (A/h), which means, roughly speaking, the amount of electricity stored in the battery. The capacity determines how long the starter can turn the engine, or more precisely, how many attempts to start the engine can be made. The price of the battery is almost directly proportional to its capacity. And the third characteristic is the starting current (measured in amperes. A), i.e. the current supplied to the starter during starting. On batteries it can be indicated according to four different systems: GOST (on domestic), EN (standard of the United Europe), SAE (american standard) and DIN. The latter, the German standard, is the closest to our GOST and is set "by default" on most European ones, i.e. when the standard system is not specified. The larger it is, the faster and with greater force the starter will turn the engine.
It is better if you buy a battery with the characteristics specified in the operating instructions for your car: this way it will serve you longer with minimal expenses. You can save money and buy a battery with a smaller capacity, but it will serve you less than the usual period and will not cope well with winter starting. Even if you buy a battery with a slightly larger capacity, you will not win in service life, since constant undercharging of the battery will lead to sulfation of the plates, and you will lose money. You should also not get carried away with increased starting current: you will burn out the starter. It is better to change the oil in the engine, and there will be no problems with starting.
Recently, the country's market has been overflowing with low-quality goods and fakes. Batteries are no exception. There are several signs by which you can distinguish the original from a fake with sufficient accuracy. First and perhaps most important: the country of manufacture and the manufacturing plant must be indicated on the battery, preferably with the address. Second, the date of manufacture must be indicated, which is very important if the battery is flooded. Each battery must be accompanied by a technical passport, but the presence of instructions is not required. This is due to the fact that in the West, batteries are almost never sold at retail; they are installed by specialists at service stations. Third, a high-quality battery is unthinkable without a high-quality case, good plugs and smooth terminals, often lubricated with technical protective grease from oxidation and covered with colored plastic caps on top.