Repair Chevrolet Repair Toyota Repair Honda Repair AvtoVAZ Repair Mercedes-Benz Repair BMW Repair Opel
Home  |  Contacts  |  Sitemap  |    
English Русский
Български
Беларускі
Український
Српски
Hrvatski
Română
Polski
Slovenský
Magyar
AudiManual.ru


  • AUDI 80
  • AUDI 100
  • AUDI A3
  • AUDI A4
  • AUDI A6
  • AUDI A8
  • AUDI Q
  • OTHER
  • ARTICLES
Type 8L (1996-2003)

Checking, removing and installing the starter traction relay (Audi A3 8L)

  • Home
  • Audi A3
  • Type 8L (1996-2003)
  • Electrical equipment
  • Power devices
  • Checking, removing and installing the starter traction relay
            0
Table of contents: Check without removal ↓ Check with removal ↓ Removal ↓ Installation ↓
If the traction relay is damaged, the starter pinion does not engage the flywheel ring gear. As a result, the starter cannot start the engine. This malfunction is more common than a starter motor malfunction.

Check without removal


1. Set the gear shift lever to neutral position.

2. Test condition: The battery must be charged.

3. Short-circuit terminal 30 (thick positive cable) and 50 (thin cable to ignition switch) starter. The starter pinion should move forward (click) and the starter should start. If this does not happen, remove the starter and test it while it is removed.

Check with removal


1. Remove the starter.

2. Connect the battery with an auxiliary cable (starter) as follows to the starter and traction relay. Connect the negative pole of the battery to the starter housing. Briefly apply the cable from the positive terminal of the battery to terminal 50 of the relay. The starter gear should come forward.

Warning: The positive cable must be connected to terminal 50 for no more than 10 seconds, otherwise the relay coil will burn out.


3. If the pinion moves forward and the starter does not rotate, the starter motor must be repaired.

4. If the pinion does not move forward, replace the traction relay.

Removal


1. Remove the starter.

2. Unscrew the 2 bolts securing the traction relay.

3. Disconnect and remove the traction relay from the starter.

Installation


Installation


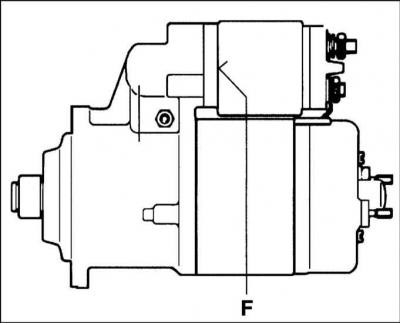
1. Coat the contact surface (F) of the starter with a suitable sealant.


2. Connect the traction relay to the drive lever in the starter, then secure with nuts.

3. Connect the wire to the traction relay.

4. Check the traction relay again as described above.

5. Reinstall the starter.
The article was checked by auto expert Nikita Rudakov
This article is available at russian, bulgarian, belarusian, ukrainian, serbian, croatian, romanian, polish, slovak, hungarian

Share information:
Previous articles
Audi A3 Type 8L: Power devices
Next articles

Removal and installation the starter
Checking the engine starting system
Starter — general information
Checking and replacing the generator and voltage regulator…


Similar articles on other Audi car models:
Cooling Fan Thermal Switch — Checking, Removing and Installing Audi 80 B3 (1986-1991, petrol)
Steering Damper — Checking, Removing and Installing Audi 100 C3 (1982-1990, diesel)
Checking, removing and installing the thermostat Audi A4 B7 (2004-2008)
Checking the fuel pump relay Audi A6 C5 (1997-2004)
Checking the exhaust system Audi A8 D2 (1994-2002)
Checking, cleaning, removing the water drainage box and… Audi Q5 Type 8R (2008-2017)
Engine — Checking Oil Level Audi A2 (1999-2005)
Link to this page in different formats


Visitor comments

No comments yet


How much will 45 + 47 =


A3(8L, 1996-2003) 
  • General information
  • User manual
  • Maintenance
  • Power unit
  • Engine repair
  • Lubrication system
  • Cooling system
  • Supply system
  • Fuel injection system
  • Exhaust system
  • Ignition system
  • Transmission
  • Manual transmission
  • Automatic transmission
  • Clutch and drive shafts
  • Chassis
  • Brake system
  • Front suspension
  • Rear suspension
  • Steering
  • Body
  • Ventilation and heating
  • Exterior (external elements)
  • Interior (internal elements)
  • Doors, covers and windows
  • Electrical equipment
  • Power devices
  • Lighting and appliances
  • Electrical circuits
 
AudiManual.ru © 2017-2026 · Mobile version · Feedback · Sitemap: EN BG BY UA RS HR RO PL SK HU · Site search · News and articles
80 B2 · 80 B3 petrol · 80 B3 · 80 B4 · 100 C3 diesel · 100 C3 petrol · 100 C3 · 100 C4 petrol · 100 C4 · A3 Type 8L · A4 B5 petrol · A4 B5 · A4 B6 petrol · A4 B6 · A4 B7 · A4 B8 · A6 C4 · A6 C5 · A6 C5 Allroad · A8 D2 · Q5 Type 8R · Q7 Typ 4L · Audi A2 ·
This site uses cookies 🍪. Click the button to accept this fact.