
Repair Chevrolet Repair Toyota Repair Honda Repair AvtoVAZ Repair Mercedes-Benz Repair BMW Repair Opel
Home  |  Contacts  |  Sitemap  |    
English Русский
Български
Беларускі
Український
Српски
Hrvatski
Română
Polski
Slovenský
Magyar
AudiManual.ru


  • AUDI 80
  • AUDI 100
  • AUDI A3
  • AUDI A4
  • AUDI A6
  • AUDI A8
  • AUDI Q
  • OTHER
  • ARTICLES
Q7 Typ 4L (2005-2015, diesel) Q5 Type 8R (2008-2017)

Checking, cleaning, removing the water drainage box and installing gutters (Audi Q5-8R)

  • Home
  • Audi Q
  • Q5 Type 8R (2008-2017)
  • Body
  • Ventilation and heating
  • Checking, cleaning, removing the water drainage box and installing gutters
            0
Table of contents: Cleaning ↓ Removal ↓ Installation ↓
Instructions. The following figure shows the arrangement of units and components for Audi A4, Audi Q5, etc. There are minor differences in the arrangement of units/components from this figure. Deposits in the water drainage box (leaves, various needles, etc.), which are collected in the drains "A" can worsen the water flow from the water drainage box. In the line for the machine, car wash or during heavy precipitation, the water level in the water drainage box increases and water enters the air conditioner through the suction channel and is blown by the supply air fan "V2" together with the supplied air into the evaporator. If both water drains "A" (left and right in the water drainage box) if the drains are contaminated with leaves or needles, this can lead to the drains freezing in winter and the water no longer draining. However, after a short drive, the ice in the drains melts again under the influence of the waste heat from the engine and the exhaust system, and before the car gets to the workshop, the water may already drain normally again. The "A" gutter nozzles are installed from above in the holes in the bottom of the water drainage box. In addition to both "A" gutter bushings, there is another hole "C" on the right in the body, through which water drains behind the wheel arch liners if both "A" gutter bushings are closed. These holes will also be checked for contamination.


Cleaning


Clean the gutters on the left and right "A". Clean the water-diverting box from deposits (foliage, various needles) and other contaminants. Check the operation of the bushings "A" (valves "B" should not be glued or clogged with dirt).
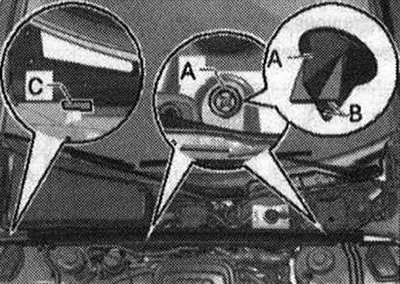


Clean the gutters on the left and right «A». Clean the water-diverting box from deposits (foliage,…


Removal


Remove bushings "B" from the top of the drain holes "A" in the area of the bottom of the drainage box.

Installation


Insert bushings "A" from above into the drain holes in the area of the bottom of the water-diverting box. After installation, check the operation of bushings "A" (valves "B" should not be glued and should close).
The article was checked by auto expert Timur Bazhenov
This article is available at russian, bulgarian, belarusian, ukrainian, serbian, croatian, romanian, polish, slovak, hungarian

Share information:
Previous articles
Audi Q Q5 Type 8R: Ventilation and heating
Next articles

Removal the air composition sensor
Elements outside the cabin, set of elements
Removal the outside temperature sensor
Parts and units for controlling and regulating the air…
Removal the climate control and display unit, installation,…
Removal the temperature sensor fan on the instrument panel «V42»
Removal the cabin filter


Similar articles on other Audi car models:
Cooling Fan Thermal Switch — Checking, Removing and Installing Audi 80 B3 (1986-1991, petrol)
Steering Damper — Checking, Removing and Installing Audi 100 C3 (1982-1990, diesel)
Checking, removing and installing the starter traction relay Audi A3 Type 8L (1996-2003)
Cleaning the water drainage holes Audi A4 B5 (1994-2001, petrol)
Checking/cleaning water drainage hoses Audi A6 C5 (1997-2004)
Checking the exhaust system Audi A8 D2 (1994-2002)
Fixing the cover of the water drainage box Audi A2 (1999-2005)
Link to this page in different formats


Visitor comments

No comments yet


How much will 24 + 24 =


Q7 4L(2005-2015, diesel) 
  • General information
  • Operating instructions
  • Maintenance
  • Power unit
  • Diesels 3.0 l (BUG, BUN, CAS)
  • Diesels 3.0 l (CATA, CCMA)
  • Diesels 3.0 l (CJGA/CJGC)
  • Diesels 4.2 l (BTR, CCFA/CCFC)
  • Cooling system
  • Fuel and exhaust system
  • Engine management system
  • Starting and charging
  • Transmission
  • Automatic gearbox
  • Drive shafts
  • Chassis
  • Brake system
  • Front suspension
  • Rear suspension
  • Steering system
  • Body
  • Air conditioner
  • Exterior
  • Interior
  • Electrical equipment
  • Equipment and devices
  • Electrical circuits
 
Q5 8R(2008-2017) 
  • General information
  • User manual
  • Power unit
  • Petrol engine 2.0 l
  • Petrol engine 3.2 l
  • Fuel system (petrol)
  • Diesel 2.0 liter (CA)
  • Diesel 2.0 liter (CG/CJ/CM)
  • Diesel engine 3.0 l
  • Fuel system (diesel)
  • Transmission
  • Manual gearbox 0B1
  • Manual gearbox 0B2
  • Automatic gearbox 0B5
  • Automatic gearbox 0B6
  • Chassis
  • Front suspension
  • Rear suspension
  • Brake system
  • Steering
  • Body
  • Exterior
  • Interior
  • Doors, locks and windows
  • Safety system
  • Ventilation and heating
  • Electrical equipment
  • Power devices
  • Equipment and devices
  • Lighting and alarm
  • Audio system
  • Electrical circuits
 
AudiManual.ru © 2017-2026 · Mobile version · Feedback · Sitemap: EN BG BY UA RS HR RO PL SK HU · Site search · News and articles
80 B2 · 80 B3 petrol · 80 B3 · 80 B4 · 100 C3 diesel · 100 C3 petrol · 100 C3 · 100 C4 petrol · 100 C4 · A3 Type 8L · A4 B5 petrol · A4 B5 · A4 B6 petrol · A4 B6 · A4 B7 · A4 B8 · A6 C4 · A6 C5 · A6 C5 Allroad · A8 D2 · Q5 Type 8R · Q7 Typ 4L · Audi A2 ·
This site uses cookies 🍪. Click the button to accept this fact.