Repair Chevrolet Repair Toyota Repair Honda Repair AvtoVAZ Repair Mercedes-Benz Repair BMW Repair Opel
Home  |  Contacts  |  Sitemap  |    
English Русский
Български
Беларускі
Український
Српски
Hrvatski
Română
Polski
Slovenský
Magyar
AudiManual.ru


  • AUDI 80
  • AUDI 100
  • AUDI A3
  • AUDI A4
  • AUDI A6
  • AUDI A8
  • AUDI Q
  • OTHER
  • ARTICLES
A2 (1999-2005)

Removal and installation the exhaust gas recirculation (ATL) radiator (Audi A2)

  • Home
  • Audi
  • A2 (1999-2005)
  • Engine 1.4 l (diesel)
  • Exhaust system
  • Removal and installation the exhaust gas recirculation (ATL) radiator
            0
Table of contents: Removal ↓ Installation ↓

Removal


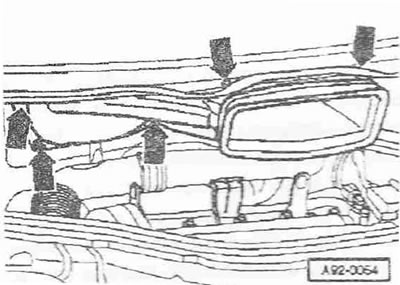
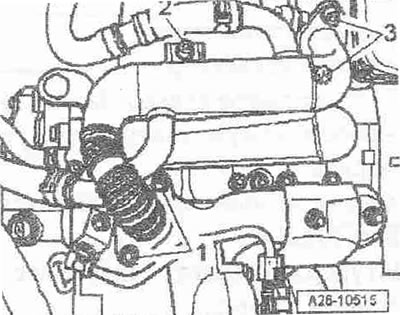
Remove the sound insulation. Unscrew nuts "1". For clarity, shown with the engine removed. Bolts "2 and 3" are unscrewed later.

Unscrew the heat shield of the «arrow» turbocharger.


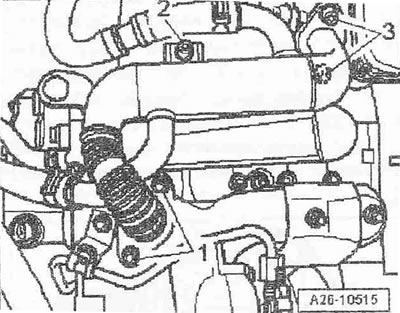
Unscrew the heat shield of the "arrow" turbocharger.

Remove the hood. If present, loosen the bracket. Remove the engine cover «arrows». Remove the sound…


Remove the hood. If present, loosen the bracket. Remove the engine cover "arrows". Remove the sound insulation underneath. Use a screwdriver to lift caps "3" and "4" of the 2-piece wiper arm. Loosen the nuts of both parts of the wiper arm with a few turns. Loosen the arms "1" and "2" of the wiper blades on the axles one by one by lightly rocking them. Completely unscrew the nuts and remove both parts of the wiper arm. If it is not possible to remove the arm in this way, then a standard puller must be used.


Disconnect the washer fluid supply pipe «3». If present, disconnect the plug connectors «4» and «5»…


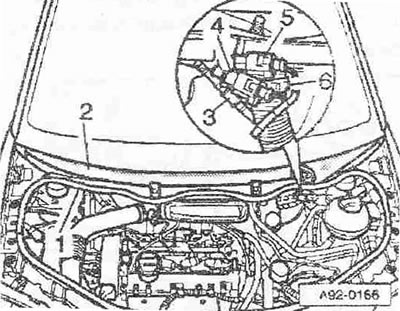
Disconnect the washer fluid supply pipe "3". If present, disconnect the plug connectors "4" and "5" of the heated windshield washer nozzles. Loosen the hose clamp "6" using hose clamp pliers "V.A.G 1921" and remove the drain hose from the deflector grille. Remove the rubber seal "1" of the deflector grille. Remove the deflector grille "2".

Loosen the nuts and bolts of the «arrow». Pull the fresh air supply duct forward and remove it,…


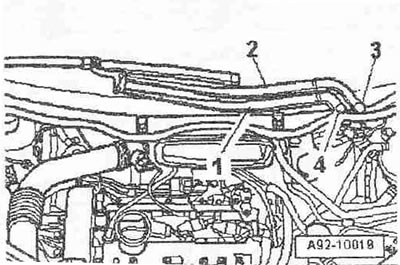
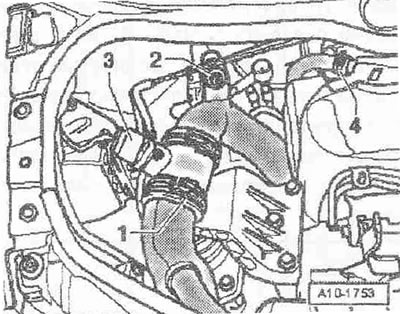
Loosen the nuts and bolts of the "arrow". Pull the fresh air supply duct forward and remove it, turning it towards the right side of the car.

Remove the air duct hose «3» from the intake manifold flap motor «VI57» by slightly loosening the…


Remove the air duct hose "3" from the intake manifold flap motor "VI57" by slightly loosening the clamp "2". Disconnect the vacuum hose "1" of the mechanical EGR valve and unfasten it.


Remove the crankcase ventilation hose «4» from the cylinder head cover and put it aside. Ignore…


Remove the crankcase ventilation hose "4" from the cylinder head cover and put it aside. Ignore pos. "1...3".

Disconnect the plug connector «arrow» of the intake manifold flap motor «VI57». Unscrew the bolts…


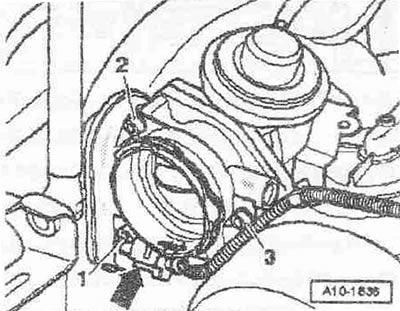
Disconnect the plug connector "arrow" of the intake manifold flap motor "VI57". Unscrew the bolts "1...3" and remove the intake manifold flap motor "V157".

Loosen the clamps of the coolant supply hoses to the EGR radiator «3094». Remove the EGR coolant…


Loosen the clamps of the coolant supply hoses to the EGR radiator "3094". Remove the EGR coolant supply hoses "arrows" from the EGR radiator.


Loosen bolts «2 and 3» and remove the EGR radiator. Ignore item «1».


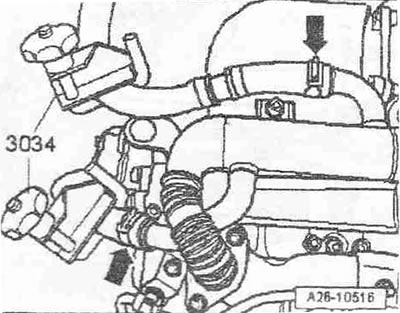
Loosen bolts "2 and 3" and remove the EGR radiator. Ignore item "1".

Installation


Installation is in the reverse order, replacing the seals, cuffs and self-locking nuts. The supercharging system must be airtight. The hoses and hose fittings of the air supercharging system must be cleaned of oils and grease before installation. Use clamps of the appropriate series to secure all hose connections. Install the wiper arm.

Tightening torques:


Tightening torques:
  • Heat shield to turbocharger: 22 Nm
  • EGR radiator
  • To mechanical EGR valve: 22 Nm
  • Intake manifold: 20 Nm
  • Exhaust manifold: 22 Nm
  • Intake manifold flap motor "V157" to mechanical EGR valve: 10 Nm
  • Engine compartment cover to bracket: 5.5 Nm


[This article was copied from an online resource audimanual.ru]
The article was checked by auto expert Daniil Ushakov
This article is available at russian, bulgarian, belarusian, ukrainian, serbian, croatian, romanian, polish, slovak, hungarian

Share information:
Previous articles
Audi A2: Exhaust system
Next articles

Exhaust gas recirculation system (ATL engines)
Exhaust gas recirculation system (AMF, BHC engines)
Vacuum hose connection diagram (ATL, VNS engines)
Vacuum hose connection diagram (AMF engines)
Checking the mechanical EGR valve


Similar articles on other Audi car models:
Radiator grille — removal and installation Audi 80 B3 (1986-1991, petrol)
Radiator — removal, inspection, cleaning and installation Audi 100 C3 (1982-1990, diesel)
Removal and installation the radiator and fan Audi A3 Type 8L (1996-2003)
Radiator — removal and installation Audi A4 B5 (1994-2001, petrol)
Removal and installation the radiator Audi A6 C4 (1994-1997)
Removal and installation of the exhaust system Audi A8 D2 (1994-2002)
Removal and installation the radiator, its casing and fans Audi Q7 Typ 4L (2005-2015, diesel)
Link to this page in different formats


Visitor comments

No comments yet


How much will 42 + 11 =


Audi A2(1999-2005) 
  • General information
  • Introduction to the guide
  • Maintenance
  • Engine 1.4 l (gasoline)
  • Engine repair
  • Lubrication system
  • Cooling system
  • Exhaust system
  • Engine 1.6 l (gasoline)
  • Engine repair
  • Lubrication system
  • Cooling system
  • Exhaust system
  • Engine 1.2 l (diesel)
  • Engine repair
  • Lubrication system
  • Cooling system
  • Injection and turbocharging
  • Engine 1.4 l (diesel)
  • Engine repair
  • Lubrication system
  • Cooling system
  • Turbocharging system
  • Supply system
  • Fuel injection system
  • Exhaust system
  • Transmission
  • Mechanical gearbox 02J
  • Mechanical gearbox 02T
  • Mechanical gearbox 085 DS
  • Chassis
  • Car suspension
  • Steering
  • Brake system
  • Body
  • Exterior
  • Interior
  • Seats
  • Doors, locks and windows
  • Safety system
  • Heating and air conditioning
  • Electrical equipment
  • Power devices
  • Equipment and devices
  • Wipers and washers
  • Lighting and lamps
  • Breakers and switches
  • Electrical circuits
 
AudiManual.ru © 2017-2026 · Mobile version · Feedback · Sitemap: EN BG BY UA RS HR RO PL SK HU · Site search · News and articles
80 B2 · 80 B3 petrol · 80 B3 · 80 B4 · 100 C3 diesel · 100 C3 petrol · 100 C3 · 100 C4 petrol · 100 C4 · A3 Type 8L · A4 B5 petrol · A4 B5 · A4 B6 petrol · A4 B6 · A4 B7 · A4 B8 · A6 C4 · A6 C5 · A6 C5 Allroad · A8 D2 · Q5 Type 8R · Q7 Typ 4L · Audi A2 ·
This site uses cookies 🍪. Click the button to accept this fact.