
Table of contents: Removal ↓ Installation ↓
Removal
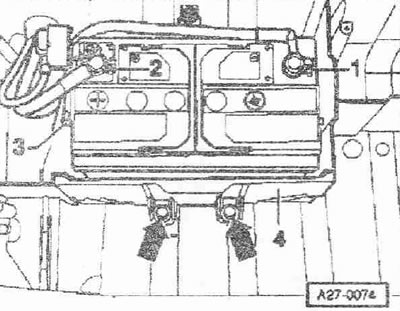
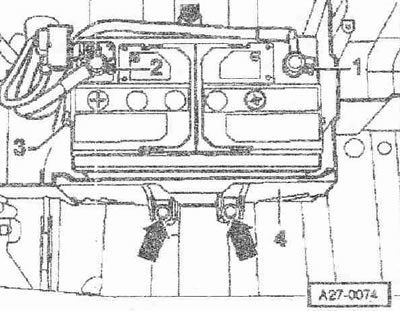
Switch off the ignition and remove the ignition key. Where necessary, remove the floor from the trunk. Fold the trunk floor mat forward. Cars without a spare wheel holder: Open the cover above the positive terminal of the battery. Connect the battery charger in the battery buffer compensation mode. Disconnect the ground wire "1" and (+) wire "2" on the battery. Disconnect the hose "3" of the central gas outlet. Where necessary, unscrew the molded element in front of the battery. Unscrew the screws "arrows" on the battery mounting bracket "4".
Car with spare wheel holder
Remove the emergency wheel. Unscrew the molded element in front of the Strelka battery.
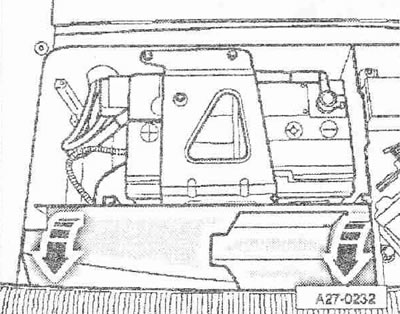
Unscrew the screws "arrows" on the holder of the emergency wheel/battery mounting bracket "4". Remove the holder of the emergency wheel/battery mounting bracket. Open the cover above the positive terminal of the battery. Connect the battery charger in the battery buffer compensation mode. Disconnect the ground wire "3" and (+) wire "2" on the battery. Disconnect the central gas outlet hose of the battery "1". Remove all batteries from the trunk.
Installation
Installation is in reverse order, taking into account the following:
Instructions: Only maintenance-free batteries according to the "TL82506" standard are allowed to be installed (since December 1997.) and "VW75073" (since August 2001.). The batteries in the Audi spare parts program have a support bar adapter for adaptation to various mounting bars. Information on the availability and use of the support bar adapter is provided in the battery operating manual.
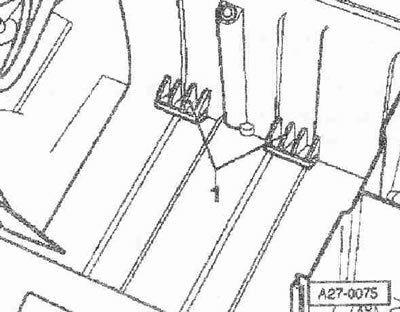
Install the battery in the niche so that the protrusion in the battery base fits under the clamps "1". To ensure a secure fit of the battery, install only batteries with a protrusion in the base of 10.5 mm.
Car without spare wheel holder
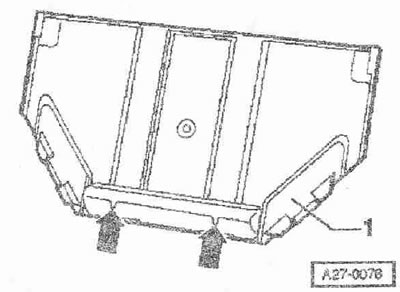
Insert the battery mounting bracket "1" so that both "arrow" protrusions enter the recesses in the battery base.
Tighten the screws "arrows" on the fastening bracket "4" of the battery. Connect the battery terminals with the ignition off and electrical consumers disconnected in the following sequence. First, manually put the pole tip "2" of the positive wire on the (+) pole of the battery and tighten the nut. Manually put the pole tip "1" of the ground wire on the (-) pole of the battery and tighten the nut. Put on the hose "3" of the central gas outlet of the battery.
Car with spare wheel holder
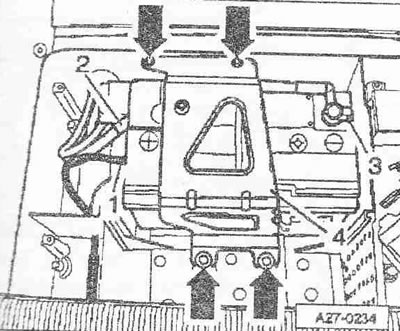
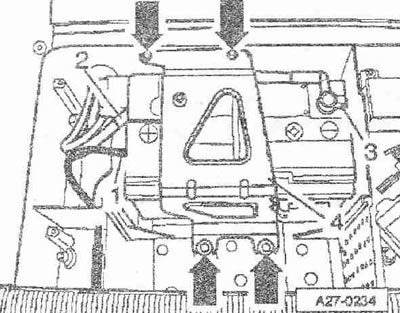
Connect the battery terminals with the ignition off and electrical consumers disconnected in the following sequence. First, manually push the pole tip "2" of the positive wire onto the (+) pole of the battery and tighten the nut. Manually push the pole tip "3" of the ground wire onto the (-) pole of the battery and tighten the nut. Push on the hose "1" of the central gas outlet of the battery. Insert the holder of the emergency wheel/battery mounting bracket and tighten the screws "arrows" on the holder of the mounting bracket "4".
After installation, check the reliability of the battery fastening. Complete the buffer compensation mode of the battery charger. If the battery was removed and installed without using the buffer compensation mode, the following steps should be taken after connection. Activate the vehicle equipment elements (radio/navigation system, clock, electric windows) in accordance with the operating instructions. Deactivate the operating mode of the Telematik control unit - Radio, telephone, navigation, self-diagnosis. Check the operation of the radio remote control, if necessary, synchronize the radio code. Inform the customer that the second and additional codes must also be synchronized to ensure remote radio communication. Query the fault memory of all control units and, if necessary, delete the fault message "Unterspannung/Low voltage".
Instructions: After reconnecting the power supply, the ABS/ESP warning light goes out only after a few meters of movement. Make sure that after installation you do not forget to return the molded element in front of the battery.
Tightening torques:
- Battery mounting bracket to the bottom of the trunk: 10 Nm
- Holder of the emergency wheel/battery mounting bracket to the bottom of the trunk: 10 Nm
- Battery terminal to terminal: 6 Nm
This article was previously published on the resource: audimanual