
Repair Chevrolet Repair Toyota Repair Honda Repair AvtoVAZ Repair Mercedes-Benz Repair BMW Repair Opel
Home  |  Contacts  |  Sitemap  |    
English Русский
Български
Беларускі
Український
Српски
Hrvatski
Română
Polski
Slovenský
Magyar
AudiManual.ru


  • AUDI 80
  • AUDI 100
  • AUDI A3
  • AUDI A4
  • AUDI A6
  • AUDI A8
  • AUDI Q
  • OTHER
  • ARTICLES
A2 (1999-2005)

Removal and installation the generator (1.6 liter FSI engine) (Audi A2)

  • Home
  • Audi
  • A2 (1999-2005)
  • Electrical equipment
  • Power devices
  • Removal and installation the generator (1.6 liter FSI engine)
            0
Table of contents: Removal ↓ Installation ↓ Poly V-belt running in a car with an… ↓

Removal


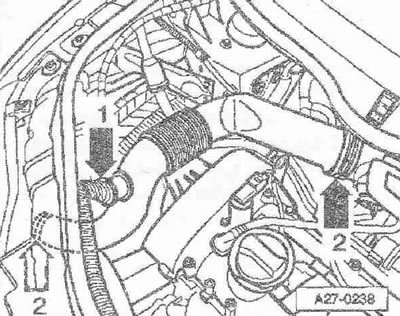
Disconnect the battery ground wire with the ignition off. Wash the hood outside and wipe it with chamois leather. Unlock the service cover from the inside. Unlock the hood and pull it forward a little. Pull the "VAS 6011" hood cover onto the hood. Remove the hood. Remove the resonator on the air duct hose "arrow 1" by pressing the release buttons. Remove the air duct by loosening the spring clamps "arrow 2" using hose clamp pliers "V.A.G 1921". Remove the air duct.
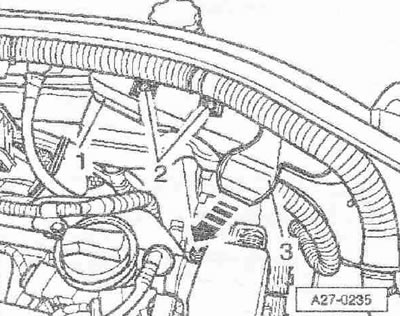
Unscrew bolts «2». Remove water trap «3» in the «direction of the arrow». Disconnect hose «1» from…


Unscrew bolts "2". Remove water trap "3" in the "direction of the arrow". Disconnect hose "1" from the lock shelf and air casing. Mark the direction of rotation of the poly V-belt with chalk or a felt-tip pen. Changing the direction of the previously used belt may damage it.
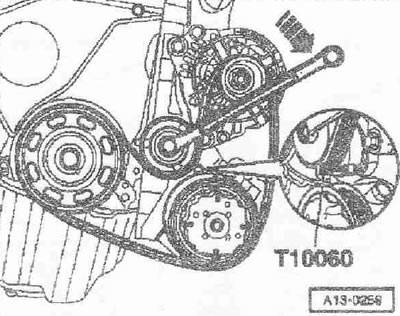
To loosen the tension of the poly V-belt, turn the tensioner in the direction of the «arrow» with a…


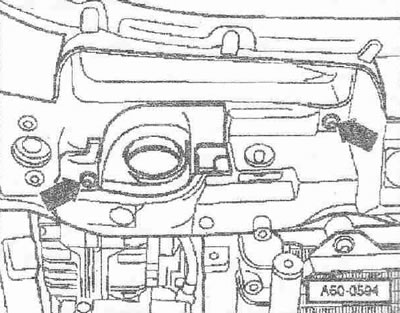
To loosen the tension of the poly V-belt, turn the tensioner in the direction of the "arrow" with a ring spanner. Fix the poly V-belt tensioner in the holes using the "T10060 A" mandrel. Remove the poly V-belt. Turn the oil filler pipe, bypassing the stop, to the right side of the car "arrow". Remove the oil filler pipe in an upward direction.


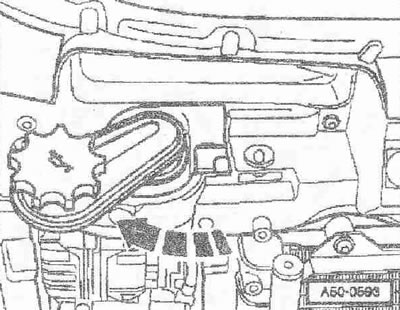
Unscrew the «arrow» screws. Remove the oil filler tank from the lock shelf. Remove the oil filler…


Unscrew the "arrow" screws. Remove the oil filler tank from the lock shelf. Remove the oil filler tube by pressing the release buttons.
Unscrew the generator mounting bolts «1» and «2». Remove the generator from the holder and turn it…


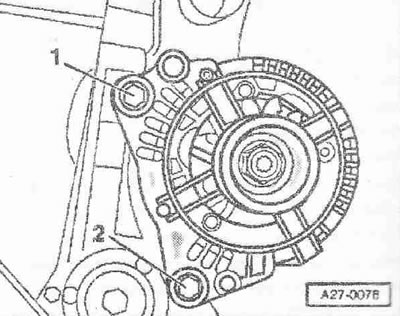
Unscrew the generator mounting bolts "1" and "2". Remove the generator from the holder and turn it to the right with the wires attached.
If the generator is clamped in the bracket, screw the mounting bolts back in by 2 turns. Carefully…


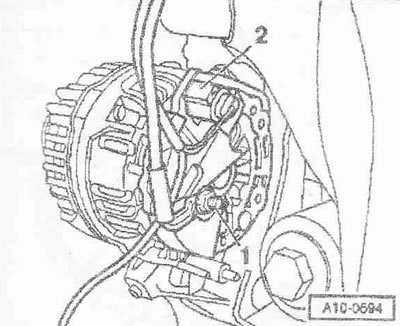
If the generator is clamped in the bracket, screw the mounting bolts back in by 2 turns. Carefully tap the flat surface of the hammer on the heads of the bolts to unlock the generator mounting bushings. Unscrew the wire of terminal 30/B+ "pos. 1" from the generator. Disconnect connector "2". Remove the generator upwards.


Installation


Installation is in reverse order, taking into account the following. To facilitate installation of…


Installation is in reverse order, taking into account the following. To facilitate installation of the generator, move the mounting bolts on the bushings back a little. This should facilitate the movement of the generator mounting bushings, since otherwise the clamping force of the bushing, despite the corresponding torque, is too small.
Pay attention to the correct fit and movement of the poly V-belt.


Pay attention to the correct fit and movement of the poly V-belt.

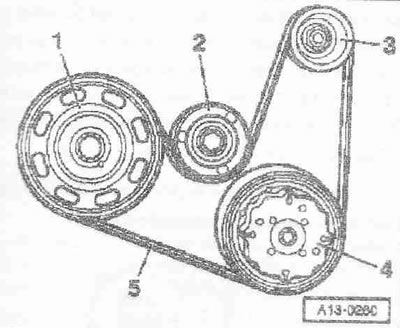
Poly V-belt running in a car with an air conditioning system


1. Crankshaft belt pulley

1. Crankshaft belt pulley
2. Tension roller
3. Generator belt pulley
4. Air conditioning compressor pulley
5. Poly V-belt


Put the poly V-belt on the track-hall and alternator pulleys. Install the poly V-belt on the air conditioner compressor pulley last. Unload the tensioner and remove the "T10060 A" mandrel from the holes. Check the correct installation of the poly V-belt. Connect the battery. Start the engine and check the movement of the belt.

Tightening torques:
  • Terminal 30/V+ to generator: 16 Nm
  • Generator to holder: 25 Nm
  • Oil filler cap to lock shelf: 3.5 Nm
  • Air duct hose to the lock shelf: 2.5 Nm


This article was previously published on the resource AudiManual.ru
The article was checked by auto expert Daniil Ushakov
This article is available at russian, bulgarian, belarusian, ukrainian, serbian, croatian, romanian, polish, slovak, hungarian

Share information:
Previous articles
Audi A2: Power devices
Next articles

Removal and installation the generator (MPI engine 1.4 liters)
Removal and installation the battery
Disconnecting and connecting the battery
Removal and installation the generator (1.2 liter TDI engine)
Removal and installation the generator (1.4 liter TDI engine)
Bosch generator produced before 2000
Bosch generator manufactured since 2001


Similar articles on other Audi car models:
Engine hood Audi 80 B3 (1986-1991, petrol)
Engine cooling (2-liter 4-cylinder, Mono-Motronic) Audi 100 C4 (1990-1994, petrol)
Starting the engine from an auxiliary power source Audi A3 Type 8L (1996-2003)
Removal the gearbox for vehicles with a 2.7 liter TDI engine Audi A4 B8 (2007-2015)
Diagram 4-3. Battery, starter, generator, engine start interlock… Audi A6 C5 Allroad (1999-2005)
General information about the 2.5 liter diesel engine Audi A8 D2 (1994-2002)
Engine number Audi Q5 Type 8R (2008-2017)
Link to this page in different formats


Visitor comments

No comments yet


How much will 11 + 14 =


Audi A2(1999-2005) 
  • General information
  • Introduction to the guide
  • Maintenance
  • Engine 1.4 l (gasoline)
  • Engine repair
  • Lubrication system
  • Cooling system
  • Exhaust system
  • Engine 1.6 l (gasoline)
  • Engine repair
  • Lubrication system
  • Cooling system
  • Exhaust system
  • Engine 1.2 l (diesel)
  • Engine repair
  • Lubrication system
  • Cooling system
  • Injection and turbocharging
  • Engine 1.4 l (diesel)
  • Engine repair
  • Lubrication system
  • Cooling system
  • Turbocharging system
  • Supply system
  • Fuel injection system
  • Exhaust system
  • Transmission
  • Mechanical gearbox 02J
  • Mechanical gearbox 02T
  • Mechanical gearbox 085 DS
  • Chassis
  • Car suspension
  • Steering
  • Brake system
  • Body
  • Exterior
  • Interior
  • Seats
  • Doors, locks and windows
  • Safety system
  • Heating and air conditioning
  • Electrical equipment
  • Power devices
  • Equipment and devices
  • Wipers and washers
  • Lighting and lamps
  • Breakers and switches
  • Electrical circuits
 
AudiManual.ru © 2017-2026 · Mobile version · Feedback · Sitemap: EN BG BY UA RS HR RO PL SK HU · Site search · News and articles
80 B2 · 80 B3 petrol · 80 B3 · 80 B4 · 100 C3 diesel · 100 C3 petrol · 100 C3 · 100 C4 petrol · 100 C4 · A3 Type 8L · A4 B5 petrol · A4 B5 · A4 B6 petrol · A4 B6 · A4 B7 · A4 B8 · A6 C4 · A6 C5 · A6 C5 Allroad · A8 D2 · Q5 Type 8R · Q7 Typ 4L · Audi A2 ·
This site uses cookies 🍪. Click the button to accept this fact.