
Table of contents: 3.2 TDI engines 1st generation ↓ Engines 3.2 TDI 2nd generation ↓ 4.2 TDI engines ↓
3.2 TDI engines 1st generation
1. Thermostat installation details are shown on illustrations 4.1a-b.
2. Drain the coolant (see section 2) and remove the drive belt (see Section 6 of Chapter 2).
3. On CASA/CASB engines, disconnect the coolant hose (2 in the illustration).
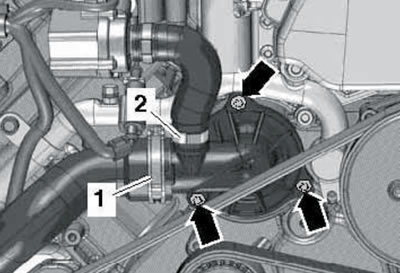
6.3. Connections (1 and 2) and fasteners (arrows) of the thermostat.
4. On all engines, disconnect the coolant hose (1 in illustration 6.3), unscrew the bolts (arrows) and remove the thermostat housing together with the thermostat.
5. Installation is carried out in reverse order. Use a new O-ring.
Engines 3.2 TDI 2nd generation
6. The thermostat is built into the oil filter housing (see Chapter 2) and is not replaced separately from it. The oil filter housing seals are single-use only and are not supplied separately, so the housing must be replaced after each removal.
4.2 TDI engines
7. Thermostat installation details are shown on illustrations 4.6a-b.
8. Remove the coolant expansion tank cap and remove the front sound insulation panel under the engine compartment (see Section 19 of Chapter 1).
9. Prepare to collect the coolant, disconnect the hose from the thermostat housing (1 in illustration 4.8), unscrew the bolts (arrows) and remove the thermostat housing.
10. Installation is carried out in reverse order. Use new O-rings.