
Table of contents: Removal the side cover of the front… ↓ Removal the decorative trim of the… ↓ Removal the side deflectors on the… ↓ Installation ↓ Removal the front panel deflector in… ↓ Installation ↓ Removal the MMI display cover ↓ Installation ↓ Removal the speaker side cover ↓ Installation ↓ Removal the speaker cover in the… ↓ Installation ↓ Removal the upper middle defroster… ↓ Installation ↓ Removal the mounting frame of the… ↓ Removal the cover of the access… ↓ Installation ↓
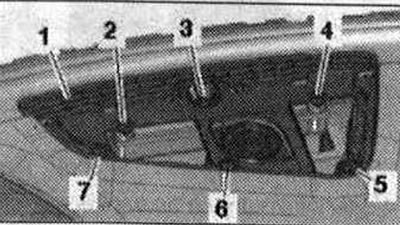
1. Front panel deflector, side; 2/3/13/26/28. Bolt. 2 pcs. 3 Nm; 4. Midrange speaker; 5. Speaker cover, side; 6. Bolt. 6 pcs. 1.5 Nm; 7. Solar radiation intensity photo sensor "G107"; 8. Speaker cover in the middle; 9. Upper middle defroster deflector; 10. Midrange speaker; 11. Upper side defroster deflector; 12. Front panel; 14. Airbag on the front passenger side. Locking and activation via key switch; 15. Decorative trim for the front panel; 16. MMI display; 17. MMI display cover; 18. Front panel deflector in the middle; 19. Switch of the access authorization system and engine start "E415"; 20. Radio/navigation system; 21. Used front control panel, indication and information output "J523"; 22. Used Climatronie "J255"; 23. Bolt. 4 pcs. 3 Nm; 24. Mounting frame for radio/navigation system; 25. Bolt. 3 Nm; 27. Instrument cluster
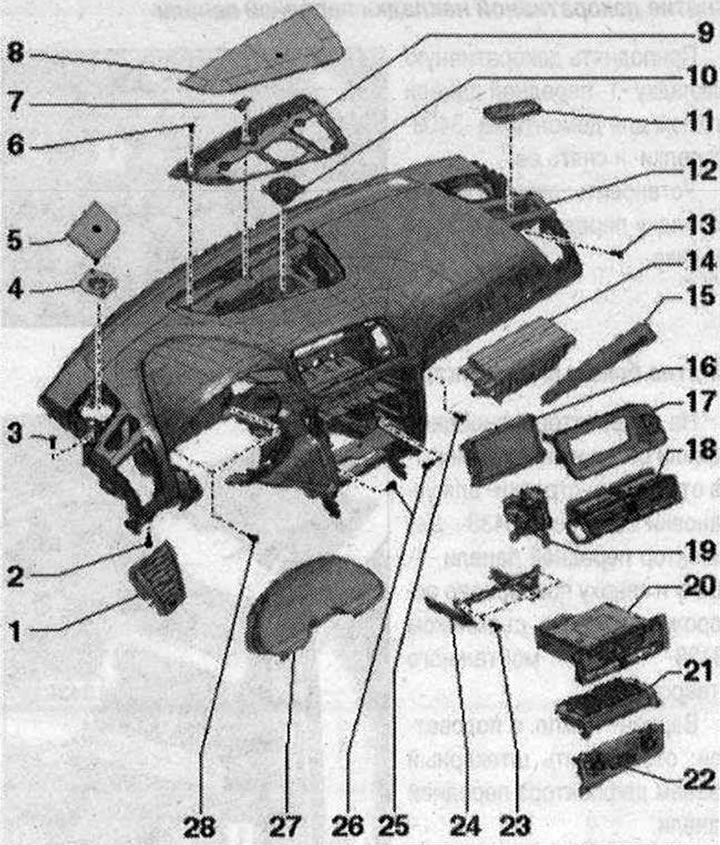
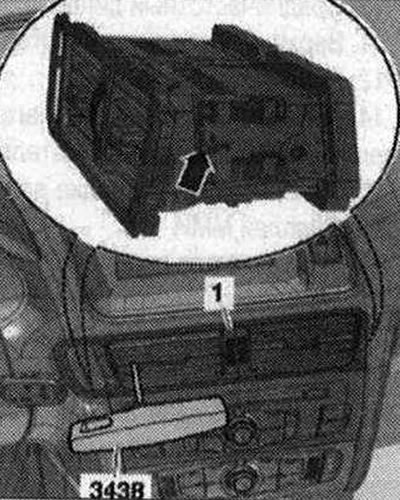
Removal the side cover of the front panel
Lift the cover "1" on the side of the front panel with wedge "3409" "arrow" and remove it.
Install the front panel side trim until it clicks into place.
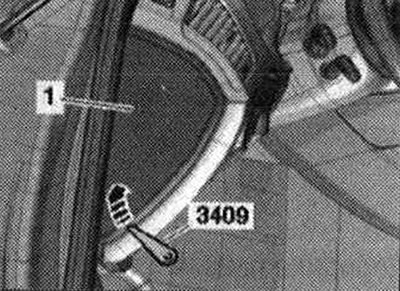
Removal the decorative trim of the front panel
Lift the decorative trim "1" of the front panel with a wedge for dismantling "3409" of the "arrow" and remove it.
Install the decorative front panel trim until it clicks into place.
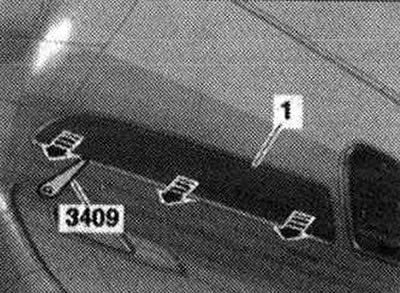
Removal the side deflectors on the front panel
On the front panel deflector, there are holes "arrows" on the side and top for installing the puller "3438". Carefully remove the front panel deflector "1" from the side and top one by one using the puller "3438" from the mounting hole.
Option kit with backlight: disconnect the front panel deflector plug.
Installation
Install in reverse order, checking the mounting brackets for deformation and damage, replacing them if necessary. When installing the front panel deflector, make sure that it fits correctly into the air duct. Press the deflector into the front panel mounting hole until it stops.
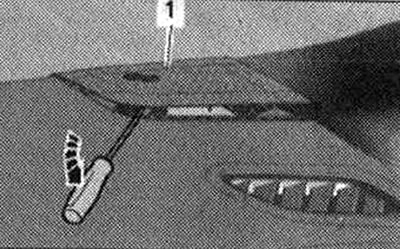
Removal the front panel deflector in the middle
The front panel deflector has a hole "arrow" on both sides for installing the puller "3438". Carefully remove the front panel deflectors "1" on both sides one by one from the mounting hole with the puller "3438".
Option kit with backlight: disconnect the front panel deflector plug.
Installation
Install in reverse order, checking the mounting brackets for deformation and damage, replacing them if necessary. When installing the front panel deflector, make sure that it fits correctly into the air duct. Press the deflector into the front panel mounting hole until it stops.
Removal the MMI display cover
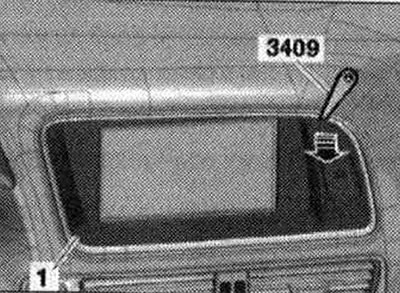
Lift the trim "1" of the MMI display with wedge "3409" by the corners "arrow" and remove it. Disconnect the plug connector of the Airbag indicator lamp on the front passenger side off "K145-/kla" hazard warning light switch "E229" and remove the trim.
Installation
Installation in reverse order, taking into account the need to check the mounting brackets for deformation and damage, and replace them if necessary. Install the MMI display cover until it clicks into place.
Removal the speaker side cover
Remove and install the speaker cover very carefully, as it is quite fragile. The order of removal and installation is the same on the right and left. The picture shows the left speaker cover. Carefully lift the speaker cover "1" along the entire perimeter "arrow" with a small screwdriver.
Fold the speaker trim upward and remove.
Installation
First, place the speaker cover on the front panel from the front and press until it clicks into place.
Removal the speaker cover in the middle
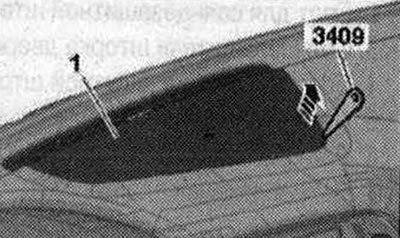
Remove and install the speaker cover very carefully, as it is quite fragile. Carefully unfasten the speaker cover "1" with the wedge "3409" from the rear relative to the direction of movement of the trunnions "arrow".
Lift the speaker cover slightly upwards at the back, detach it from the defroster deflector at the front and remove it to the back.
Installation
First, place the speaker cover on the front panel from the front and press until it clicks into place.
Removal the upper middle defroster deflector
Remove the speaker cover in the middle. Unscrew the screws "2...7" and remove the upper middle defroster deflector "1" back from the front panel. Disconnect the electrical connector of the solar radiation intensity photo sensor "G107".
Installation
Installation is in reverse order, while fixing the locking tabs at the front on the defrost deflector in the front panel.
Removal the mounting frame of the radio/navigation system
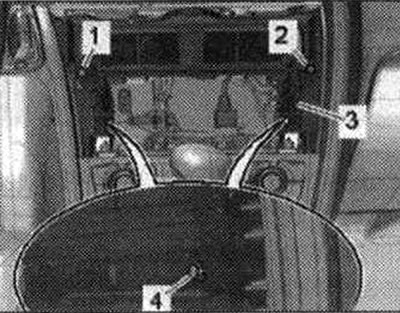
Remove the front panel deflector in the middle. Remove the radio/navigation system. Unscrew the front bolts "1" and "2" securing the mounting frame. Unscrew the bolt "4" on the side. Pull the mounting frame "3" backwards and remove.
Installation in reverse order.
Removal the cover of the access control system switch and the right to start the engine "E415"
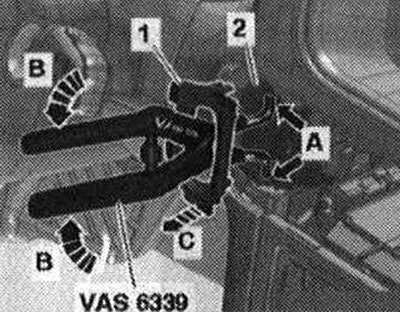
Remove the front panel deflector in the middle. Pass the ignition switch dismantling pliers "VAS 6339" through the lining valves. Install the ends of the ignition switch dismantling pliers "VAS 6339" in both holes arrow A- switch "2" of the access control and engine start right "E415". Squeeze them "VAS 6339" "arrows B", which will cause the ends of the pliers to spread apart and the locking tabs of the pad to be released. Squeeze "VAS 6339" with 1 hand and remove the pad "1" with the other "arrow C".
Use the ignition lock removal pliers "VAS 6339" only for unlocking; remove the trim by hand.
Installation
Place the cover plate on top and bottom of the switch and press until it locks into place. Install the front panel deflector in the middle.