



Table of contents: Door handle bracket ↓ Removal the decorative trim ↓ Installation ↓ Removal the tweeter cover ↓ Installation ↓
The picture shows the driver's door trim.
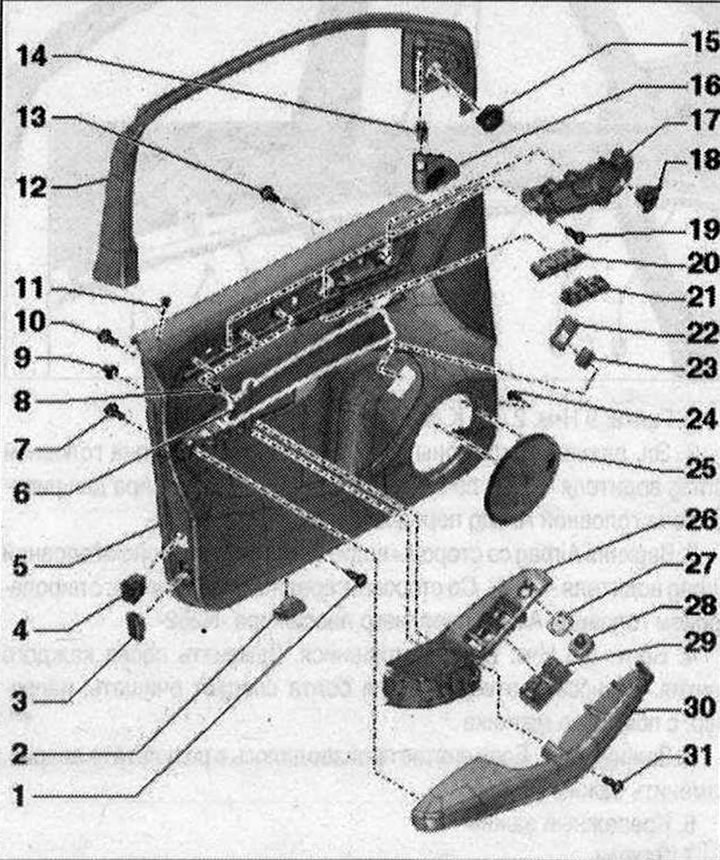 1. Bolt 2.5 Nm. For door trim; 2. Threshold illumination; 3. Active and passive reflector; 4. Interior security system deactivation switch "E183-/You" anti-theft alarm switch "E217". The hole for the bushing "pos. 11" must be additionally processed when replacing the door trim according to the sample of the removed door trim; 5. Door trim; 6. Decorative overlay; 7. Armrest bolt. 8 pcs. 1.2 N·m; 8. Clip for decorative trim. 3 pcs. Press into door trim; 9. Door trim mounting clip with sealing gasket. 8 pcs. For trouble-free operation of the collision sensor (pressure sensor) the door must be sealed. The door trim fastening clips serve to seal the system. Replace the door trim fastening clips if necessary; 10. Closing handle bolt. 6 pcs. 1.2 N·m; 11. Bushing only in the driver's door of the control lamp for the SAFE mode of the central lock "K133". The hole for the bushing must be additionally processed before replacing the door trim according to the sample of the removed door trim; 12. Glass frame; 13. Facing of glass frames; 14. Bolt for the opening of the inner door handle. 4 pcs. 1.2 N·m; 15. Lane change assist button "E530"; 16. High frequency speaker; 17. Tweeter speaker cover; 18. Internal door opening handle mechanism; 19. Interior lock button. Driver's side: Interior door lock switch on the driver's side "E308". Front passenger's side: Interior door lock switch on the front passenger's side "E309"; 20. Door trim bolt. 2 pcs. 2.5 N·m; 21. Decorative trim with switch for driver's seat control panel with memory function "E97"; 22. Driver's seat control panel with memory function "E97"; 23. Trim only in the driver's door for the remote release switch for the trunk lid "E188"; 24. Remote trunk lid release switch "E188"; 25. Bolt. 1 Nm; 26. Speaker cover for midrange speaker; 27. Door handle with key socket; 28. Symbol panel; 29. Exterior mirror position control button "E43" in driver's door only. Equipment option: mirror adjustment switch with folding function "E168"; 30. Window lift switch. Driver side: window lift control panel in the driver's door "E512". Front passenger side: window lift switch in the front passenger door "E107"; 31. Armrest; 32. Door trim bolt. 2.5 Nm
Door handle bracket
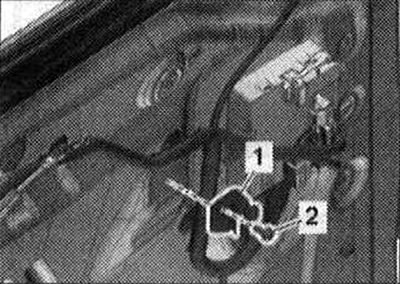 1. Door handle bracket; 2. Bolt 2.5 Nm
Removal the decorative trim
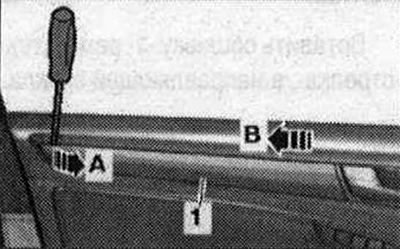
Wrap the end of a small screwdriver with electrical tape to protect the trim and trim. Starting from the back, use the screwdriver to pry up the trim "1" and remove "arrow A" from the door trim.
Remove the decorative cover in the rear direction "in the direction of arrow B" from the inner door drive by slightly lifting the decorative cover with a screwdriver at the front so that the inner hook of the decorative cover can come out of the opening in the door trim.
Installation
First install the decorative trim on the inner door drive, and then press it against the door trim until it clicks into place.
Removal the tweeter cover
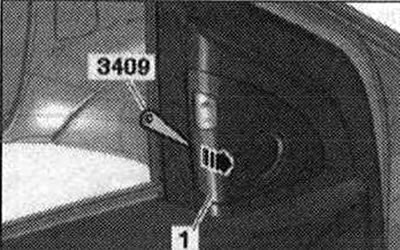
Carefully press the cover "1" of the high-frequency speaker with a wedge "3409" or a narrow screwdriver from the glass frame trim "arrow" and remove.
Installation
Install the tweeter cover until it clicks into place.