
Table of contents: Removal the interior rearview mirror ↓ All ↓ Installation ↓ Turning the compass display on and… ↓ Adjusting the magnetic deviation zone ↓ Adjusting the magnetic deviation zone ↓ Calibrating a digital compass ↓ Adjustment of interior mirror with… ↓ Checking the operation of the… ↓
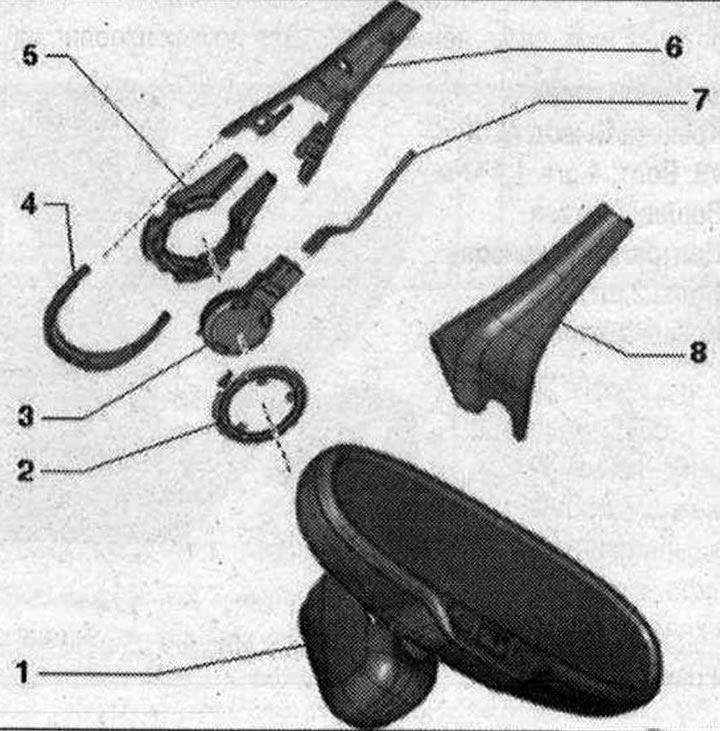
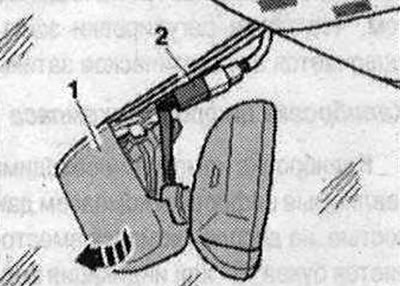
Interior rear view mirror 1. Rear view mirror; 2. Retaining spring; 3. Rain and light sensor "G397"; 4. Upper overlay; 5. The mounting plate is glued to the windshield; 6. Upper overlay; 7. Electric wire; 8. Bottom overlay
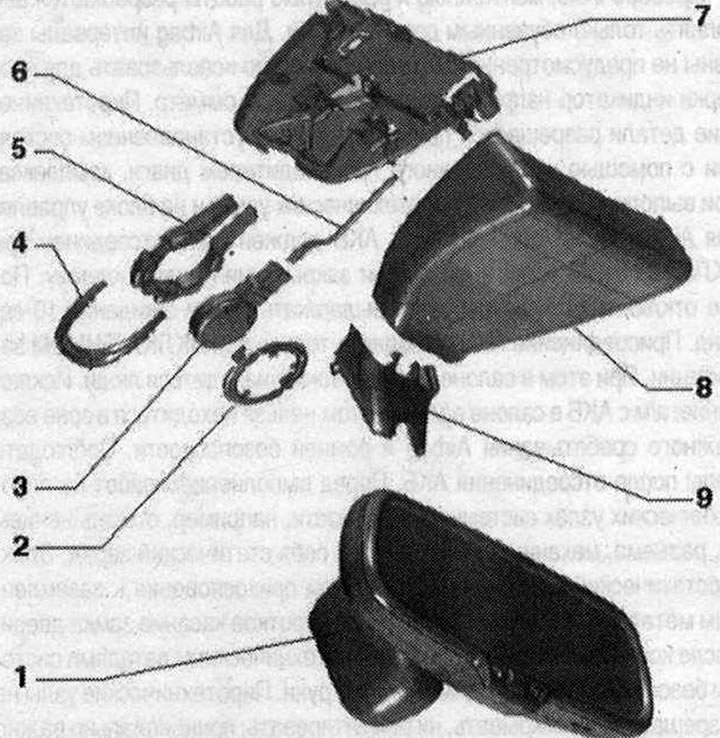
Installation diagram of the interior rearview mirror with lane assist 1. Rear view mirror; 2. Retaining spring; 3. Rain and light sensor "G397"; 4. Upper overlay; 5. The mounting plate is glued to the windshield; 6. Electric wire; 7. Upper overlay; 8. Bottom overlay
Removal the interior rearview mirror
When removing and installing, observe the safety regulations and general instructions for handling the interior rearview mirror. The removal and installation procedure is described for an interior mirror with automatic, dimming "Y7". For other versions of the interior mirror, removal and installation are similar.
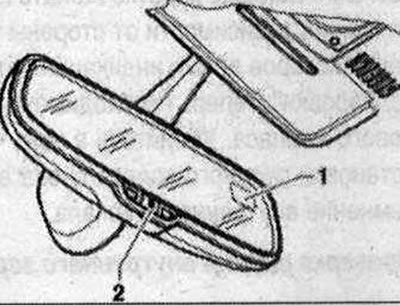
Option complete with lane assist: unlock the lower cover "1" "arrow". Using a screwdriver, pry the lower cover off and remove it.
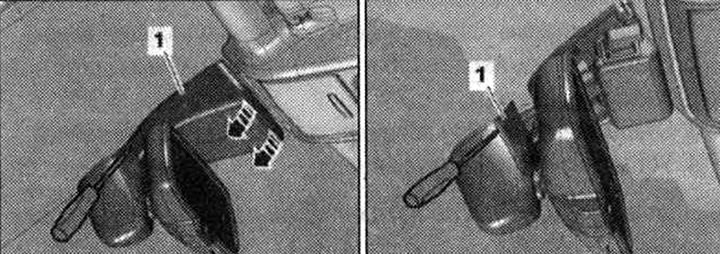
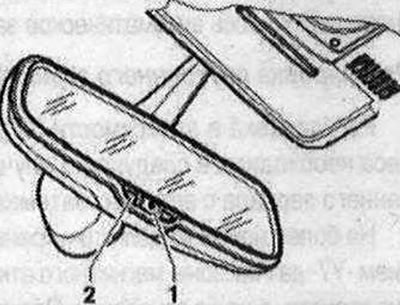
Using a screwdriver, unlock cover "1" on the mirror base and remove it.
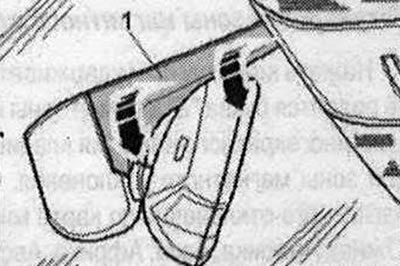
Option kit without lane assist: remove cover "1" from below near the "arrow" mirror base.
All
Option kit without lane assist: remove cover "1" from below near the "arrow" mirror base.
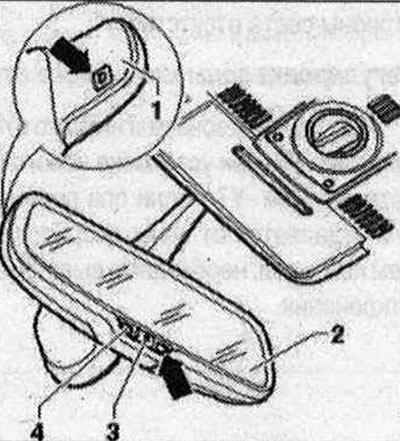
Remove the electrical plug from the bracket. Disconnect the electrical connector "2". Turn the interior mirror by the leg "1" in the counterclockwise direction "arrow" until it stops.
Remove the interior mirror from the mounting plate.
Installation
Installation in reverse order: attach the interior mirror at a 30° angle relative to its mounting position. Then turn the mirror clockwise until it stops.
Automatic switching on and off, dimming
Automatic dimming is switched on and off by pressing briefly (less than 3 seconds) keys "1". Auto-dimming "On": indicator "2" is lit. Auto-dimming "Off": indicator "2" is not lit.
Automatic dimming is activated each time the ignition is "turned on". If you turn off the automatic dimming of the interior mirror, the automatic dimming of the exterior mirror will also be turned off. In dimming mode, the mirror surface becomes lighter if the interior light or reverse gear is turned on. Please note that the automatic dimming of the interior mirror only works correctly if the rear window shade is raised.
Turning the compass display on and off
Press key "2" and hold it down for 3 to 6 seconds. The compass display switches from "on" to "off" and vice versa. Compass display "1" "On - cardinal direction indication is on". Compass display "1" "Off - no cardinal direction indication".
Adjusting the magnetic deviation zone
Adjustment of the magnetic deviation zone is necessary in the following cases: when installing a new interior mirror with automatic, dimming "Y7". If, when moving a long distance, the car moves away from the reference magnetic deviation zone by more than 2 zones, it is necessary to adjust the magnetic deviation zone.
Adjusting the magnetic deviation zone
Press the "2" key and hold it down for 6 to 9 seconds until the letter "Z" and the magnetic deviation zone number appear. Select the desired magnetic deviation zone number by pressing the "2" key multiple times. Determine the desired magnetic deviation zone on the world map: Europe, North America, South America, Asia, Africa, Australia. After a few seconds, the indication of the desired magnetic deviation zone number on the compass display switches to the cardinal direction indication. Make sure that after adjusting the magnetic deviation zone, the automatic dimming of the interior mirror is turned on again.
Calibrating a digital compass
Calibration of the compass is necessary in the following cases: the course data provided by the digital compass is not accurate, the letter "C" appears on the compass display instead of the cardinal direction indication, or there is no indication at all, when installing a new interior mirror with automatic dimming "Y7".
Compass calibration may be required in exceptional cases, for example in the following cases: when reconnecting the battery after disconnecting it for a long period, a new audio system is installed or its components are replaced.
Calibrating the digital compass: Turn on the ignition. The letter "C" should appear on the compass display "1". If the letter "C" is not displayed, press the "2" button and hold it down for 9 to 12 seconds until the letter "C" appears on the compass display "1". Drive at a speed of about 10 km/h for 2 or 3 laps until the cardinal direction appears on the compass display "1". Make sure that the automatic dimming of the interior mirror is turned on again after calibration is complete.
Adjustment of interior mirror with automatic, dimming "Y7"
Adjustment depending on the side of the steering wheel installation is necessary in the following cases: when installing a new interior mirror with automatic dimming "Y7".
On newer models of the interior mirror with automatic dimming "Y7" the magnetic deviation zone sensor is installed on the mirror housing, not on the base. Mirror adjustment depending on the magnetic deviation zone can or "must" be performed only for such mirrors. The new interior mirror with automatic dimming "Y7" is easily recognized by the appearance on the display when pressing the "2" key and holding it down for more than 12 seconds of the letter "L" or "A".
Press and hold the "2" button for 12 to 15 seconds until "L" for left-hand drive vehicles or "A" for right-hand drive vehicles appears. Briefly press the "2" button again to change the adjustment depending on the steering wheel installation side. After a while, the automatic display will switch to "C" for calibration. Now you also need to calibrate the digital compass. Make sure that after adjusting the steering wheel installation side, the automatic dimming of the interior mirror is turned on again.
Checking the operation of the interior mirror with automatic dimming
The operation check can only be performed if the following conditions are met: The interior mirror is installed. The ignition is on. Reverse gear is not engaged. Automatic dimming and the corresponding indicator are off. The doors and glove box are closed.
The interior lighting is off. Cover or tape the "arrow" photo sensor on the side of the housing. Direct a beam of light, for example from a flashlight, at the "arrow" photo sensor on the side of mirror "2".
After a short time, the interior mirror should darken.