Repair Chevrolet Repair Toyota Repair Honda Repair AvtoVAZ Repair Mercedes-Benz Repair BMW Repair Opel
Home  |  Contacts  |  Sitemap  |    
English Русский
Български
Беларускі
Український
Српски
Hrvatski
Română
Polski
Slovenský
Magyar
AudiManual.ru


  • AUDI 80
  • AUDI 100
  • AUDI A3
  • AUDI A4
  • AUDI A6
  • AUDI A8
  • AUDI Q
  • OTHER
  • ARTICLES
Q7 Typ 4L (2005-2015, diesel) Q5 Type 8R (2008-2017)

Front center armrest (Audi Q5-8R)

  • Home
  • Audi Q
  • Q5 Type 8R (2008-2017)
  • Body
  • Interior
  • Front center armrest
            0
Table of contents: Removal the front armrest ↓ Removal the front center armrest… ↓ Installation ↓ Removal the hinge arm trim ↓ Installation ↓
Front armrest 1. Bracket. 2 pcs.; 2. The overlay is clipped using «pos. 5»; 3. Lower trim for the…

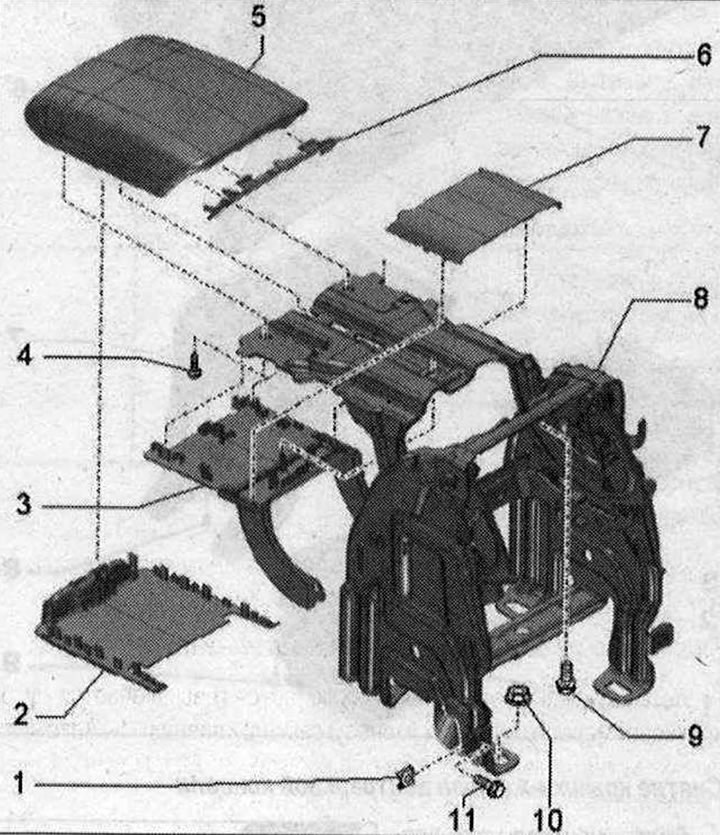
Front armrest 1. Bracket. 2 pcs.; 2. The overlay is clipped using "pos. 5"; 3. Lower trim for the hinge arm. Fixed with "Pos. 7" and "Pos. 8"; 4. Bolt. 2 pcs. 2.2 Nm; 5. Central armrest cushion; 6. Overlay; 7. The upper cover for the hinge arm is clipped using "pos. 3"; 8. Support; 9/11. Bolt. 2 pcs. 3 Nm; 10. Nut. 4 pcs. 20 Nm


Removal the front armrest


Removal the front armrest


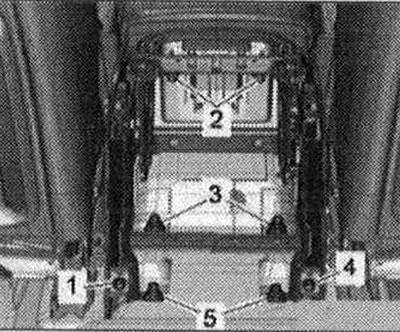
Remove the rear trim of the center console. Kit version with a deflector: remove the air duct of the rear deflector. Kit version with an AUX output: release the AUX output connector from the holder and disconnect. Kit version with a telephone/mobile phone: release the electrical connectors from the fasteners. Unscrew bolts "1,2,4". Unscrew nuts "3" and "5".


Unfasten the upper center console from the armrest support by pressing the center console. Remove the armrest support upwards, pass it over the threaded bolt and remove it towards the rear.

Installation in reverse order.

Removal the front center armrest cushion


Carefully remove the trim "1" with wedge "3409" from the cushion "arrow".

Carefully remove the trim «1» with wedge «3409» from the cushion «arrow».


Unscrew bolts "1" and lift cushion "2" above the pivot arm "arrow".

Installation


Installation in reverse order: install the cushion on the hinge arm and tighten the bolts. Install the trim until it clicks.

Removal the hinge arm trim


Remove the front armrest cushion. Carefully remove the upper trim "1" with a small screwdriver from the hinge arm and the lower trim "arrow".

Remove the front armrest cushion. Carefully remove the upper trim «1» with a small screwdriver from…


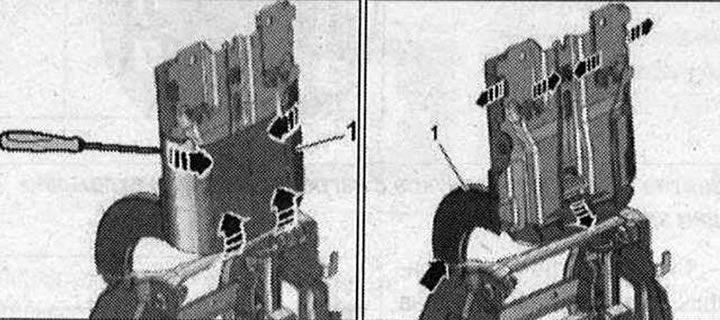
Remove the rear trim of the center console. Fold back the front armrest. For better representation, shown with the armrest removed. Remove the lower trim "1" with a screwdriver from the pivot arm of the center console "arrows".


Installation


Installation is in reverse order, while installing the trim until it clicks into place.

The original text is available on the website AudiManual.ru
The article was checked by auto expert Timur Bazhenov
This article is available at russian, bulgarian, belarusian, ukrainian, serbian, croatian, romanian, polish, slovak, hungarian

Share information:
Previous articles
Audi Q Q5 Type 8R: Interior
Next articles

Storage compartment in the center console
Beverage compartment in the center console
Center console — removal and installation
Removal the rear deflector
Rear view mirror
Removal the switch with a lock to turn off the front passenger…
Rear Side Airbag Installation Diagram
Seat Position Sensor Parts and Assemblies


Similar articles on other Audi car models:
Front seats Audi 80 B3 (1986-1991, petrol)
Front Brake Disc Pads — Checking and Replacing Audi 100 C3 (1982-1990, diesel)
Replacing the front brake pads Audi A3 Type 8L (1996-2003)
Front center armrest — removal and installation Audi A4 B8 (2007-2015)
Front center console Audi A6 C5 (1997-2004)
Checking the front suspension and steering Audi A8 D2 (1994-2002)
Removal and installation the front panel center holder Audi A2 (1999-2005)
Link to this page in different formats


Visitor comments

No comments yet


How much will 20 + 36 =


Q7 4L(2005-2015, diesel) 
  • General information
  • Operating instructions
  • Maintenance
  • Power unit
  • Diesels 3.0 l (BUG, BUN, CAS)
  • Diesels 3.0 l (CATA, CCMA)
  • Diesels 3.0 l (CJGA/CJGC)
  • Diesels 4.2 l (BTR, CCFA/CCFC)
  • Cooling system
  • Fuel and exhaust system
  • Engine management system
  • Starting and charging
  • Transmission
  • Automatic gearbox
  • Drive shafts
  • Chassis
  • Brake system
  • Front suspension
  • Rear suspension
  • Steering system
  • Body
  • Air conditioner
  • Exterior
  • Interior
  • Electrical equipment
  • Equipment and devices
  • Electrical circuits
 
Q5 8R(2008-2017) 
  • General information
  • User manual
  • Power unit
  • Petrol engine 2.0 l
  • Petrol engine 3.2 l
  • Fuel system (petrol)
  • Diesel 2.0 liter (CA)
  • Diesel 2.0 liter (CG/CJ/CM)
  • Diesel engine 3.0 l
  • Fuel system (diesel)
  • Transmission
  • Manual gearbox 0B1
  • Manual gearbox 0B2
  • Automatic gearbox 0B5
  • Automatic gearbox 0B6
  • Chassis
  • Front suspension
  • Rear suspension
  • Brake system
  • Steering
  • Body
  • Exterior
  • Interior
  • Doors, locks and windows
  • Safety system
  • Ventilation and heating
  • Electrical equipment
  • Power devices
  • Equipment and devices
  • Lighting and alarm
  • Audio system
  • Electrical circuits
 
AudiManual.ru © 2017-2026 · Mobile version · Feedback · Sitemap: EN BG BY UA RS HR RO PL SK HU · Site search · News and articles
80 B2 · 80 B3 petrol · 80 B3 · 80 B4 · 100 C3 diesel · 100 C3 petrol · 100 C3 · 100 C4 petrol · 100 C4 · A3 Type 8L · A4 B5 petrol · A4 B5 · A4 B6 petrol · A4 B6 · A4 B7 · A4 B8 · A6 C4 · A6 C5 · A6 C5 Allroad · A8 D2 · Q5 Type 8R · Q7 Typ 4L · Audi A2 ·
This site uses cookies 🍪. Click the button to accept this fact.