
Table of contents: Electric motor for remote opening of… ↓ Upper and lower end position on the… ↓ Electric motor for remote opening of… ↓
Electric motor for remote opening of the trunk lid "V139"
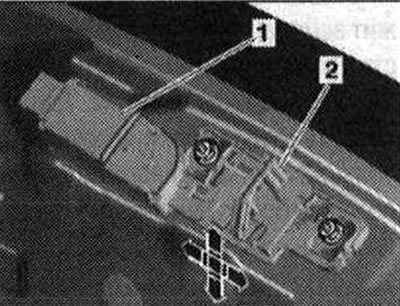
Loosen the combination nuts, the lock bracket "2" with the closer motor "1" should still be able to move. To facilitate adjustment, there are marks on the back wall, along which the lock bracket is installed.
Upper and lower end position on the trunk lid release motor "V139"

To adjust the lid, the closer motor must be in the "lid closed" position (lower extreme position). Setting the lock bracket in the upper extreme position "1" is not allowed, as this may damage the lid at the end of the closing process. When adjusting the lid, the closer motor must be disconnected from the power supply. Before adjusting the lid, completely screw in the upper part of the adjustable buffer on the lid. Tighten the nuts "A" tightly. Close the trunk lid and check the basic position. The lid lock must be latched in the main stop (2nd fixed position). Open the cover in this position and tighten nuts "1".
Electric motor for remote opening of the trunk lid "V139"
If the old lock bracket is installed, mark its position before removing it. The lock bracket with the closer may only be installed in the "lid closed" position, this position corresponds to the delivery condition of the new part. If the old lock bracket is installed, open the lid and lock the lid lock or the rotary lever, for example, with a screwdriver. The closer will assume the "lid closed" position = original position. Then remove the electrical connector from the closer, while the lid lock can be opened using the handle in the lid.
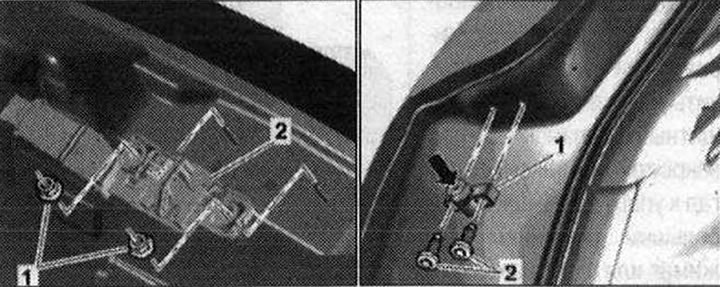
Lightly tighten nuts "1". Close the trunk lid and bring it to a level position. The lid lock should be latched in the main stopper (2nd fixed position). In this position, open the trunk lid and tighten nuts "1".
When installing bolts "2" on the stop from the body side "1", tighten them with torque. Unscrew the adjusting buffer "arrow" so much that when the cover is closed, it touches the buffers on the cover. Check the ease of closing the cover, if necessary, repeat the adjustment of the adjustable buffer. If the cover closes with difficulty, screw in the adjustable buffer a little.