



Table of contents: When removing and installing the… ↓ General remarks ↓
Rack and pinion steering mechanism with rods
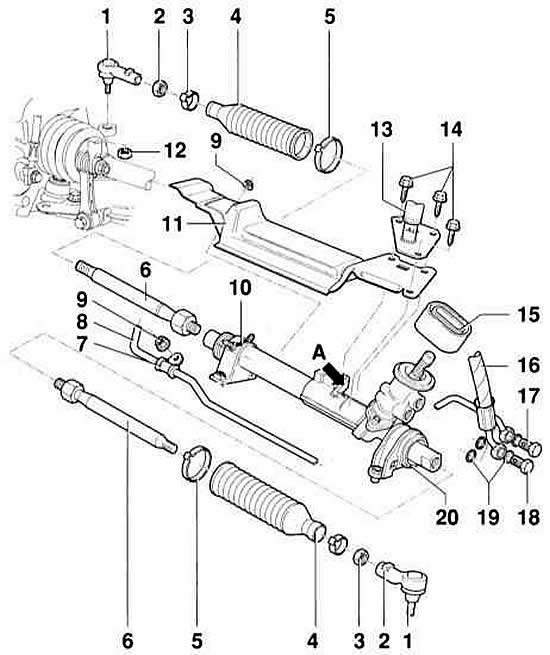
- 1 - steering rod end
- 2 - nut, 50 Nm
- 3 - clamp. Be sure to replace
- 4 - Protective cover. Do not remove after adjusting the toe. Can only be replaced after removing the steering gear (work of the service station).
- 5 - clamp. Be sure to replace it
- 6 - steering rod, 75 Nm. Can only be replaced after removing the steering gear (work of the service station).
- 7 - clamp with rubber
- 8 - return pipeline
- 9 - nut, 22 Nm
- 10 - clamp with rubber support. In the installation position, the arrow on the clamp points in the direction of travel. If there is damage in the thread of the welded nut, replace the clamp.
- 11 - heat shield
- 12 - nut, 45 Nm. Self-locking, be sure to replace.
- 13 - shift drive support. When installed with a heat shield -11, it should be centered on the branch pipe (arrow A).
- 14 - bolt, 24 Nm
- 15 - seal
- 16 - hydraulic pipeline
- 17 - hollow bolt, 45 Nm. M16 x1.5
- 18 - hollow bolt, 40 Nm. M14 x 1.5
- 19 - sealing ring. Be sure to replace it
- 20 - steering gear
Power steering pump with holder. Bottom mounted version
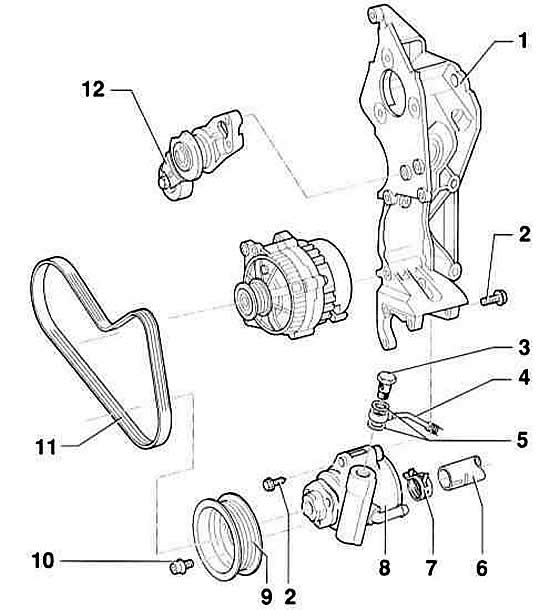
- 1 - holder
- 2 - bolt, 25 Nm
- 3 - hollow bolt, 30 Nm
- 4 - pressure pipeline
- 5 - sealing ring
- 6 - suction hose
- 7 - clamp
- 8 - Power steering pump. Before removing, fill with oil. To do this, pour oil into the suction pipe of the pump and turn the hub by hand so that the oil comes out from the discharge side of the pump.
- 9 - pulley
- 10 - Allen screw, 25 Nm
- 11 - V-belt
- 12 - V-belt tensioner
Power steering pump with holder. Top mounted version
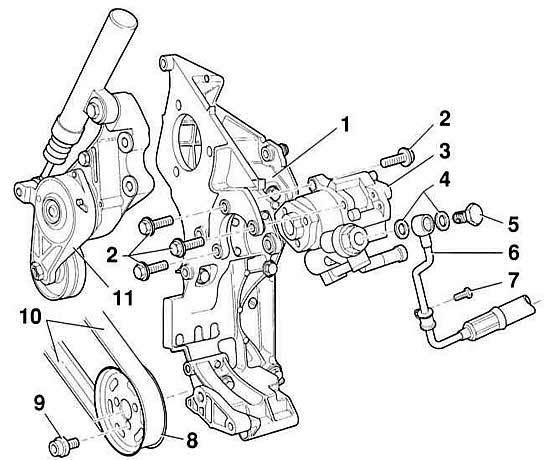
- 1 - holder
- 2 - bolt, 25 Nm
- 3 - Power steering pump. Before removing, fill with oil. To do this, pour oil into the suction pipe of the pump and turn the hub by hand so that the oil comes out from the discharge side of the pump.
- 4 - sealing ring. Be sure to replace.
- 5 - hollow bolt, 30 Nm
- 6 - pressure pipeline
- 7 - bolt, 22 Nm
- 8 - pulley
- 9 - Allen screw, 25 Nm
- 10 - V-belt
- 11 - V-belt tensioner
The driver's control movements are transmitted from the steering wheel through the steering column and steering mechanism to the wheels. The steering column is trauma-safe, with height adjustment within 44 mm and reach (length) within 50 mm.
The force that must be applied to the steering wheel when turning it, especially when the car is stationary, is reduced by means of a hydraulic power steering. The hydraulic power steering consists of an oil pump, a reservoir and oil lines. The pump is driven by the engine via a V-belt. The pump sucks oil from the reservoir and delivers it under pressure to the control valve body. The valve body is located in the steering gear. It is mechanically connected to the steering gear and delivers oil depending on the angle of rotation of the steering wheel to the corresponding cavity of the hydraulic cylinder. Here the oil acts on the piston with the toothed rack and thus supports the movement of the steering wheel.
The steering wheel contains an airbag. It is a folded air bag that inflates in the event of a frontal collision, thus protecting the driver's head and upper body from impact with the steering wheel. In the event of a frontal impact of sufficient force, a small charge in the airbag unit is ignited by the control unit and the gases produced thereby inflate the airbag within a few milliseconds. This time is sufficient to dampen the forward movement of the driver's body. Within a few seconds, the airbag is compressed again, as the gases escape from the airbag openings.
Warning: Welding and straightening work on steering components is not permitted. Replace self-locking nuts with new ones.
Warning: In addition to the driver's airbag, there is also a front passenger airbag and side airbags at the front and rear. If a child seat is installed in the rear-facing front passenger seat, the front passenger airbag must be deactivated. This work may only be carried out by an AUDI service center. In addition, there must be a corresponding warning sign on the door beam, sun visor or instrument panel on the right side of the vehicle "No child seat in front", otherwise the driver may be fined during a traffic police check.
When equipping your vehicle with a side airbag for the seat backs, use only special upholstery approved by AUDI.
When removing and installing the airbag unit
1. Disconnect the negative (–) battery cable with the ignition off. Caution: This will erase information from the electronic memory units, such as the radio code. Without the code, the radio can only be switched on by the manufacturer or an AUDI service station. Therefore, please read the materials in the subsection Entering the radio code.
2. Insulate the negative (–) terminal of the battery to prevent accidental contact.
3. Set the wheels straight.
Warning: If the above notes are not observed, further use may result in failure of the airbag system.
General remarks
- After connecting the airbag electrically, turn on the ignition with the ignition key in the "Drive" position before connecting the battery.
- When connecting the battery, no strangers are allowed in the vehicle.
- After removing the airbag, store it with the soft side facing up.
- If there is a break in work, the airbag must not be left unattended.
- The airbag unit should not be disassembled. If there is a fault, it will be replaced as a whole. Since the airbag contains explosive material, it must be stored securely. The airbag must be disposed of by an AUDI service station.
- Check the airbag only at a service station. Never use a test lamp, voltmeter or ohmmeter to check the airbag.
- Do not expose the pillow to liquids, particularly grease or any cleaners.
- If the pillow has been dropped on a hard surface, it can no longer be used
The original article is available on the online resource: AUDImanual.ru